 電子發燒友App


 創作
創作 發文章
發文章 發帖
發帖  提問
提問  發資料
發資料 發視頻
發視頻資料介紹
1.Beetle ESP32-C3簡介
Beetle ESP32-C3是一款基于ESP32-C3 RISC-V 32位單核處理器芯片的主控板,專為物聯網 (IoT) 設備而設計。
Beetle ESP32-C3在僅硬幣大小的體積上引出了多達13個IO口,制作項目時不必再擔心IO口不夠用的情況,同時主控板還集成鋰電池充電管理功能,可以直接連接鋰電池,不需要外圍模塊,同時保證應用體積和安全性。
Beetle ESP32-C3配套的擴展板在未增加太大體積的情況下,引出了更多的電源,在制作項目時焊接更加方便,板載的GDI顯示屏接口解決使用屏幕時的接線煩惱。
Beetle ESP32-C3支持Wi-Fi 和 Bluetooth 5 (LE) 雙模通訊,降低了設備配網難度,同時還支持藍牙 Mesh (Bluetooth Mesh) 協議和樂鑫 Wi-Fi Mesh可以實現更高的通訊穩定性和更大的覆蓋面積,適用于廣泛的物聯網應用場景。
Beetle ESP32-C3擁有詳細的示例教程,通過教程可以輕松的使用控制器的無線功能,連接阿里云、IFTTT等物聯網平臺,同時DFRobot商城提供了上千種傳感器和執行器,這些傳感器和執行器也有詳細的教程,因此你可以輕松搭建出自己的物聯網系統。
Beetle ESP32-C3可以使用Arduino IDE、ESP-IDF、MicroPython進行編程(MicroPython教程后續推出),C語言、python都可以輕松的操縱硬件。
2.產品特性
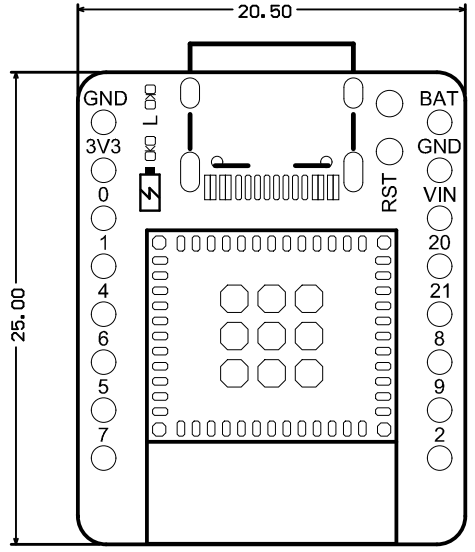
- 超小體積,尺寸僅25*20.5mm
- 板載鋰電池充電管理,充放電更安全
- 配套擴展板,制作項目、使用屏幕更加方便
- RISC-V 32位內核
- 支持Wi-Fi 和 Bluetooth 5 (LE) 雙模通訊
3.產品參數
基本參數
硬件信息
- 處理器:32 位 RISC-V 單核處理器
- 主頻:160 MHz
- SRAM:400KB
- ROM:384KB
- Flash:4MB
- RTC SRAM:8KB
- 時鐘:外置 (32 kHz) 晶振、內置快速 RC 振蕩器時鐘 17.5 MHz(可調節)、以及PLL時鐘
- USB: USB 2.0 可達 12Mbit/s
WIFI
- WIFI協議:IEEE 802.11b/g/n
- WIFI頻寬: 2.4 GHz 頻帶支持 20 MHz 和 40 MHz 頻寬
- WIFI模式:Station 模式、SoftAP 模式、SoftAP+Station 模式和混雜模式
- WIFI頻率:2.4GHz
- 幀聚合: TX/RX A-MPDU, TX/RX A-MSDU
藍牙
- 藍牙協議:Bluetooth 5、Bluetooth mesh
- 藍牙頻率:125 Kbps、500 Kbps、1 Mbps、2 Mbps
接口引腳
- 數字I/O x13
- LED PWM 控制器 6個通道
- SPI x1
- UART x2
- I2C x1
- I2S x1
- 紅外收發器:發送通道 x2、接收通道 x2,(任意管腳)
- 2 × 12 位 SAR 模/數轉換器, 6 個通道
- DMA 控制器,3 個接收通道和 3 個發送通道
4.功能引腳示意圖
功能指示
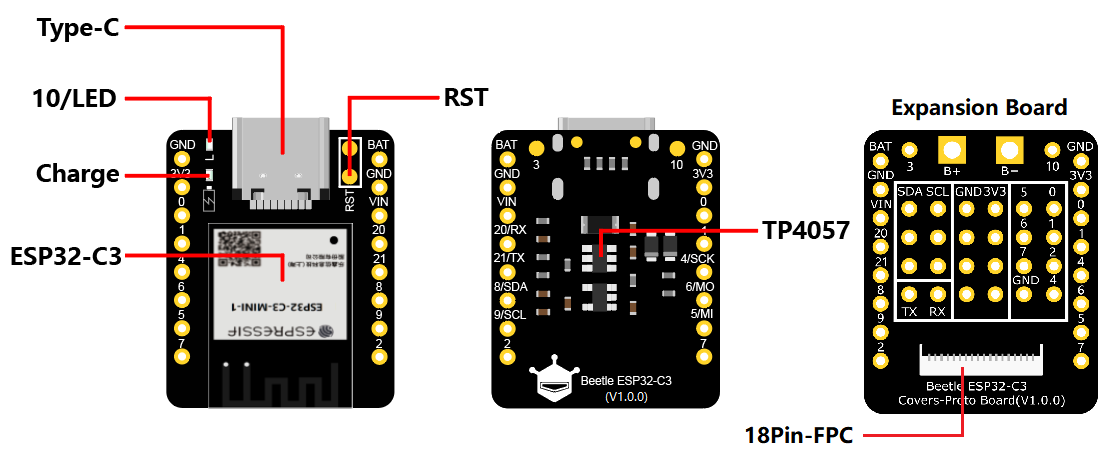
- Type-C:5V
- 10/LED:板載LED引腳
- ESP32-C3模組:樂鑫公司推出的最新ESP32-C3模組
- RST:復位引腳,短接觸點觸發復位
- TP4057:TP4057鋰電池充電管理芯片
- Charge:充電指示燈
- 熄滅:未接入電源或已充滿
- 常亮:充電中
- 閃爍:電池未接入
- 18Pin-FPC:GDI顯示屏接口
引腳示意
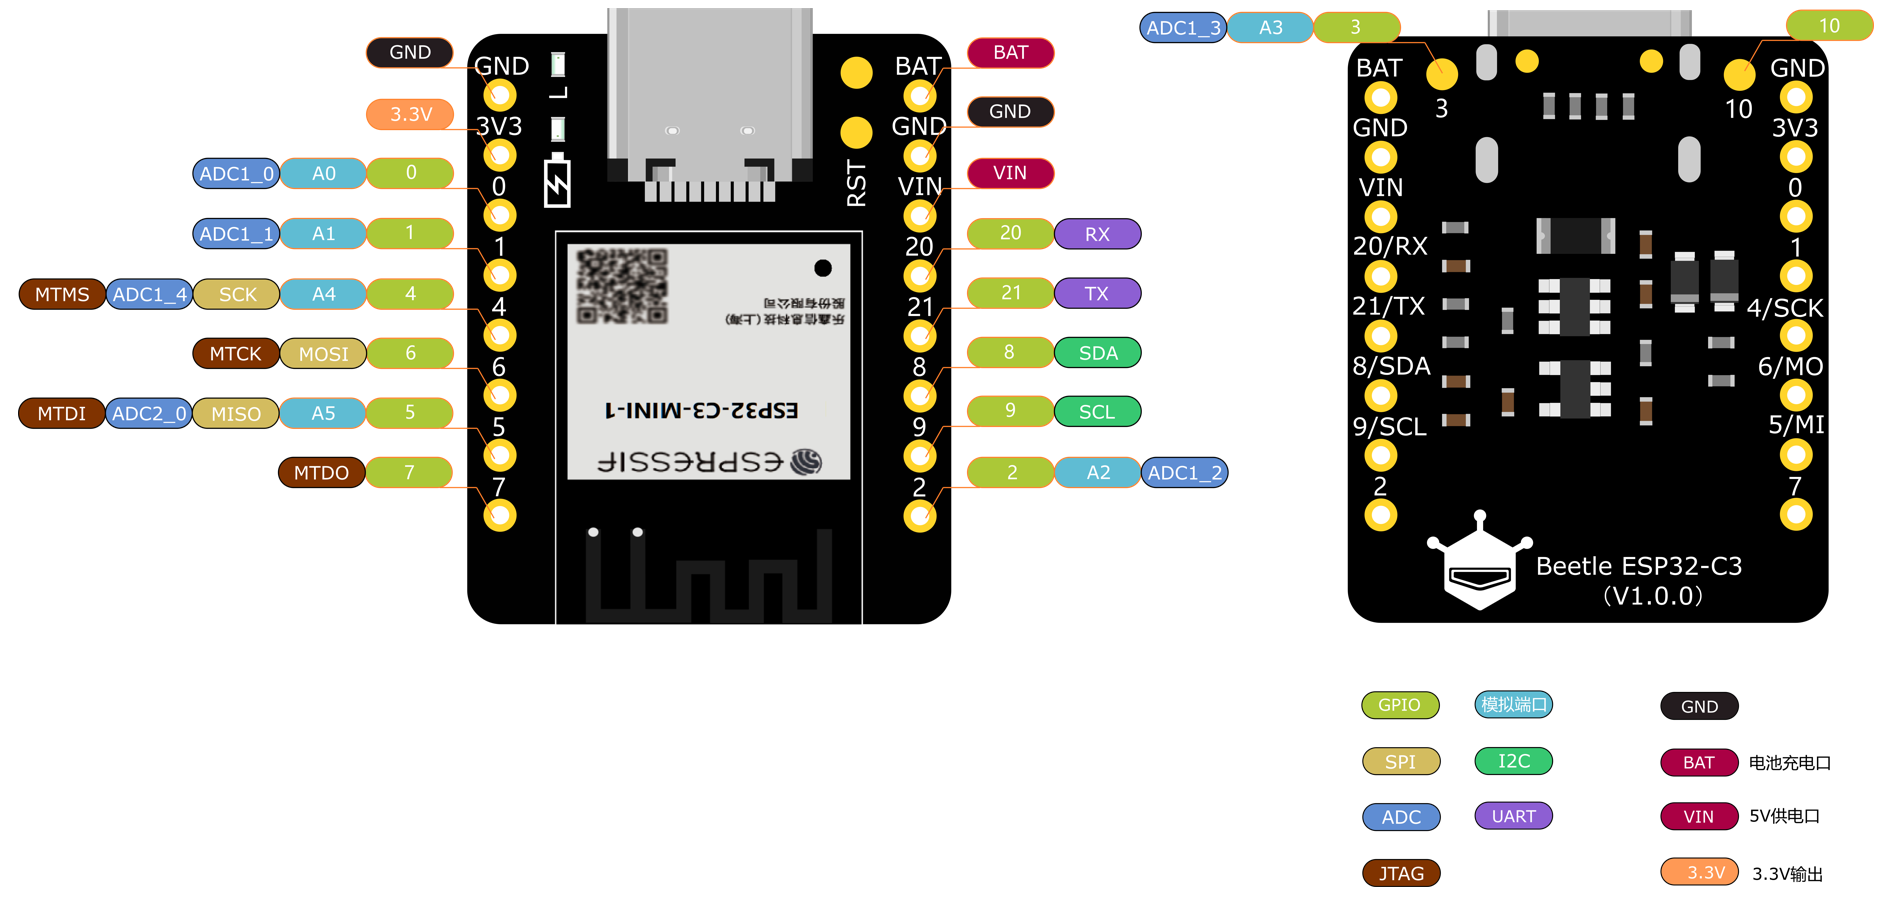
引腳概述
GDI顯示接口
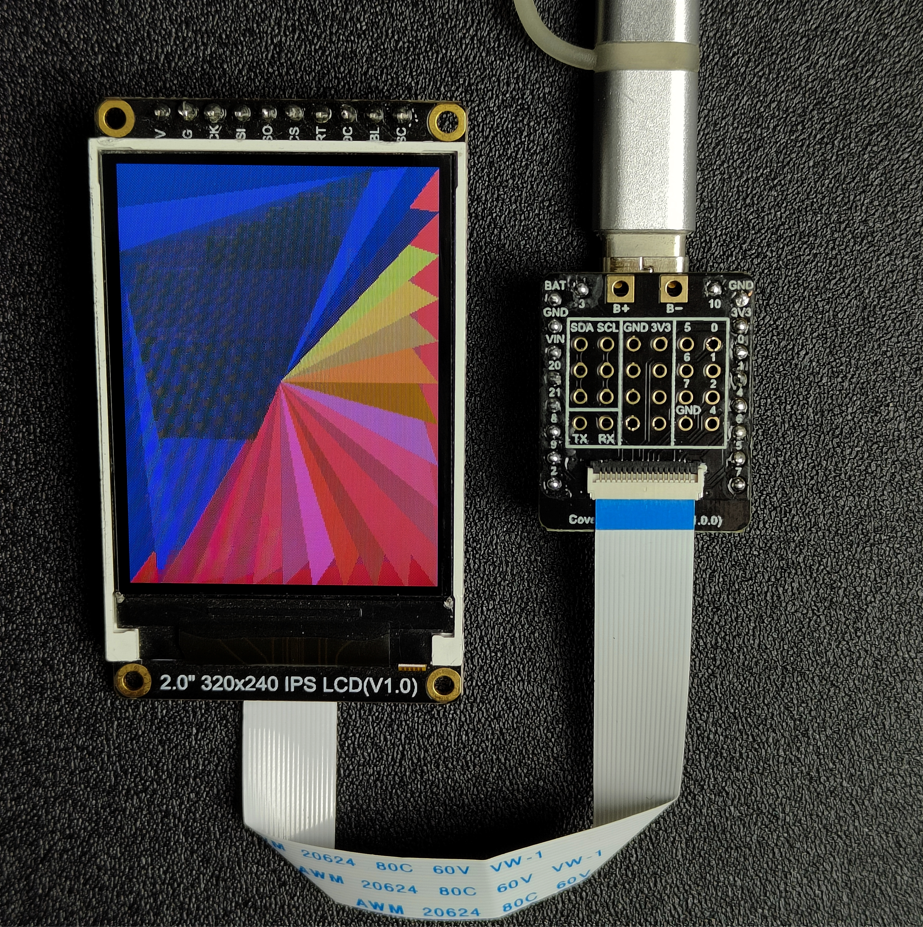
此接口為DFRbot專用GDI顯示屏接口,使用18pin-FPC線連接,單線材連接屏幕,為您提供最簡捷的屏幕使用方式。
以下是GDI接口使用的引腳列表
| FPC PINS | Beetle ESP32 C3 PINS | Description |
|---|---|---|
| VCC | 3V3 | 3.3V |
| BLK(PWM調光) | 10 | 背光 |
| GND | GND | GND |
| SCLK | 4/SCK | SPI時鐘 |
| MOSI | 6/MOSI | 主機輸出,從機輸入 |
| MISO | 5/MISO | 主機輸入,從機輸出 |
| DC | 1 | 數據/命令 |
| RES | 2 | 復位 |
| CS | 7 | TFT片選 |
| SDCS | 0 | SD卡片選 |
| FCS | NC | 字庫 |
| TCS | 3 | 觸摸 |
| SCL | 9/SCL | I2C時鐘 |
| SDA | 8/SDA | I2C數據 |
| INT | NC | INT |
| BUSY-TE | NC | 防撕裂引腳 |
| X1 | NC | 自定義引腳1 |
| X2 | NC | 自定義引腳2 |
使用FPC鏈接屏幕時根據GDL demo配置所需對應的引腳號即可,通常只需要根據不同主控配置三個引腳
支持GDI的顯示屏:
- 1.54" 240x240 IPS廣視角TFT顯示屏
- 2.0" 320x240 IPS廣視角TFT顯示屏
- 2.8" 320x240 IPS TFT電阻觸摸顯示屏
- 3.5" 480x320 IPS TFT電容觸摸顯示屏
- 1.51”OLED 透明屏幕
5. 首次使用
5.1 Arduino環境配置
當您首次使用Beetle-ESP32-C3,您需要了解以下步驟
- 添加IDE中的json鏈接
- 下載主控的核心
- 選擇開發板以及串口
- 打開示例程序并燒錄
- 了解串口監視器
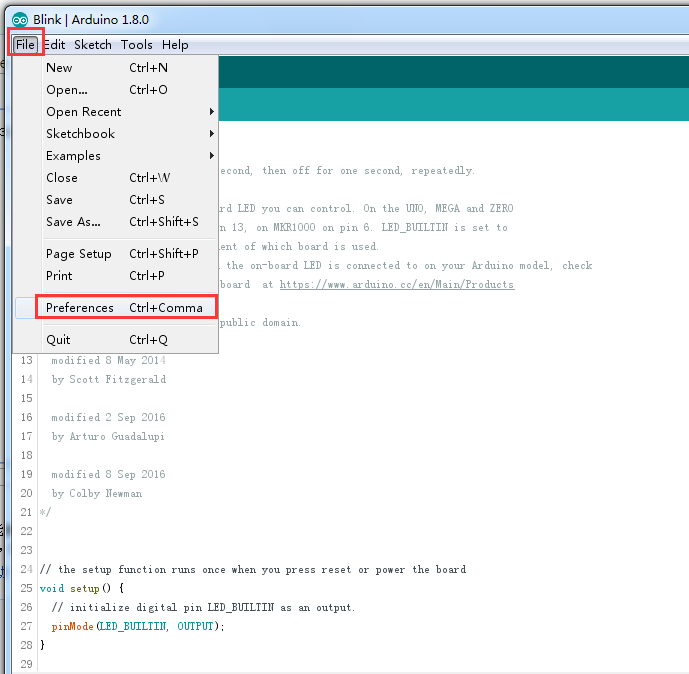
Arduino IDE 編譯環境配置
配置URL網址到Arduino IDE
打開Arduino IDE,點擊File->Preferences,如下圖所示:
- 在新打開的界面中,點擊如下圖紅色圓圈中的按鈕
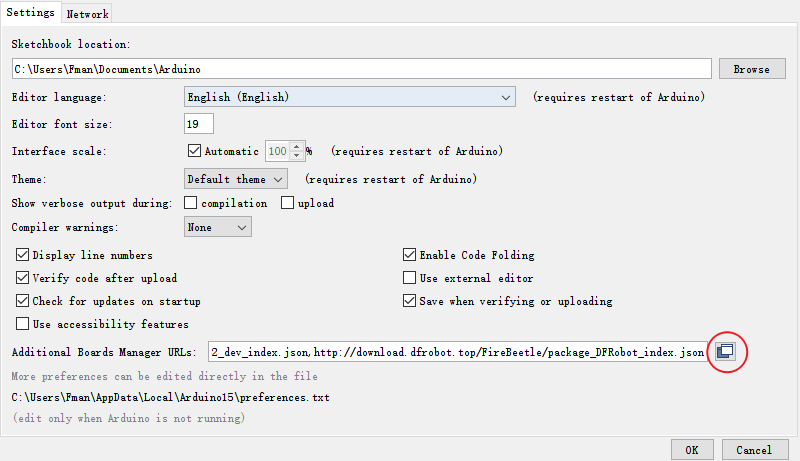
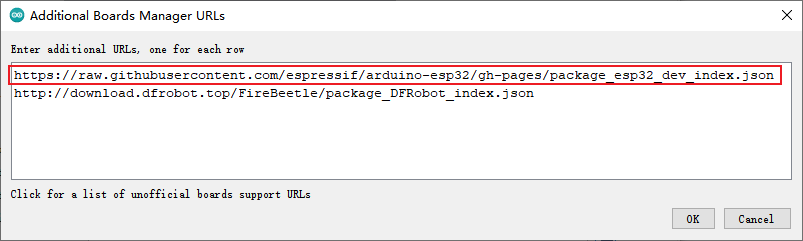
- 將如下鏈接地址復制到新彈出的對話框中:https://raw.githubusercontent.com/espressif/arduino-esp32/gh-pages/package_esp32_index.json
- 注意:如果您之前安裝過其它的環境,那么您可以在上一個鏈接地址開頭或末尾處直接回車并將上面鏈接粘貼在其上下任意一行
- 點擊OK
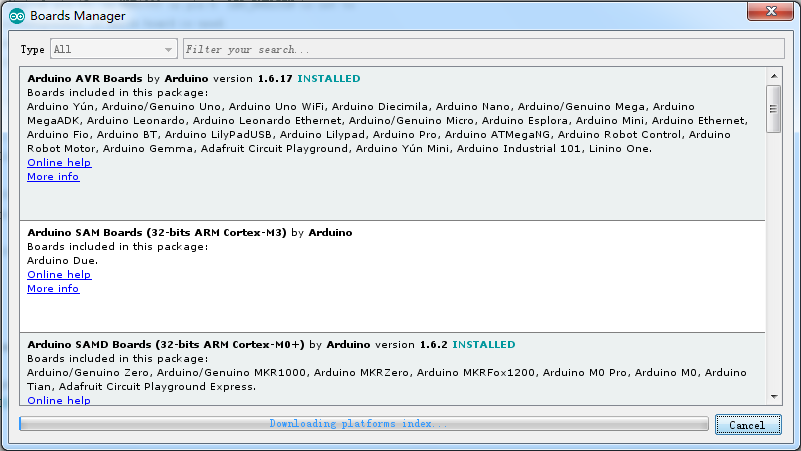
- 更新板卡
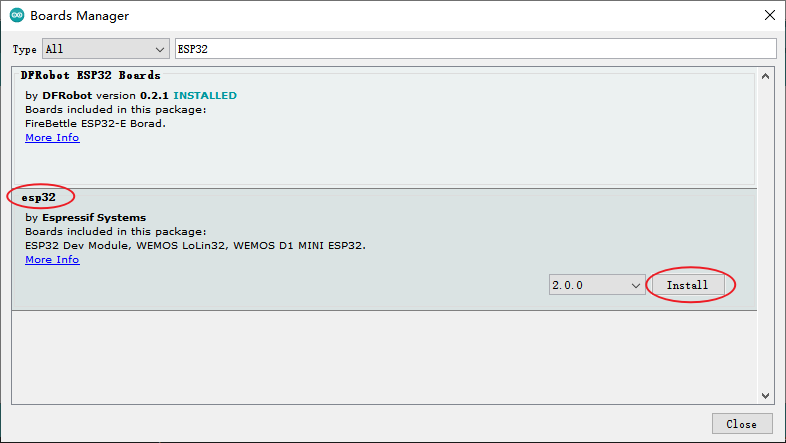
- 打開Tools->Board:->Boards Manager...,如下圖所示:

- Boards Manager會自動更新板卡,如下圖所示:
- 更新完成后,您可以在上方輸入esp32,出現如下情況時選擇esp32點擊安裝即可(當前安裝為2.0.0版本):
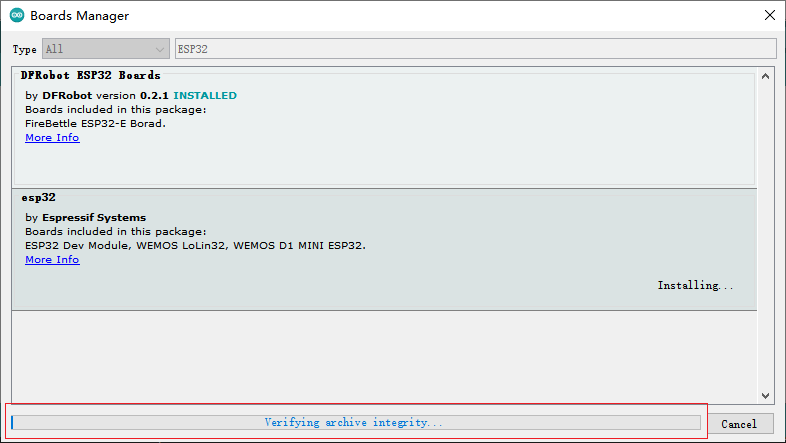
- 等待如下進度條結束:
- 安裝完成后,列表會顯示已經安裝esp32主板,如下圖所示:
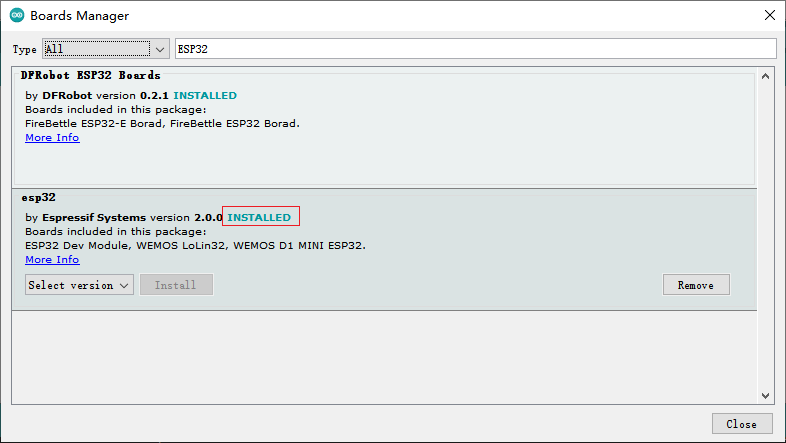
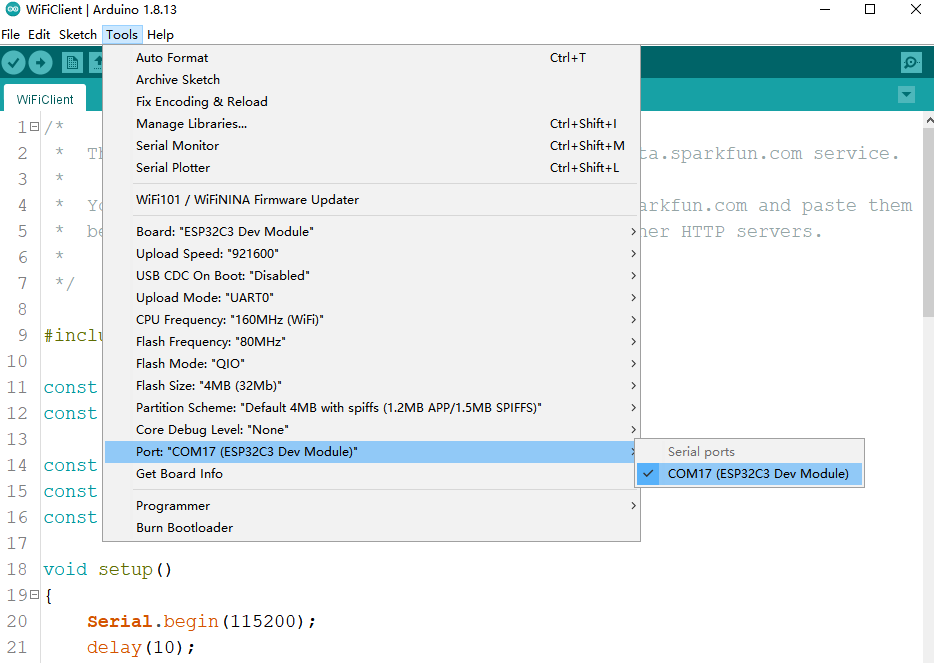
- 點擊Tools->Board:,選擇ESP32C3 Dev Module(通常在列表第一個)
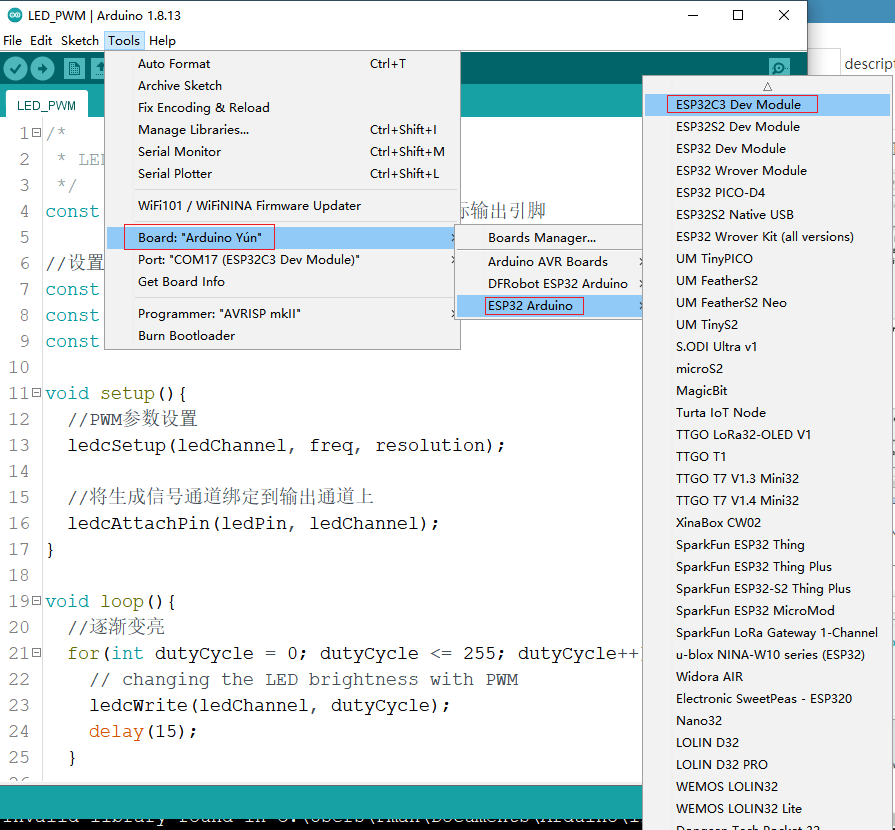
- 在開始前您還需要配置如下設置(當您選擇 Disabled 時,串口為RX(20)、TX(21),如果您需要通過USB在Arduino監視器上打印,您需要選擇Enable)
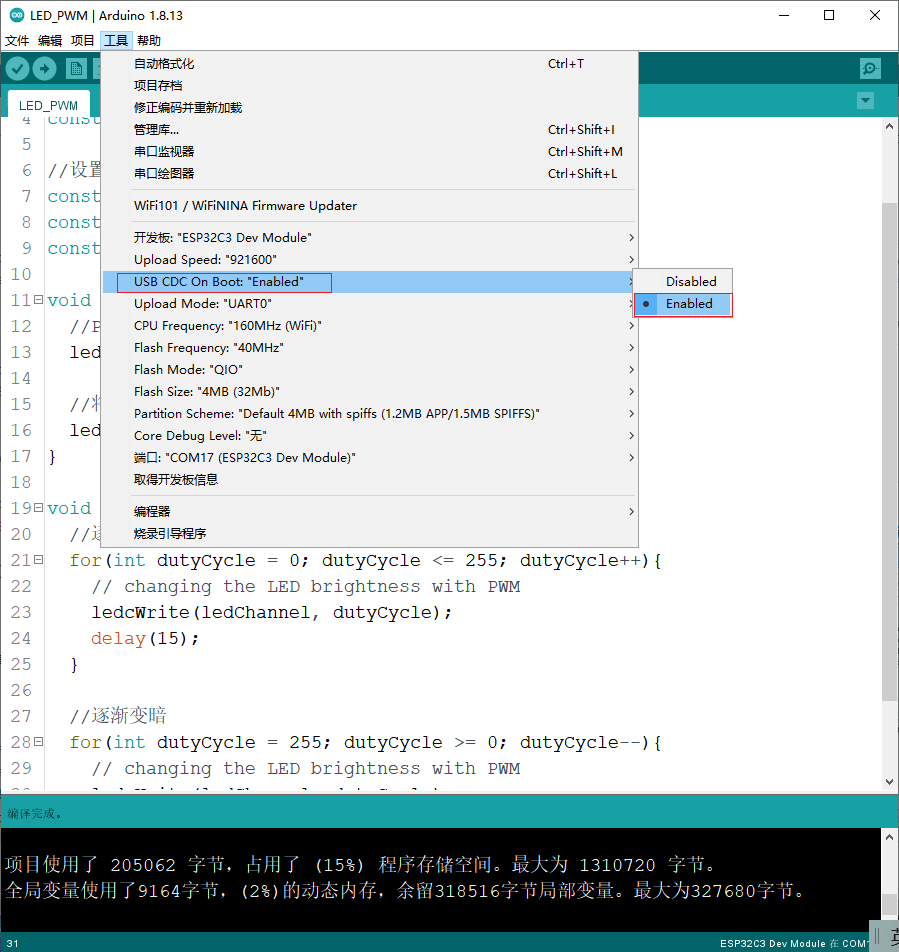
- 點擊Port選擇對應的串口
5.2 LED閃爍
板載LED燈默認為引腳10
代碼
int led = 10;
void setup() {
  pinMode(led,OUTPUT);
}

void loop() {
  digitalWrite(led,HIGH);
  delay(1000);
  digitalWrite(led,LOW);
  delay(1000);
}
Copy
- 將以上程序粘貼到程序框中
- 點擊箭頭等待程序編譯并燒錄至開發板
燒錄成功

如圖所示及燒錄成功
您會看見板載LED燈開始閃爍
仍不能燒錄?請點擊此處
6. Beetle-ESP32C3基礎教程(此處介紹為Arduino之間的差別處)
- 想了解Arduino基礎?點擊此處
6.1 PWM輸出
ESP32C3的PWM功能需要提前定義聲明
ledcAttachPin(GPIO, Channel)
說明:指定信號將出現在哪些 GPIO 上
參數:
- GPIO: 輸出信號的GPIO
- Channel: 生成信號的GPIO
ledcWrite(Channel, dutyCycle)
說明:設置PWM信號生成通道
參數:
- Channel: 信號生成通道
- dutyCycle: PWM值
ledcSetup(Channel, freq, resolution)
說明:設置PWM信號生成通道
參數:
- LedChannel: 信號生成通道
- freq: PWM頻率
- resolution: PWM分辨率
示例
ESPC3的PWM由于其可以自由映射到其它端口進行輸出,您需要進行幾步設置,該案例將使用幫助您理解其中的步驟 該案例你可以看到LED燈逐漸變亮變暗
/*
 * LED呼吸燈示例
 */
const int ledPin = 10;  // PWM生成后實際輸出引腳

//設置PWM參數
const int freq = 5000;//PWM頻率
const int ledChannel = 0;//信號生成GPIO
const int resolution = 8;//8位分辨率

void setup(){
  //PWM參數設置
  ledcSetup(ledChannel, freq, resolution);

  //將生成信號通道綁定到輸出通道上
  ledcAttachPin(ledPin, ledChannel);
}

void loop(){
  //逐漸變亮
  for(int dutyCycle = 0; dutyCycle <= 255; dutyCycle++){
    // changing the LED brightness with PWM
    ledcWrite(ledChannel, dutyCycle);
    delay(15);
  }

  //逐漸變暗
  for(int dutyCycle = 255; dutyCycle >= 0; dutyCycle--){
    // changing the LED brightness with PWM
    ledcWrite(ledChannel, dutyCycle);
    delay(15);
  }
}
Copy
6.2 中斷
ESP32C3中斷可自由分配
pinMode(GPIO,INPUT_PULLUP);
說明:外部中斷引腳定義
參數:
- GPIO:ESP32C3想要作為中斷的引腳號。
- INPUT_PULLINGUP:設置為上拉模式。
attachInterrupt(digitalPinToInterrupt(pin), ISR, mode)
說明:外部中斷
參數:
- pin:Arduino引腳號。
- ISR:發生中斷時要調用的ISR;此函數必須不帶任何參數,并且不返回任何內容。有時將此功能稱為中斷服務程序。
- mode:定義何時觸發中斷。預定義了三個常數作為有效值:
- CHANGE 當引腳電平發生變化時觸發中斷引腳
- RISING 當引腳電平由低電平變為高電平時觸發中斷引腳
- FALLING 當引腳電平由高電平變為低電平時觸發中斷引腳
detachInterrupt(digitalPinToInterrupt(pin))
說明:關閉給定的中斷。
參數:
- pin:需要禁用的中斷引腳
interrupts()
說明:重新啟用中斷(在被noInterrupts()禁用之后。中斷允許某些重要任務在后臺發生并默認啟用。當禁用中斷時,某些功能將不起作用,并且傳入通信可能會被忽略。可能會稍微破壞代碼的時序,但是對于特別關鍵的代碼部分可能會被禁用。
noInterrupts()
說明:禁用中斷(您可以使用來重新啟用它們interrupts())。中斷允許某些重要任務在后臺發生,并且默認情況下啟用。禁用中斷時,某些功能將不起作用,并且傳入的通信可能會被忽略。但是,中斷可能會稍微破壞代碼的時序,并且可能會在代碼的特別關鍵的部分將其禁用。
6.3 串口
ESP32C3串口初始化需要映射
- Serial1.begin(baud, config, rxPin, txPin);
說明:Serial1初始化
參數:- baud:波特率。
- config:數據位和停止位設置。
- rxPin:RX引腳
- txPin:TX引腳
Serial1.begin(9600,SERIAL_8N1,/*rx =*/0,/*Tx =*/1); Copy
6.4 舵機
ESP32-C3通過Servo庫不能驅動舵機,可以在項目->加載庫->管理庫中搜索安裝ESP32_C3_ISR_Servo庫驅動舵機
7.進階教程
7.1 使用SD庫
SD類
begin(cspin)
說明:初始化SD卡庫和 SD卡。當使用SD.begin()時﹐默認將Arduino SPI的SS引腳連接到SD卡的CS使能選擇端;也可以使用begin(cspin)指定一個引腳連接到SD卡的CS使能選擇端,但仍需保證 SPI 的SS引腳為輸出模式,否則SD卡庫將無法運行。
參數:cspin:連接到SD 卡CS端的Arduino引腳。
返回值: boolean型值,為 true表示初始化成功;為 false表示初始化失敗。
exists()
說明:檢查文件或文件夾是否存在于SD卡中。語法:SD. exists( filename)
參數: filename:需要檢測的文件名。其中可以包含路徑,路徑用“/”分隔。
返回值: boolean型值,為 true表示文件或文件夾存在;為false表示文件或文件夾不存在。
open()
說明:打開SD卡上的一個文件。如果文件不存在,且以寫入方式打開,則Arduino會創建一個指定文件名的文件。(所在路徑必須事先存在)
語法:SD.open( filename)SD.open(filename,mode)
參數:
filename:需要打開的文件名。其中可以包含路徑,路徑用“/”分隔。
mode(可選):打開文件的方式,默認使用只讀方式打開。也可以使用以下兩種方式打開文件:
FILE_READ:只讀方式打開文件;FILE_WRITE,寫入方式打開文件。
返回值:返回被打開文件對應的對象﹔如果文件不能打開,則返回false。
FILE_WRITE,寫入方式打開文件。
返回值:返回被打開文件對應的對象;如果文件不能打開,則返回false。
remove()
說明:從SD卡移除一個文件。如果文件不存在,則函數返回值是不確定的,因此在移除文件之前,最好使用SD. exists(filename)先檢測文件是否存在。
語法:SD. remove( filename)
參數: filename,需要移除的文件名。其中可以包含路徑,路徑用“!”分隔。
返回值: boolean型值,為true表示文件移除成功;為false表示文件移除失敗。
mkdir(filename)
說明:創建文件夾。
參數:
- filename,需要創建的文件夾名。其中可以包含路徑,路徑用“/”分隔。返回值: boolean型值,為 true表示創建成功;為false表示創建失敗。
rmdir(filename)
說明:移除文件夾。被移除的文件夾必須是空的。語法:SD.rmdir( filename)
參數:
- filename,需要移除的文件夾名。其中可以包含路徑,路徑用“/”分隔。
- 返回值* : boolean型值,為 true表示移除成功;為false表示移除失敗。
File類
File類提供了讀/寫文件的功能,該類的功能與之前使用的串口相關函數的功能非常類似。其成員函數如下。
available()
說明:檢查當前文件中可讀數據的字節數。語法:file. available()
參數:
- file:一個 File類型的對象。返回值:可用字節數。
close()
說明:關閉文件,并確保數據已經被完全寫入SD卡中。語法:file. close()
參數:
- file:一個 File類型的對象。返回值:無。
flush()
說明:確保數據已經寫入SD卡。當文件被關閉時,flush()會自動運行。語法: file.flush
參數:
- file:一個File類型的對象。返回值:無。
peek()
說明:讀取當前所在字節,但并不移動到下一個字節。
參數
- file:一個 File類型的對象。
- 返回值*:下一個字節或者下一個字符。如果沒有可讀數據,則返回一1。
position( )
說明:獲取當前在文件中的位置(即下一個被讀/寫的字節的位置)。語法:file. position()
參數:
- file:一個 File類型的對象。返回值:在當前文件中的位置。
print()
說明:輸出數據到文件。要寫入的文件應該已經被打開,且等待寫入。語法:file. print(data)file. print(data,BASE)
參數:
- file:一個 File類型的對象。
- data,要寫入的數據(可以是類型char, byte ,int .long 或 String)。
- BASE(可選),指定數據的輸出形式:BIN(二進制);oCT(八進制);DEC(十進制);HEX(十六進制)。 返回值;發送的字節數。
println()
說明:輸出數據到文件,并回車換行。語法:file. println(data)file,println(data,BASE)
參數:
- file:一個 File類型的對象。
- data:要寫入的數據(類型可以是char , byte , int , long或String)。
- BASE(可選),指定數據的輸出形式:BIN(二進制>;OCT(八進制);DECK十進制;HEX(十六進制)返回值;發送的宇節數。
seek()
說明;跳轉到指定位置。該位置必須在·到該文件大小之間。語法:file. seek( pos)
參數:
- file:一個 File類型的對象。pos,需要查找的位置。
- 返回值*: boolean型值,為 true表示跳轉成功;為false表示跳轉失敗。
size()
說明:獲取文件的大小。語法:filue. size()
參數:
- file:一個File類型的對象。
- 返回值*:以字節為單位的文件大小。
read()
說明:讀取1B數據。語法:file.read參數:
- file:一個 File類型的對象。
- 返回值*:下一個字節或者字符;如果沒有可讀數據,則返回一1。
write()
說明;寫入數據到文件。語法:file. write(data)file. write(buf,len)
參數:
- file:一個File類型的對象。
- data:要寫入的數據,類型可以是 byte ,char或字符串(char * ) 。buf,一個字符數組或者寧節數據。
- len:buf數組的元素個數。
- 返回值*:發送的字節數。
isDirectory()
說明:判斷當前文件是否為目錄。語法:file.isDirectory()
參數:
- file:一個File類型的對象。
- 返回值*: boolcan型值;為 true表示是目錄;為 false表示不是目錄。
openNextFile()
說明:打開下一個文件。語法:file.openNextFile()
參數:
- file:一個 File類型的對象。
- 返回值*:下一個文件對應的對象。
rewindDirectory()
說明:回到當前目錄中的第一個文件。語法:file.rewindDirectory()
參數: file,一個File類型的對象。返回值:無。
7.2 ESP32-C3藍牙收發
7.2.1 ESP32-C3與手機藍牙通信
使用該實例演示ESP32-C3與手機之間的數據傳輸,如果需要修改或使用數據,只需更改數據接收部分或數據發送部分代碼
/*
    Video: https://www.youtube.com/watch?v=oCMOYS71NIU
    Based on Neil Kolban example for IDF: https://github.com/nkolban/esp32-snippets/blob/master/cpp_utils/tests/BLE%20Tests/SampleNotify.cpp
    Ported to Arduino ESP32 by Evandro Copercini

   Create a BLE server that, once we receive a connection, will send periodic notifications.
   The service advertises itself as: 6E400001-B5A3-F393-E0A9-E50E24DCCA9E
   Has a characteristic of: 6E400002-B5A3-F393-E0A9-E50E24DCCA9E - used for receiving data with "WRITE"
   Has a characteristic of: 6E400003-B5A3-F393-E0A9-E50E24DCCA9E - used to send data with  "NOTIFY"

   The design of creating the BLE server is:
   1. Create a BLE Server
   2. Create a BLE Service
   3. Create a BLE Characteristic on the Service
   4. Create a BLE Descriptor on the characteristic
   5. Start the service.
   6. Start advertising.

*/

/* 該示例演示了藍牙數據透傳,燒錄代碼,打開串口監視器,打開手機的BLE調試助手
 * 1.即可看見ESP32-C3發送的數據--見APP使用圖
 * 2.通過BLE調試助手的輸入框可向ESP32-C3發送數據--見APP使用圖
 * 該示例由BLE_uart示例更改而來
 */

#include
#include
#include
#include

BLEServer *pServer = NULL;
BLECharacteristic * pTxCharacteristic;
bool deviceConnected = false;
uint8_t txValue = 0;

// See the following for generating UUIDs:
// https://www.uuidgenerator.net/

#define SERVICE_UUID           "6E400001-B5A3-F393-E0A9-E50E24DCCA9E" // UART service UUID
#define CHARACTERISTIC_UUID_RX "6E400002-B5A3-F393-E0A9-E50E24DCCA9E"
#define CHARACTERISTIC_UUID_TX "6E400003-B5A3-F393-E0A9-E50E24DCCA9E"


//藍牙連接/斷開處理。當有連接/斷開事件發生時自動觸發
class MyServerCallbacks: public BLEServerCallbacks {
    void onConnect(BLEServer* pServer) {   //當藍牙連接時會執行該函數
      Serial.println("藍牙已連接");
      deviceConnected = true;
    };

    void onDisconnect(BLEServer* pServer) {  //當藍牙斷開連接時會執行該函數
      Serial.println("藍牙已斷開");
      deviceConnected = false;
      delay(500); // give the bluetooth stack the chance to get things ready
      pServer->startAdvertising(); // restart advertising

    }
};

/****************數據接收部分*************/
/****************************************/
//藍牙接收數據處理。當收到數據時自動觸發
class MyCallbacks: public BLECharacteristicCallbacks {
    void onWrite(BLECharacteristic *pCharacteristic) {
      std::string rxValue = pCharacteristic->getValue();//接收數據,并賦給rxValue

      //if(rxValue == "ON"){Serial.println("開燈");}   //判斷接收的字符是否為"ON"

      if (rxValue.length() > 0) {
        Serial.println("*********");
        Serial.print("Received Value: ");
        for (int i = 0; i < rxValue.length(); i++){
          Serial.print(rxValue[i]);
        }
        Serial.println();
        Serial.println("*********");
      }
    }
};
/***************************************/
/****************************************/


void setup() {
  Serial.begin(115200);
  BLEBegin();  //初始化藍牙

}

void loop() {
/****************數據發送部分*************/
/****************************************/
  if (deviceConnected) {  //如果有藍牙連接,就發送數據
    pTxCharacteristic->setValue("Hello");  //發送字符串
    pTxCharacteristic->notify();
    delay(10); // bluetooth stack will go into congestion, if too many packets are sent

    pTxCharacteristic->setValue("DFRobot");  //發送字符串
    pTxCharacteristic->notify();
    delay(10); // bluetooth stack will go into congestion, if too many packets are sent
  }
/****************************************/
/****************************************/
}


void BLEBegin(){
  // Create the BLE Device
  BLEDevice::init(/*BLE名稱*/"UART Service");

  // Create the BLE Server
  pServer = BLEDevice::createServer();
  pServer->setCallbacks(new MyServerCallbacks());

  // Create the BLE Service
  BLEService *pService = pServer->createService(SERVICE_UUID);

  // Create a BLE Characteristic
  pTxCharacteristic = pService->createCharacteristic(
                    CHARACTERISTIC_UUID_TX,
                    BLECharacteristic::PROPERTY_NOTIFY
                  );

  pTxCharacteristic->addDescriptor(new BLE2902());

  BLECharacteristic * pRxCharacteristic = pService->createCharacteristic(
                      CHARACTERISTIC_UUID_RX,
                      BLECharacteristic::PROPERTY_WRITE
                    );

  pRxCharacteristic->setCallbacks(new MyCallbacks());

  // Start the service
  pService->start();

  // Start advertising
  pServer->getAdvertising()->start();
  Serial.println("Waiting a client connection to notify...");
}
Copy
7.2.2 兩個ESP32C3藍牙通訊
使用該實例演示ESP32-C3與ESP32-C3之間的數據傳輸,如果需要修改或使用數據,只需更改數據接收部分或數據發送部分代碼
主機代碼
/**
 * A BLE client example that is rich in capabilities.
 * There is a lot new capabilities implemented.
 * author unknown
 * updated by chegewara
 */

#include "BLEDevice.h"
//#include "BLEScan.h"

// The remote service we wish to connect to.
static BLEUUID serviceUUID("4fafc201-1fb5-459e-8fcc-c5c9c331914b");
// The characteristic of the remote service we are interested in.
static BLEUUID    charTXUUID("beb5483e-36e1-4688-b7f5-ea07361b26a8");

static BLEUUID    charRXUUID("beb5483f-36e1-4688-b7f5-ea07361b26a8");

static boolean doConnect = false;
static boolean connected = false;
static boolean doScan = false;
static BLERemoteCharacteristic* pTXRemoteCharacteristic;
static BLERemoteCharacteristic* pRXRemoteCharacteristic;
static BLEAdvertisedDevice* myDevice;


/****************數據接收部分*************/
/****************************************/
//藍牙接收數據處理,當收到數據時自動觸發
static void notifyCallback(BLERemoteCharacteristic* pBLERemoteCharacteristic, uint8_t* pData, size_t length, bool isNotify) {  //傳入uint8_t* pData用于存放數據
    String BLEData = "";
    for(int i = 0; i < length; i++)  //
      BLEData += (char)pData[i];
    Serial.println("*********");
    Serial.print("Received Value: ");
    Serial.println(BLEData);
    Serial.println("*********");

    //if(BLEData == "ON"){Serial.println("開燈");}  //判斷接收的字符是否為"ON"

    //Serial.print("Notify callback for characteristic ");
    //Serial.print(pBLERemoteCharacteristic->getUUID().toString().c_str());
    //Serial.print(" of data length ");
    //Serial.println(length);
}
/****************************************/
/****************************************/

//藍牙連接/斷開處理。當有連接/斷開事件發生時自動觸發
class MyClientCallback : public BLEClientCallbacks {
  void onConnect(BLEClient* pclient) {
  }

  void onDisconnect(BLEClient* pclient) {
    connected = false;
    Serial.println("onDisconnect");
  }
};


/**
 * Scan for BLE servers and find the first one that advertises the service we are looking for.
 */
 //藍牙掃描處理事件。當開啟掃描時自動觸發
class MyAdvertisedDeviceCallbacks: public BLEAdvertisedDeviceCallbacks {
 /**
   * Called for each advertising BLE server.
   */
  void onResult(BLEAdvertisedDevice advertisedDevice) {
    //Serial.print("BLE Advertised Device found: ");
    //Serial.println(advertisedDevice.toString().c_str());

    // We have found a device, let us now see if it contains the service we are looking for.
    if (advertisedDevice.haveServiceUUID() && advertisedDevice.isAdvertisingService(serviceUUID)) {
      BLEDevice::getScan()->stop();
      myDevice = new BLEAdvertisedDevice(advertisedDevice);
      doConnect = true;
      doScan = true;

    } // Found our server
  } // onResult
}; // MyAdvertisedDeviceCallbacks


void setup() {
  Serial.begin(115200);
  Serial.println("Starting Arduino BLE Client application...");
  bleBegin();

}

void loop() {
  // If the flag "doConnect" is true then we have scanned for and found the desired
  // BLE Server with which we wish to connect.  Now we connect to it.  Once we are
  // connected we set the connected flag to be true.
  if (doConnect == true) {
    if (connectToServer()) {
      Serial.println("We are now connected to the BLE Server.");
    } else {
      Serial.println("We have failed to connect to the server; there is nothin more we will do.");
    }
    doConnect = false;
  }
/****************數據發送部分*************/
/****************************************/
  if (connected) {  //當連接到藍牙從機時發送數據
    pTXRemoteCharacteristic->writeValue("我是主機");
    pTXRemoteCharacteristic->writeValue("Hello client");
  }
  if(!connected){  //當沒有連接到藍牙從機時重新掃描
    BLEDevice::getScan()->start(5,false);  // this is just example to start scan after disconnect, most likely there is better way to do it in arduino
  }
/****************************************/
/****************************************/
  delay(1000);
}


void bleBegin()
{
  BLEDevice::init("");

  // Retrieve a Scanner and set the callback we want to use to be informed when we
  // have detected a new device.  Specify that we want active scanning and start the
  // scan to run for 5 seconds.
  BLEScan* pBLEScan = BLEDevice::getScan();
  pBLEScan->setAdvertisedDeviceCallbacks(new MyAdvertisedDeviceCallbacks());//掃描處理函數
  pBLEScan->setInterval(1349);//設置掃描間隔時間
  pBLEScan->setWindow(449);//主動掃描時間
  pBLEScan->setActiveScan(true);
  pBLEScan->start(5, false);//掃描時間,單位秒
  }


//藍牙連接處理
bool connectToServer() {
    Serial.print("Forming a connection to ");
    Serial.println(myDevice->getAddress().toString().c_str());

    BLEClient*  pClient  = BLEDevice::createClient();
    Serial.println(" - Created client");

    pClient->setClientCallbacks(new MyClientCallback());

    // Connect to the remove BLE Server.
    pClient->connect(myDevice);  // if you pass BLEAdvertisedDevice instead of address, it will be recognized type of peer device address (public or private)
    Serial.println(" - Connected to server");
    pClient->setMTU(517); //set client to request maximum MTU from server (default is 23 otherwise)

    // Obtain a reference to the service we are after in the remote BLE server.
    BLERemoteService* pRemoteService = pClient->getService(serviceUUID);
    if (pRemoteService == nullptr) {
      Serial.print("Failed to find our service UUID: ");
      Serial.println(serviceUUID.toString().c_str());
      pClient->disconnect();
      return false;
    }
    Serial.println(" - Found our service");


    // Obtain a reference to the characteristic in the service of the remote BLE server.
    pTXRemoteCharacteristic = pRemoteService->getCharacteristic(charTXUUID);
    if (pTXRemoteCharacteristic == nullptr) {
      Serial.print("Failed to find our characteristic UUID: ");
      Serial.println(charTXUUID.toString().c_str());
      pClient->disconnect();
      return false;
    }
    pRXRemoteCharacteristic = pRemoteService->getCharacteristic(charRXUUID);
    if (pRXRemoteCharacteristic == nullptr) {
      Serial.print("Failed to find our characteristic UUID: ");
      Serial.println(charRXUUID.toString().c_str());
      pClient->disconnect();
      return false;
    }
    Serial.println(" - Found our characteristic");

    if(pRXRemoteCharacteristic->canNotify())
      pRXRemoteCharacteristic->registerForNotify(notifyCallback);

    connected = true;
    return true;
}
Copy
從機代碼
/*
    Based on Neil Kolban example for IDF: https://github.com/nkolban/esp32-snippets/blob/master/cpp_utils/tests/BLE%20Tests/SampleServer.cpp
    Ported to Arduino ESP32 by Evandro Copercini
    updates by chegewara
*/

#include
#include
#include
#include

// See the following for generating UUIDs:
// https://www.uuidgenerator.net/

#define SERVICE_UUID        "4fafc201-1fb5-459e-8fcc-c5c9c331914b"
#define CHARACTERISTIC_UUID_RX "beb5483e-36e1-4688-b7f5-ea07361b26a8"
#define CHARACTERISTIC_UUID_TX "beb5483f-36e1-4688-b7f5-ea07361b26a8"
uint8_t txValue = 0;
bool deviceConnected = false;
BLECharacteristic *pTxCharacteristic;


//藍牙連接/斷開處理。當有連接/斷開事件發生時自動觸發
class MyServerCallbacks: public BLEServerCallbacks {
    void onConnect(BLEServer* pServer) {   //當藍牙連接時會執行該函數
      Serial.println("藍牙已連接");
      deviceConnected = true;
    };

    void onDisconnect(BLEServer* pServer) {  //當藍牙斷開連接時會執行該函數
        Serial.println("藍牙已斷開");
        deviceConnected = false;
        delay(500); // give the bluetooth stack the chance to get things ready
        BLEDevice::startAdvertising(); // restart advertising
    }
};
/****************數據接收部分*************/
/****************************************/
//藍牙接收數據處理。當收到數據時自動觸發
class MyCallbacks: public BLECharacteristicCallbacks {
    void onWrite(BLECharacteristic *pCharacteristic) {
      std::string rxValue = pCharacteristic->getValue();  //使用rxValue接收數據

      //if(rxValue == "ON"){Serial.println("開燈");}   //判斷接收的字符是否為"ON"

      if (rxValue.length() > 0) {
        Serial.println("*********");
        Serial.print("Received Value: ");
        for (int i = 0; i < rxValue.length(); i++)
              Serial.print(rxValue[i]);    //將接收的數據打印出來

        Serial.println();
        Serial.println("*********");
      }
    }
};
/****************************************/
/****************************************/

void setup() {
  Serial.begin(115200);
  Serial.println("Starting BLE work!");
  bleBegin();
}

/****************數據發送部分*************/
/****************************************/
void loop() {
  if(deviceConnected){  //當有設備連接時發送數據
    pTxCharacteristic->setValue("我是從機");
    pTxCharacteristic->notify();

    pTxCharacteristic->setValue("Hello Sever");
    pTxCharacteristic->notify();
  }
  /****************************************/
  /****************************************/
  delay(1000);
}


void bleBegin()
{
  BLEDevice::init(/*BLE名稱*/"Long name works now");
  BLEServer *pServer = BLEDevice::createServer();
  pServer->setCallbacks(new MyServerCallbacks());
  BLEService *pService = pServer->createService(SERVICE_UUID);
  BLECharacteristic *pRxCharacteristic = pService->createCharacteristic(
                                         CHARACTERISTIC_UUID_RX,
                                         BLECharacteristic::PROPERTY_WRITE
                                       );
  pRxCharacteristic->setCallbacks(new MyCallbacks());

 pTxCharacteristic = pService->createCharacteristic(
                                         CHARACTERISTIC_UUID_TX,
                                         BLECharacteristic::PROPERTY_NOTIFY
                                       );
 pTxCharacteristic->addDescriptor(new BLE2902());

  pService->start();
  // BLEAdvertising *pAdvertising = pServer->getAdvertising();  // this still is working for backward compatibility
  BLEAdvertising *pAdvertising = BLEDevice::getAdvertising();
  pAdvertising->addServiceUUID(SERVICE_UUID);
  pAdvertising->setScanResponse(true);
  pAdvertising->setMinPreferred(0x06);  // functions that help with iPhone connections issue
  pAdvertising->setMinPreferred(0x12);
  BLEDevice::startAdvertising();

  }
Copy
7.3 WIFI控制LED
ESP32C3具有WIFI功能,以下示例使用ESP32C3創建了一個wifi服務器,使用客戶端連接到該服務器,控制LED的亮滅
步驟
1.連接到WIFI”Beetle ESP32 C3“,已設置WIFI密碼:12345678
2.訪問網址 http://192.168.4.1/ON 來打開燈 訪問 http://192.168.4.1/OFF 來關閉燈
3.在訪問后通過點擊上下 here 來便捷控制燈的亮滅而不需要輸入網址進行
代碼
/*
步驟:
1.連接到WIFI”Beetle ESP32 C3“,已設置WIFI密碼:12345678
2.訪問網址 http://192.168.4.1/ON 來打開燈 訪問 http://192.168.4.1/OFF 來關閉燈
3.在訪問后通過點擊上下 here 來便捷控制燈的亮滅而不需要輸入網址進行
*/

#include
#include
#include

#define myLED 10 //設置引腳10為LED引腳
// 設置WIFI名稱以及密碼
const char *ssid = "Beetle ESP32 C3";//WIFI名稱
const char *password = "12345678";//密碼

WiFiServer server(80);//網頁服務端口默認為80


void setup() {
  pinMode(myLED, OUTPUT);

  Serial.begin(115200);
  Serial.println();
  Serial.println("Configuring access point...");

  //如果想要無密碼開放網絡請刪除password
  WiFi.softAP(ssid, password);
  IPAddress myIP = WiFi.softAPIP();
  Serial.print("AP IP address: ");
  Serial.println(myIP);
  server.begin();

  Serial.println("Server started");
}

void loop() {
  WiFiClient client = server.available();   // 檢測等待連接

  if (client) {                             // 檢測是否連接
    Serial.println("New Client.");
    String currentLine = "";                // 創建String變量來保存數據
    while (client.connected()) {            // 保持連接時一直循環
      if (client.available()) {             // 檢測連接是否有數據
        char c = client.read();             // 讀取接收的數據
        //Serial.write(c);                    // 打印在串行監視器
        if (c == '\n') {                    // 如果讀取的是換行符

          //結尾用換行符提醒結束
          if (currentLine.length() == 0) {
            client.println("HTTP/1.1 200 OK");
            client.println("Content-type:text/html");
            client.println();
             //將字符與here連接
            client.print("Click here to turn ON the LED.");
            client.print("Click here to turn OFF the LED.");

            // HTTP響應為空行
            client.println();
            // 跳出循環
            break;
          } else {    // 如果有一個換行符就清除變量緩存的數據
            currentLine = "";
          }
        } else if (c != '\r') {  // 如果獲得回車以外的字符
          currentLine += c;      // 獲得的字符添加到變量末尾
        }

        // 檢查是否獲得/ON或者/OFF
        if (currentLine.endsWith("/ON")) {
          digitalWrite(myLED, HIGH);               //得到/ON時打開燈
        }
        if (currentLine.endsWith("/OFF")) {
          digitalWrite(myLED, LOW);                //得到/OFF時關閉燈
        }
      }
    }
    // 關閉連接
    client.stop();
    Serial.println("Client Disconnected.");
  }
}
Copy
結果
使用手機連接該wifi,通過瀏覽器訪問192.168.4.1,如圖所示顯示ip地址為192.168.4.1,服務已開啟
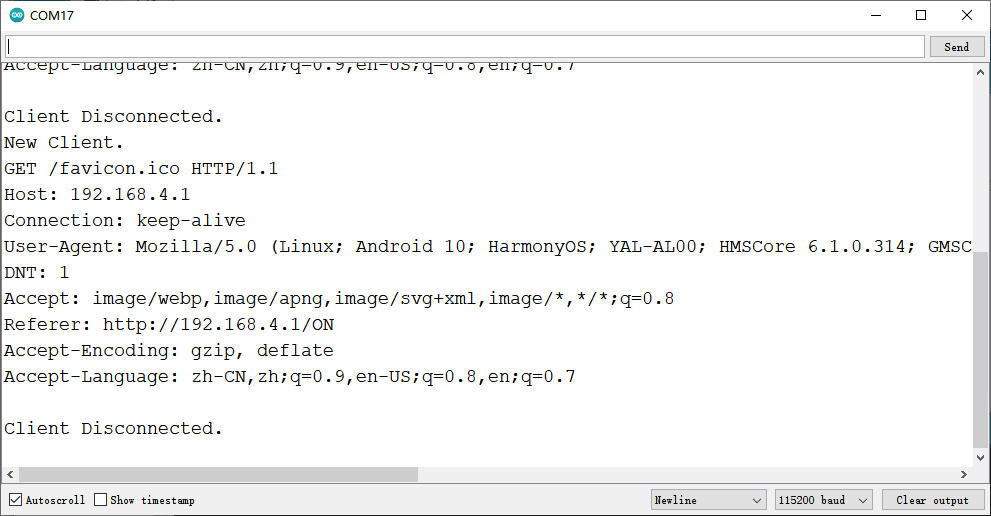
使用瀏覽器訪問該ip地址得到如下圖所示

嘗試分別點擊鏈接控制LED吧
成員函數
WiFiServer server()
說明:設置服務器端口
softAP(ssid,password)
說明:將WiFi配置為AP模式,并設置名稱以及密碼
參數:
- ssid: AP模式的wifi名字
- password: ap模式的wifi密碼
server.available()
說明:檢測服務端口是否有連接(WIFI是否連接)
client.connected()
說明:檢測連接狀態
返回值:true/false
client.available()
說明:檢測連接WIFI是否有數據輸入
client.read()
說明*:讀取WIFI接收數據
currentLine.endsWith()
說明*:檢測是否獲得括號內容
client.stop()
說明*:斷開連接
8.應用示例拓展
8.1 OLED顯示測量溫濕度
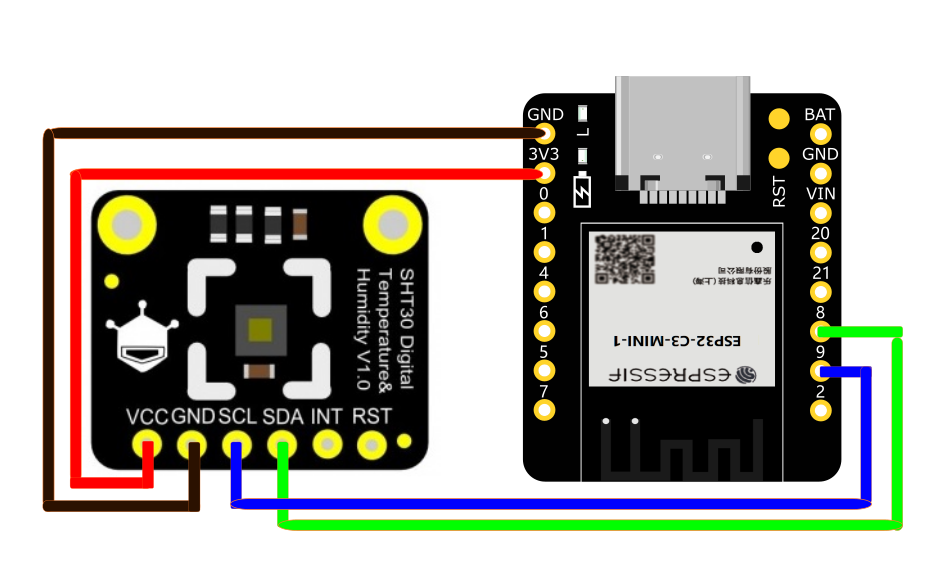
獲取溫濕度顯示在OLED屏幕上是非常直觀有趣的項目,下面你將學會基礎的OLED顯示以及使用I2C接口獲取溫濕度傳感器數據。
您還需準備
- 0.96”128x64 IIC/SPI OLED單色顯示屏 x1
- 母母頭杜邦線 若干
- FermionSHT30溫濕度傳感器 x1 (或使用相同SHT3x代碼庫其它SHT溫濕度傳感器)
1.您需要先安裝SHT3x庫
關于如何安裝庫點擊這里
2.接線圖
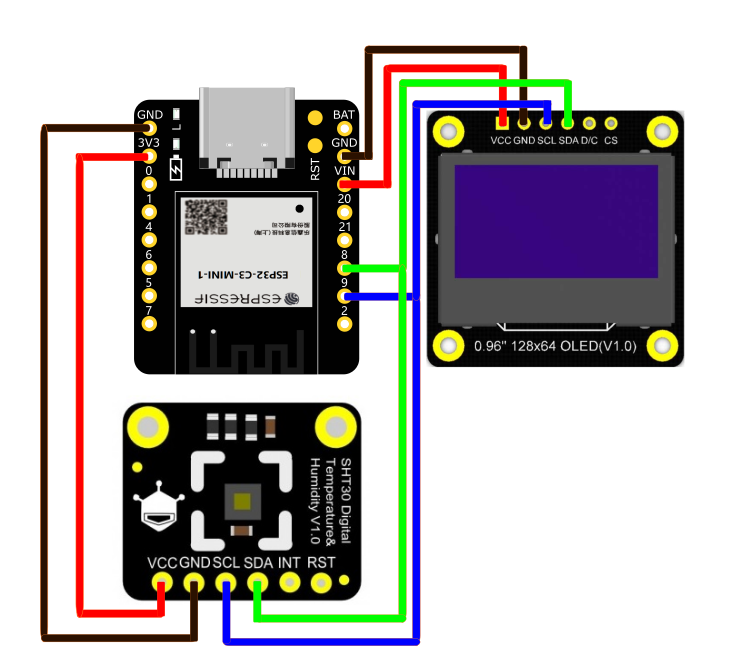
按照上圖連接好線拷貝下面代碼,您將看見你周圍的溫濕度狀況。
代碼
#include
#include  //導入字庫
//#include
#include

#include

/*
---顯示屏硬件I2C接口---
U8G2_R0 不旋轉,橫向,繪制方向從左到右
U8G2_R1 順時針旋轉90度,繪制方向從上到下
U8G2_R2 順時針旋轉180度,繪制方向從右到左
U8G2_R3 順時針旋轉270度,繪制方向從下到上
U8G2_MIRROR 正常顯示鏡像內容(v2.6.x版本以上使用)   注意:U8G2_MIRROR需要與setFlipMode()配搭使用.
U8x8_PIN_NONE 表示引腳為空,不會使用復位引腳
---顯示屏硬件SPI接口---
cs 按引腳接上即可(引腳可自己選擇)
dc 按引腳接上即可(引腳可自己選擇)
*/
U8G2_SSD1306_128X64_NONAME_F_HW_I2C u8g2(/* rotation=*/U8G2_R0, /* reset=*/ U8X8_PIN_NONE);

//當ADR接VDD時可選擇0x45當ADR接GND時可選擇0x44
//默認為0x45,RST(復位腳)不用連接
DFRobot_SHT3x sht3x(&Wire,/*address=*/0x45,/*RST=*/4);

//使用SPI需要注釋上方代碼,使用下方代碼
//DFRobot_SHT3x   sht3x;

void setup() {
  Serial.begin(115200);
  u8g2.begin();
  u8g2.setFontPosTop();//使用drawStr顯示字符串時,默認標準為顯示字符的左下角坐標。本函數的功能可理解為將坐標位置改為顯示字符串的左上角為坐標標準。
  //初始化傳感器
  while (sht3x.begin() != 0) {
        Serial.println("Failed to Initialize the chip, please confirm the wire connection");
        delay(1000);
      }
      Serial.print("Chip serial number");
      Serial.println(sht3x.readSerialNumber());
      if(!sht3x.softReset()){
         Serial.println("Failed to Initialize the chip....");
       }
}

void loop() {
  //清理屏幕
  u8g2.clearBuffer();
  //將溫度、濕度讀取賦值用于顯示
  float   temp = sht3x.getTemperatureC();
  float   humi = sht3x.getHumidityRH();
  //顯示溫度
  u8g2.setFont(u8g2_font_osb18_tf);    // 選擇字體以及大小(見官方)
  u8g2.drawStr(5,10,"Temp");//在指定位置寫出字符
  u8g2.setFont(u8g2_font_t0_18b_tr);
  u8g2.setCursor(75, 15);//顯示從該位置開始
  u8g2.print(temp);
  //顯示濕度
  u8g2.setFont(u8g2_font_osb18_tf);
  u8g2.drawStr(5,40,"Humi");
  u8g2.setFont(u8g2_font_t0_18b_tr);
  u8g2.setCursor(75, 45);
  u8g2.print(humi);
  u8g2.sendBuffer();
  delay(1000);
}
Copy
結果
成員函數
u8g2.drawStr(x,y,"Temp")
說明:指定屏幕位置顯示自定義內容
參數:
- X、Y: 開始寫的坐標(顯示字體從左下角向右上角顯示)
- "Temp": 可填英文和數字
u8g2.setCursor(x,y)和u8g2.print()
說明:搭配使用,前者為顯示開始位置,后者同Arduino的print相同作用
參數:
- X、Y: 開始寫的坐標(顯示字體從左下角向右上角顯示)
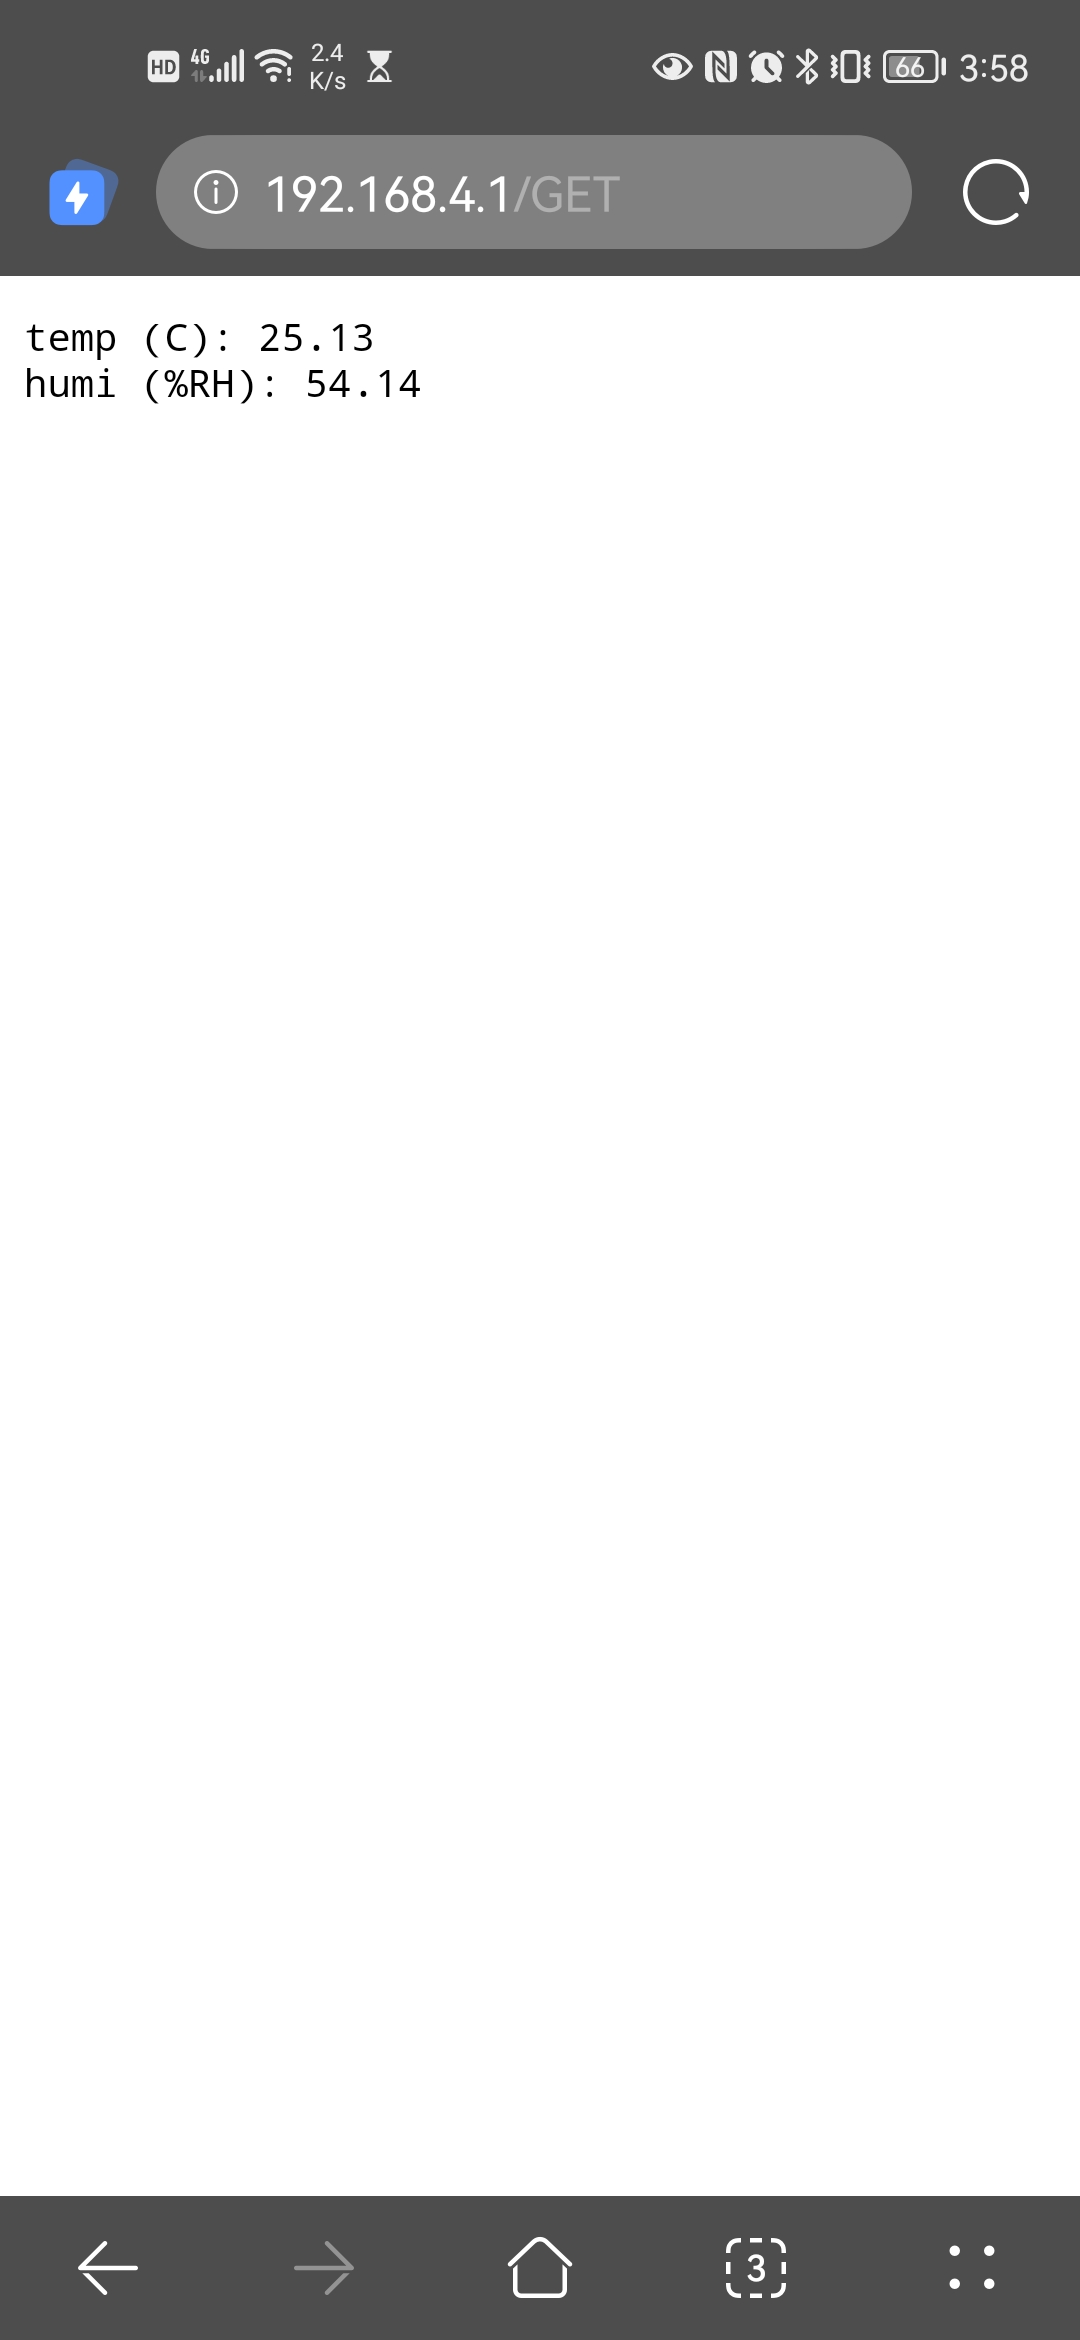
8.2 WIFI獲取溫濕度
本示例參照示例8.3而來,進一步學會局域網下Wifi的信息傳遞,你可以學會如何訪問局域網下的IP地址來獲得在另一處的SHT30的溫濕度傳感器狀態
您還需準備
- FermionSHT30溫濕度傳感器 x1 (或使用相同SHT3x代碼庫其它SHT溫濕度傳感器)
- 母母頭杜邦線 若干
您還需要按照示例9.1中步驟安裝傳感器庫以及將其與ESP32連接。
接線圖
步驟
1.連接到WIFI”Beetle ESP32 C3“,已設置WIFI密碼:12345678
2.訪問網址 http://192.168.4.1/GET 來獲取局域網中的溫濕度信息
3.在溫濕度顯示網頁您可以通過刷新來更新傳感器的數據
代碼
/*
本示例是SHT30連接上ESPC3通過局域網獲取溫濕度
*/

#include
#include
#include
#include
//當ADR接VDD時可選擇0x45當ADR接GND時可選擇0x44
//默認為0x45,RST(復位腳)不用連接
DFRobot_SHT3x sht3x(&Wire,/*address=*/0x45,/*RST=*/4);

//使用SPI需要注釋上方代碼,使用下方代碼
//DFRobot_SHT3x   sht3x;

// 設置WIFI名稱以及密碼
const char *ssid = "Beetle ESP32 C3";//WIFI名稱
const char *password = "12345678";//密碼

WiFiServer server(80);//網頁服務端口默認為80

// 顯示上次傳感器狀態反饋狀態

void setup() {
  //pinMode(myLED, OUTPUT);

  Serial.begin(115200);
  Serial.println();
  Serial.println("Configuring access point...");

  //如果想要無密碼開放網絡請刪除password
  WiFi.softAP(ssid, password);
  IPAddress myIP = WiFi.softAPIP();
  Serial.print("AP IP address: ");
  Serial.println(myIP);
  server.begin();

  Serial.println("Server started");
  //初始化傳感器
  while (sht3x.begin() != 0) {
        Serial.println("Failed to Initialize the chip, please confirm the wire connection");
        delay(1000);
      }
      Serial.print("Chip serial number");
      Serial.println(sht3x.readSerialNumber());
      if(!sht3x.softReset()){
         Serial.println("Failed to Initialize the chip....");
       }
}

void loop() {

WiFiClient client = server.available();   // 檢測等待連接

  if (client) {                             // 檢測是否連接
    Serial.println("New Client.");
    String currentLine = "";                // 創建String變量來保存數據
    while (client.connected()) {            // 保持連接時一直循環
      if (client.available()) {             // 檢測連接是否有數據
        char c = client.read();             // 讀取接收的數據
        //Serial.write(c);                    // 打印在串行監視器
        if (c == '\n') {                    // 如果讀取的是換行符

          //清除掉緩存的內容
          if (currentLine.length() == 0) {
            client.print(" ");
            break;
          } else {    // 如果有一個換行符就清除變量緩存的數據
            currentLine = "";
          }
        } else if (c != '\r') {  // 如果獲得回車以外的字符
          currentLine += c;      // 獲得的字符添加到變量末尾
        }

        // 檢查是否有/GET在末尾
        if (currentLine.endsWith("/GET")) {
             //把溫度、濕度讀出
             float   temp = sht3x.getTemperatureC();
             float   humi = sht3x.getHumidityRH();
             //打印在網頁
             client.print("temp (C): "); client.println(temp);
             client.print("humi (%RH): "); client.println(humi);
        }
      }
    }
    // 關閉連接
    client.stop();
    Serial.println("Client Disconnected.");
  }
  }
Copy
結果
您可以通過手機,電腦等訪問網址以獲得如下結果(局域網下的溫濕度傳感器的溫濕度)。
成員函數
WiFi.softAP(ssid, password)
說明:類似將設置好的WIFI賬號密碼開熱點
參數:
- ssid: WIFI名
- password: WIFI密碼
WiFi.softAPIP()
說明:WIFI的IP地址
8.3 WIFI獲取網絡時間
本實例演示了從網絡時間服務器獲取時間,并使用ESP32自帶的RTC時鐘保持時間更新
本示例來自CSDN博主「Naisu Xu」,原文鏈接:https://blog.csdn.net/Naisu_kun/article/details/115627629
#include

const char *ssid = "********";    //WIFI名稱
const char *password = "********"; //WIFI密碼

const char *ntpServer = "pool.ntp.org";
const long gmtOffset_sec = 8 * 3600;
const int daylightOffset_sec = 0;

void printLocalTime()
{
    struct tm timeinfo;
    if (!getLocalTime(&timeinfo))
    {
        Serial.println("Failed to obtain time");
        return;
    }
    Serial.println(&timeinfo, "%F %T %A"); // 格式化輸出
}

void setup()
{
    Serial.begin(115200);
    Serial.println();

    WiFi.begin(ssid, password);
    while (WiFi.status() != WL_CONNECTED)
    {
        delay(500);
        Serial.print(".");
    }
    Serial.println("WiFi connected!");

    // 從網絡時間服務器上獲取并設置時間
    // 獲取成功后芯片會使用RTC時鐘保持時間的更新
    configTime(gmtOffset_sec, daylightOffset_sec, ntpServer);
    printLocalTime();

    WiFi.disconnect(true);
    WiFi.mode(WIFI_OFF);
    Serial.println("WiFi disconnected!");
}

void loop()
{
    delay(1000);
    printLocalTime();
}
Copy
struct tm結構體
struct tm {
int tm_sec; // 秒,取值0~59;
int tm_min; // 分,取值0~59;
int tm_hour; // 時,取值0~23;
int tm_mday; // 月中的日期,取值1~31;
int tm_mon; // 月,取值0~11;
int tm_year; // 年,其值等于實際年份減去1900;
int tm_wday; // 星期,取值0~6,0為周日,1為周一,依此類推;
int tm_yday; // 年中的日期,取值0~365,0代表1月1日,1代表1月2日,依此類推;
int tm_isdst; // 夏令時標識符,實行夏令時的時候,tm_isdst為正;不實行夏令時的進候,tm_isdst為0;不了解情況時,tm_isdst()為負
};
struct tm結構體格式化輸出
| 格式化字符 | 輸出 |
|---|---|
| %a | 星期幾的簡寫 |
| %A | 星期幾的全稱 |
| %b | 月份的簡寫 |
| %B | 月份的全稱 |
| %c | 標準的日期的時間串 |
| %C | 年份的后兩位數字 |
| %d | 十進制表示的每月的第幾天 |
| %D | 月/天/年 |
| %e | 在兩字符域中,十進制表示的每月的第幾天 |
| %F | 年-月-日 |
| %g | 年份的后兩位數字,使用基于周的年 |
| %G | 年分,使用基于周的年 |
| %h | 簡寫的月份名 |
| %H | 24小時制的小時 |
| %I | 12小時制的小時 |
| %j | 十進制表示的每年的第幾天 |
| %m | 十進制表示的月份 |
| %M | 十時制表示的分鐘數 |
| %p | 本地的AM或PM的等價顯示 |
| %r | 12小時的時間 |
| %R | 顯示小時和分鐘:hh:mm |
| %S | 十進制的秒數 |
| %t | 水平制表符 |
| %T | 顯示時分秒:hh:mm:ss |
| %u | 每周的第幾天,星期一為第一天 (值從0到6,星期一為0) |
| %U | 第年的第幾周,把星期日做為第一天(值從0到53) |
| %V | 每年的第幾周,使用基于周的年 |
| %w | 十進制表示的星期幾(值從0到6,星期天為0) |
| %W | 每年的第幾周,把星期一做為第一天(值從0到53) |
| %x | 標準的日期串 |
| %X | 標準的時間串 |
| %y | 不帶世紀的十進制年份(值從0到99) |
| %Y | 帶世紀部分的十進制年份 |
| %z | 時區名稱,如果不能得到時區名稱則返回空字符 |
8.4 WIFI獲取天氣
本示例用于讓你學會如何獲取天氣信息并讓你體會HTTP中獲取的信息通過Json提取數據并打印的
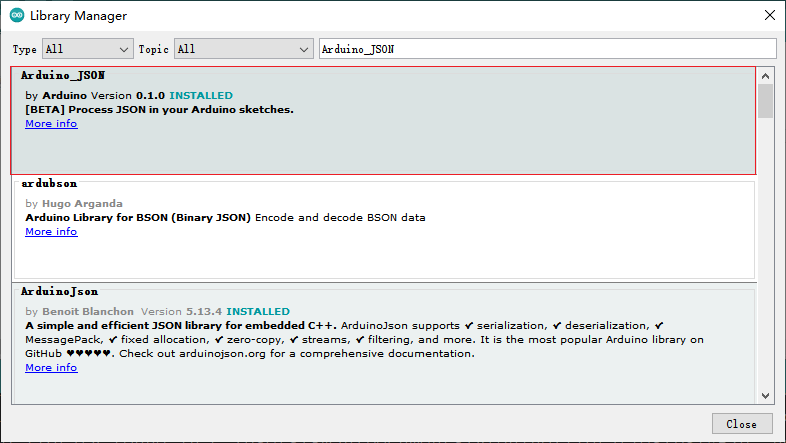
- 燒錄代碼前我們進行以下幾個步驟
1.您需要安裝Arduino_JSON庫。通過 Arduino IDE Tools -> Manage Libraries 中輸入 Arduino_JSON 并安裝該庫
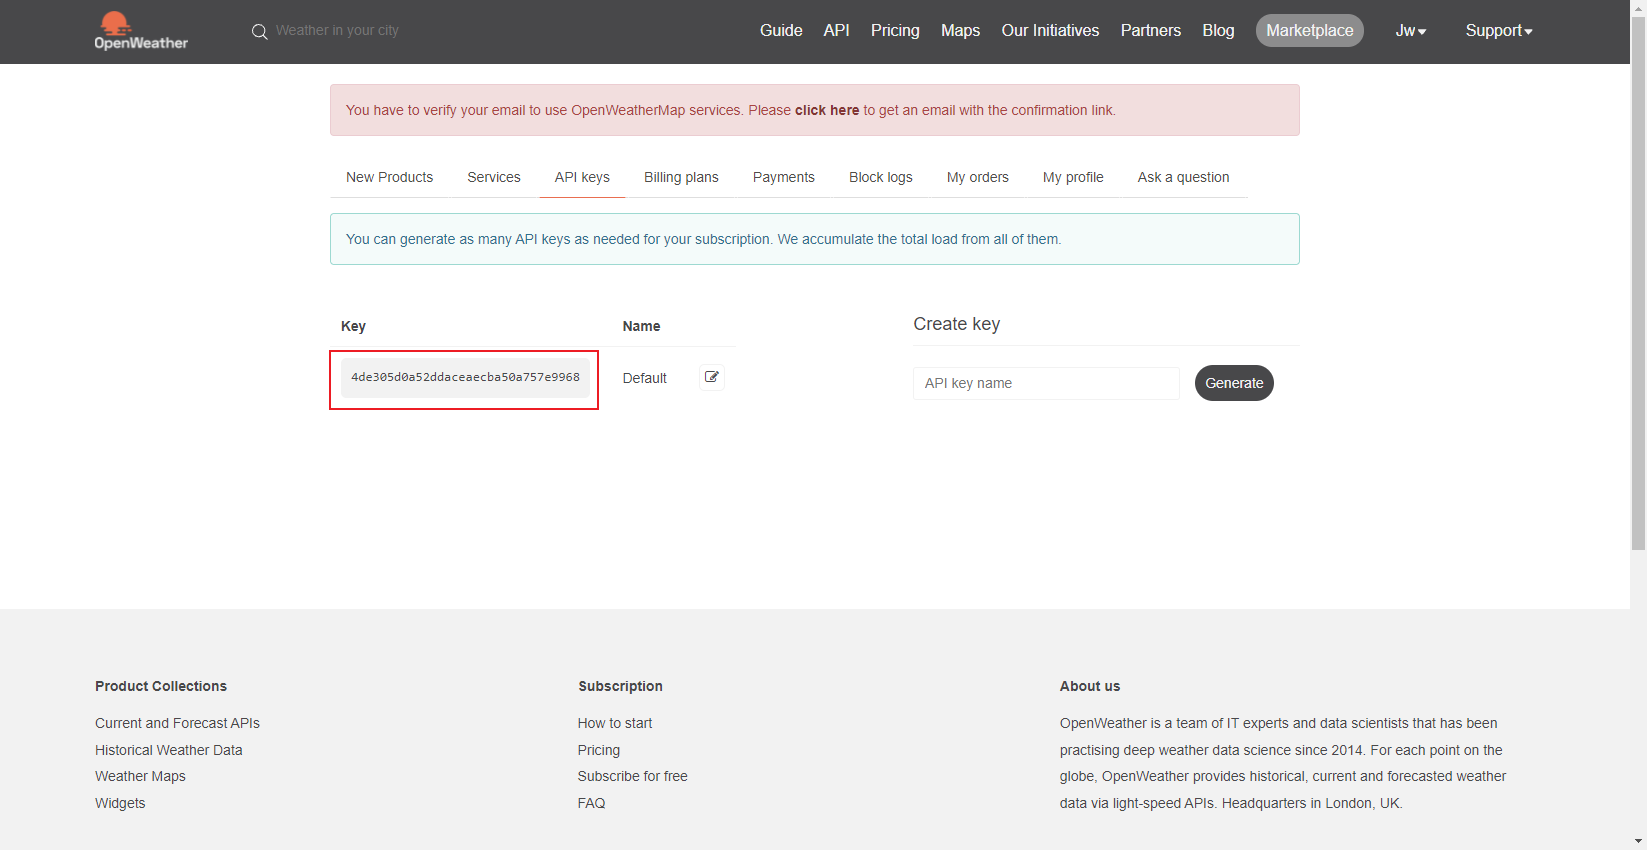
2.注冊OpenWeather的賬號以獲取我們想要的天氣信息 打開瀏覽器并轉到 https://openweathermap.org/appid/ 按注冊按鈕并創建一個免費帳戶。
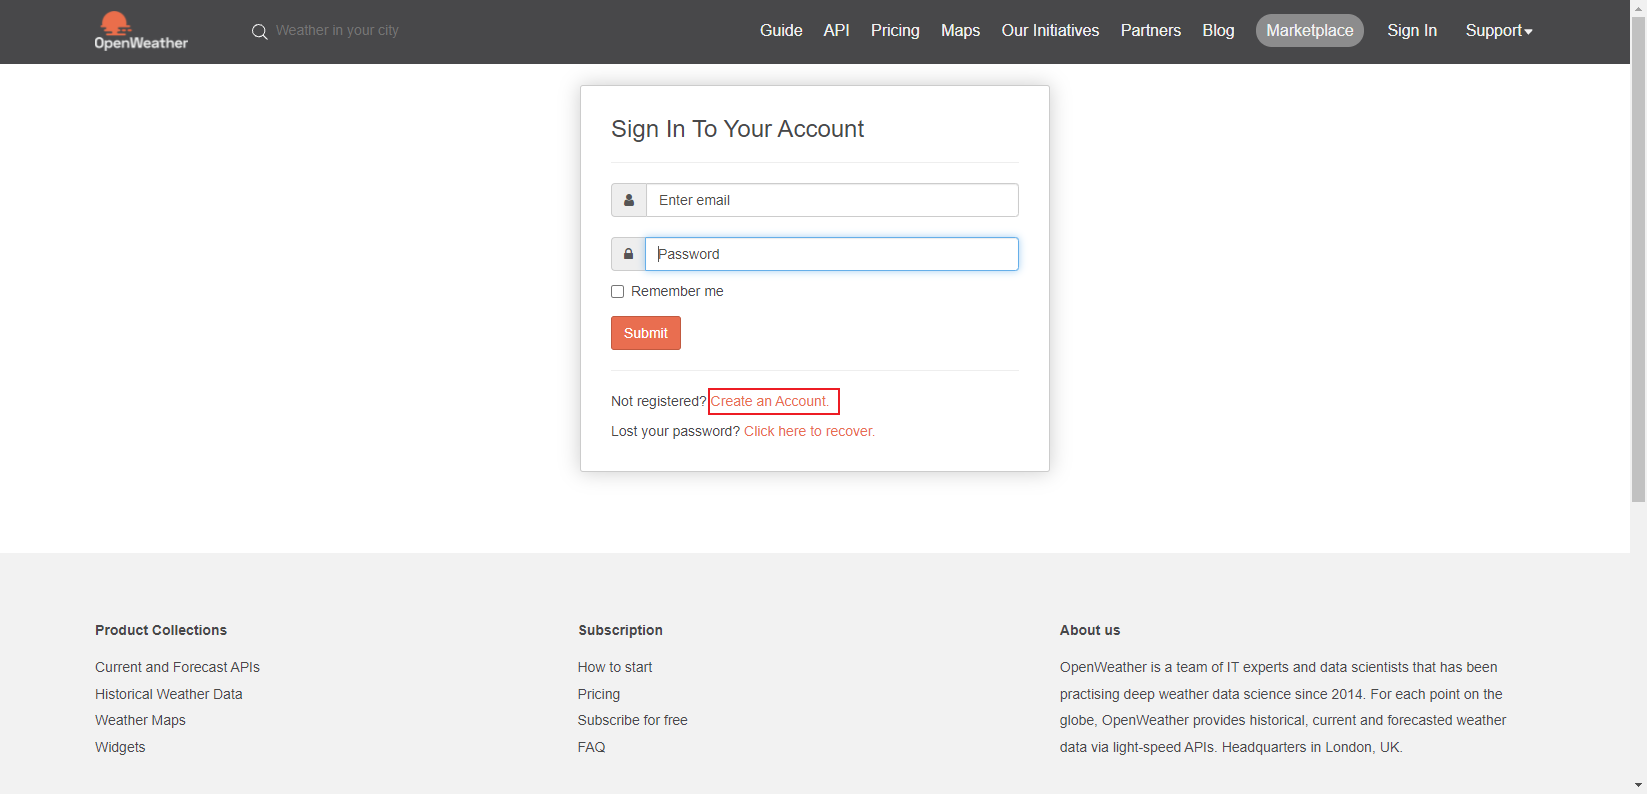
點擊 My API Keys 進入獲取API界面
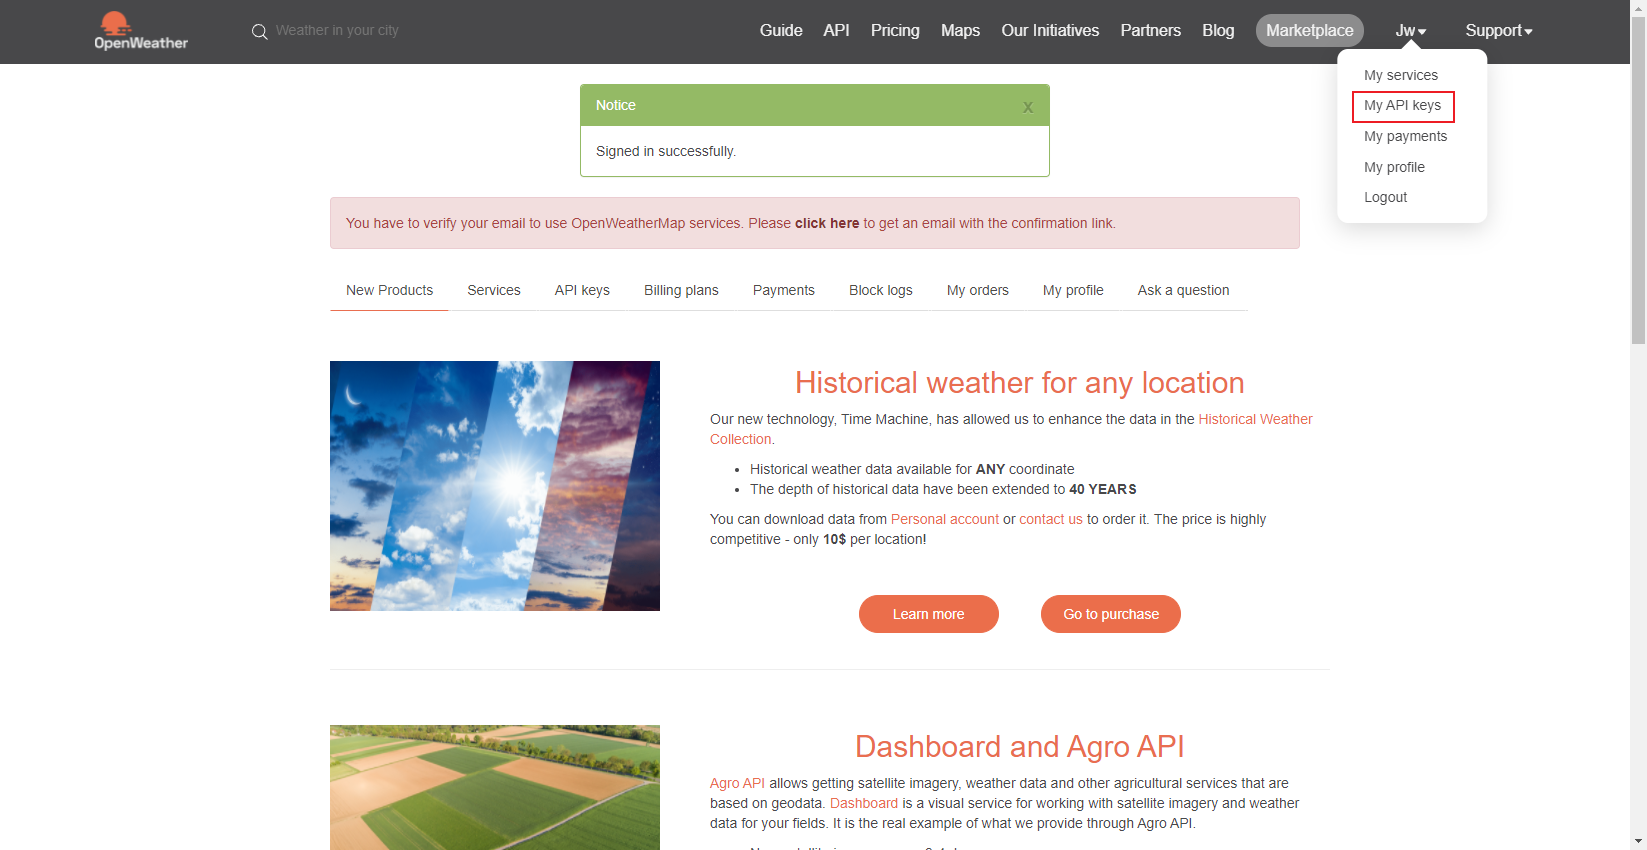
復制這里的Key(這個Key是你從OpenWeather上獲取天氣信息的唯一鑰匙)
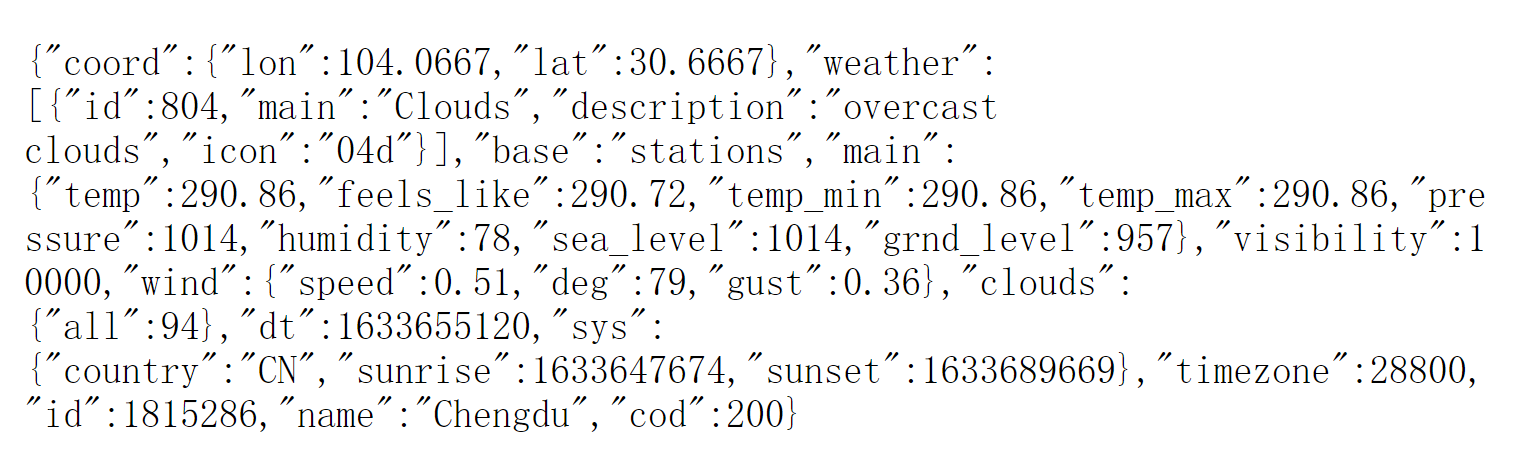
你可以將Key填入以下URL并填寫城市名以及它的國家以獲取城市天氣信息
http://api.openweathermap.org/data/2.5/weather?q=yourCityName,yourCountryCode&APPID=yourAPIkey
下面做個示例更換yourCityName你想要的數據的城市(比如成都),yourCountryCode與該城市的國家代碼(比如CN),填入yourAPIkey就是前面獲得的API密鑰,下面為中國成都加上API后的URL:
http://api.openweathermap.org/data/2.5/weather?q=ChengDu,CN&APPID=4de305d0a52ddaceaecba50a757e9968
將你的 URL 復制到您的瀏覽器中將返回一組與您當地天氣相對應的信息。編寫本教程的那天,我們獲得了以下有關中國成都的天氣的信息。
代碼
/*
該示例通過學習以了解如何獲得天氣信息
*/

#include
#include
#include

//修改WIFI名稱以及密碼
const char* ssid = "******";//WIFI名稱
const char* password = "******";//WIFI密碼

//填入你獲得的API Key
String openWeatherMapApiKey = "4de305d0a52ddaceaecba50a757e9968";
//示例:
//String openWeatherMapApiKey = "4de305d0a52ddaceaecba50a757e9968";

// 填寫你的城市名以及國家簡寫
String city = "ChengDu";
String countryCode = "CN";

//示例:
//String city = "ChengDu";
//String countryCode = "CN";

//設置獲取信息的間隔時間,以下用于測試所以設置為10秒
//您應當根據你需要獲取數據的網站,規定時間內訪問數據的次數上限來限制訪問時間的最小間隔
unsigned long lastTime = 0;
//設置每10分鐘獲得一次天氣數據
//unsigned long timerDelay = 600000;
//設置每10秒獲得一次天氣數據
unsigned long timerDelay = 10000;

String jsonBuffer;

void setup() {
  Serial.begin(115200);
  WiFi.begin(ssid, password);
  Serial.println("Connecting");

  //判斷WIFI是否連接
  while(WiFi.status() != WL_CONNECTED) {
    delay(500);
    Serial.print(".");
  }
  Serial.println("");
  Serial.print("Connected to WiFi network with IP Address: ");
  Serial.println(WiFi.localIP());
  Serial.println("Timer set to 10 seconds (timerDelay variable), it will take 10 seconds before publishing the first reading.");
}

void loop() {
  //發送HTTP獲取請求
  if ((millis() - lastTime) > timerDelay) {
    //檢測WIFI是否已經連接
    if(WiFi.status()== WL_CONNECTED){
      String serverPath = "http://api.openweathermap.org/data/2.5/weather?q=" + city + "," + countryCode + "&APPID=" + openWeatherMapApiKey;

      //將組合好的URL放入httpGETRequest函數中通過HTTP獲取請求以獲得文本
      jsonBuffer = httpGETRequest(serverPath.c_str());
      Serial.println(jsonBuffer);

      //將解析的Json對象值儲存在Jsonu緩沖區中
      JSONVar myObject = JSON.parse(jsonBuffer);

      //判斷解析是否成功
      if (JSON.typeof(myObject) == "undefined") {
        Serial.println("Parsing input failed!");
        return;
      }

      Serial.print("JSON object = ");
      Serial.println(myObject);
      Serial.print("Temperature: ");
      //獲取到的溫度其實是開氏度。
      //開氏度 = 攝氏度+273.15
      double c = myObject["main"]["temp"];
      c = c-273.15;
      Serial.println(c);
      Serial.print("Pressure: ");
      //myObject["main"]["pressure"]前為{}前的引號內容,后為讀取哪一個引號后數據
      Serial.println(myObject["main"]["pressure"]);
      Serial.print("Humidity: ");
      Serial.println(myObject["main"]["humidity"]);
      Serial.print("Wind Speed: ");
      Serial.println(myObject["wind"]["speed"]);
    }
    else {
      Serial.println("WiFi Disconnected");
    }
    lastTime = millis();
  }
}

String httpGETRequest(const char* serverName) {
  WiFiClient client;
  HTTPClient http;

  //連接網址
  http.begin(client, serverName);

  //發送HTTP站點請求
  int httpResponseCode = http.GET();

  //該數組用于儲存獲得的數據
  String payload = "{}";

  //將獲得的數據放入數組
  if (httpResponseCode>0) {
    Serial.print("HTTP Response code: ");
    Serial.println(httpResponseCode);
    payload = http.getString();
  }
  else {
    Serial.print("Error code: ");
    Serial.println(httpResponseCode);
  }

  //釋放資源
  http.end();

  //返回獲得的數據用于Json處理
  return payload;
}
Copy
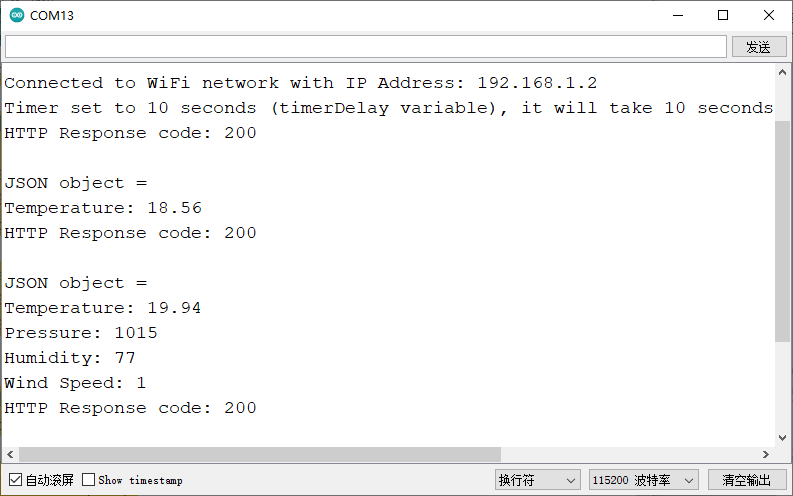
結果
成員函數
httpGETRequest(serverPath.c_str());
說明:解析獲取的對象
JSON.typeof(myObject)
說明:判斷對象是否為已被解析的格式
8.5 阿里云IoT
什么是阿里云
阿里云IoT致力于實現萬物互聯的美好世界,為生態合作伙伴提供基于云端一體化、安全物聯網基礎平臺等,在通過該平臺高效連接,管理設備的同時,其開放能力使合作伙伴更高效、低成本地構建各種創新的物聯網應用場景。 阿里云物聯網平臺為設備提供安全可靠的連接通信能力,向下連接海量設備,支撐設備數據采集上云;向上提供云端API,指令數據通過API調用下發至設備端,實現遠程控制。 此外阿里云IoT還提供了豐富的開發服務,用戶可以直接在該平臺上搭建Web可視化、移動應用、服務開發等開發服務,這降低了物聯網項目開發的難度,有了它,用戶無需任何專業的開發技巧也可開發自己的項目。
點擊下載DFRobot_Iot庫
- 阿里云IOT請點擊這里了解具體詳情,使用時需將示例中的#include "DFRobot_Aliyun.h"替換為#include "DFRobot_Iot.h"
8.6 SmartConfig 一鍵配網+自動重連
通過該代碼可使用樂鑫的ESP-TOUCH進行一鍵配網。
點擊下載安卓版
IOS版請在App Store搜索Espressif Esptouch
#include

void SmartConfig()
{
  WiFi.mode(WIFI_STA);
  Serial.println("\r\nWait for Smartconfig...");
  WiFi.beginSmartConfig();
  while (1)
  {
    Serial.print(".");
    delay(500);                   // wait for a second
    if (WiFi.smartConfigDone())
    {
      Serial.println("SmartConfig Success");
      Serial.printf("SSID:%s\r\n", WiFi.SSID().c_str());
      Serial.printf("PSW:%s\r\n", WiFi.psk().c_str());
      break;
    }
  }
}

bool AutoConfig()
{
    WiFi.begin();
    for (int i = 0; i < 20; i++)
    {
        int wstatus = WiFi.status();
        if (wstatus == WL_CONNECTED)
        {
            Serial.println("WIFI SmartConfig Success");
            Serial.printf("SSID:%s", WiFi.SSID().c_str());
            Serial.printf(", PSW:%s\r\n", WiFi.psk().c_str());
            Serial.print("LocalIP:");
            Serial.print(WiFi.localIP());
            Serial.print(" ,GateIP:");
            Serial.println(WiFi.gatewayIP());
            return true;
        }
        else
        {
            Serial.print("WIFI AutoConfig Waiting......");
            Serial.println(wstatus);
            delay(1000);
        }
    }
    Serial.println("WIFI AutoConfig Faild!" );
    return false;
}

void setup() {
  Serial.begin(115200);
  delay(100);
  if (!AutoConfig())
  {
      SmartConfig();
  }
}

void loop() {

}
Copy
常見問題
燒錄報錯
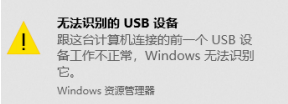
原因
如果Loop中延時過短或者不加延時會導致燒錄超時

錯誤的調用一些函數會導致計算機不能識別USB
解決辦法
- 將引腳9連接GND拉低,重新上電,再燒錄。
串口無打印
解決辦法
- 檢查USB CDC是否處于Enable狀態
- 使用其他的串口調試助手查看打印信息
更多問題及有趣的應用,可以 訪問論壇 進行查閱或發帖。
更多
- esp32-c3-mini-1 datasheet
- 原理圖
- 尺寸圖
- ESP32 Pico開發板開源
- 樂鑫ESP32-C3_技術規格書
- 樂鑫ESP32-C3_技術參考手冊
- 樂鑫ESP32-C3-MINI-1參考設計
- 樂鑫ESP32-C3-MINI-1U參考設計
- 樂鑫ESP32-C3-WROOM-02參考設計
- 樂鑫ESP32-C3-WROOM-02U參考設計
- 樂鑫ESP32-C3-MINI-1_&1U技術規格書
- 樂鑫ESP32-C3-WROOM-02_&02U技術規格書
- ESP32 S3 WROOM開發板
- ESP32開發板驅動下載 55次下載
- LoRa ESP32 TKoala開發板
- ESP32迷你開發板設計開源分享
- 荔枝糖RISC-V開發板原理圖 51次下載
- 基于esp32的開發板 105次下載
- 【AI技術支持】ESP32-C3模組AT+MQTT連接AWS證書問題處理 359次閱讀
- 【AI技術支持】ESP32-C3芯片/模組SPI-AT問題處理 530次閱讀
- GitHub Copilot+ESP開發實戰-SPI 484次閱讀
- GitHub Copilot+ESP開發實戰-I2C 536次閱讀
- ESP32-C3開發板設計指南 6666次閱讀
- ESP32-C3模塊使用問題集錦| C3的串口日志該如何禁用? 1078次閱讀
- 基于ESP32-S3的高性能開發板介紹 1w次閱讀
- 基于形式的高效 RISC-V 處理器驗證方法 693次閱讀
- ESP32-C3硬件定時器簡介及使用 4900次閱讀
- ESP32-C3 WIFI的工作模式 5207次閱讀
- 基于ESP32制造有趣的超級馬里奧主題時鐘 4783次閱讀
- RISC-V SIG成功將Chromium等桌面軟件適配到openEuler RISC-V 2275次閱讀
- 如何設計一個基于ESP32的微控制器開發板 3501次閱讀
- 基于RISC-V開發板的DDR演示的設計方案 2734次閱讀
- 5款追求極簡設計的ESP32-PICO-D4開發板 2.9w次閱讀
 上傳資料賺積分
下載排行
本周
- 1山景DSP芯片AP8248A2數據手冊
- 1.06 MB | 532次下載 | 免費
- 2RK3399完整板原理圖(支持平板,盒子VR)
- 3.28 MB | 339次下載 | 免費
- 3TC358743XBG評估板參考手冊
- 1.36 MB | 330次下載 | 免費
- 4DFM軟件使用教程
- 0.84 MB | 295次下載 | 免費
- 5元宇宙深度解析—未來的未來-風口還是泡沫
- 6.40 MB | 227次下載 | 免費
- 6迪文DGUS開發指南
- 31.67 MB | 194次下載 | 免費
- 7元宇宙底層硬件系列報告
- 13.42 MB | 182次下載 | 免費
- 8FP5207XR-G1中文應用手冊
- 1.09 MB | 178次下載 | 免費
本月
- 1OrCAD10.5下載OrCAD10.5中文版軟件
- 0.00 MB | 234315次下載 | 免費
- 2555集成電路應用800例(新編版)
- 0.00 MB | 33566次下載 | 免費
- 3接口電路圖大全
- 未知 | 30323次下載 | 免費
- 4開關電源設計實例指南
- 未知 | 21549次下載 | 免費
- 5電氣工程師手冊免費下載(新編第二版pdf電子書)
- 0.00 MB | 15349次下載 | 免費
- 6數字電路基礎pdf(下載)
- 未知 | 13750次下載 | 免費
- 7電子制作實例集錦 下載
- 未知 | 8113次下載 | 免費
- 8《LED驅動電路設計》 溫德爾著
- 0.00 MB | 6656次下載 | 免費
總榜
- 1matlab軟件下載入口
- 未知 | 935054次下載 | 免費
- 2protel99se軟件下載(可英文版轉中文版)
- 78.1 MB | 537798次下載 | 免費
- 3MATLAB 7.1 下載 (含軟件介紹)
- 未知 | 420027次下載 | 免費
- 4OrCAD10.5下載OrCAD10.5中文版軟件
- 0.00 MB | 234315次下載 | 免費
- 5Altium DXP2002下載入口
- 未知 | 233046次下載 | 免費
- 6電路仿真軟件multisim 10.0免費下載
- 340992 | 191187次下載 | 免費
- 7十天學會AVR單片機與C語言視頻教程 下載
- 158M | 183279次下載 | 免費
- 8proe5.0野火版下載(中文版免費下載)
- 未知 | 138040次下載 | 免費


 工商網監
工商網監
評論