 電子發燒友App


 創作
創作 發文章
發文章 發帖
發帖  提問
提問  發資料
發資料 發視頻
發視頻資料介紹
描述
這是我在 TensorFlow 下與 Google Summer of Code (GSoC) 合作的第二個項目。互聯網上沒有合適的文檔來構建自定義圖像識別 TinyML 模型,因此我的 GSoC 導師 Paul Ruiz 建議我嘗試解決它。您還可以通過以下方式構建圖像識別 TinyML 應用程序。快樂修補!
單擊此處查看我的第一個 GSoC 項目!
項目背后的想法:
我想解決一個變量較少的問題,因為有關如何使用相機模塊和處理其數據的文檔不是很好。我選擇構建一個 MNIST TinyML 模型,因為在這種情況下,我不需要擔心訓練數據集,它可以讓我專注于項目的重要部分,以啟動和運行項目。但是,既然我已經了解了構建自定義圖像識別項目的所有部分,我已經記錄了如何使用相機模塊收集訓練數據集。
博客的主題/基調?
我想警告您,這個博客可能有點難以理解。對此有一個正確的解釋:使用基于加速度計的應用程序,只需在串行監視器或繪圖儀上打印出一個軸的加速度計值,就可以很容易地進行健全性檢查。相比之下,對圖像識別應用程序進行健全性檢查至少要煩人 10 倍,因為檢查一段代碼是否正在執行所需的操作無法實時可視化。
一些評論
由于單元測試的復雜性,這篇博客可能有點難以理解。我想通過讀者的反饋來解決解釋中的任何差距。因此,請在下方評論您對嵌入式系統圖像識別相關的任何疑問和問題。
TinyML 有意義嗎?
我建議您通讀TinyML 書的作者 Pete Warden 撰寫的這篇精彩文章,以了解為什么在微控制器上運行機器學習模型是有意義的,并且是機器學習的未來。
即使 TinyML 有意義,圖像識別在 TinyML 上有意義嗎?
我們將在此處使用的 OV7670 相機輸出的完整 VGA(640×480 分辨率)對于當前的 TinyML 應用程序來說太大了。uTensor 通過使用 28×28 圖像的 MNIST 運行手寫檢測。TensorFlow Lite for Microcontrollers 示例中的人員檢測示例使用 96×96,這已經足夠了。即使是最先進的“Big ML”應用程序也通常只使用 320×320 的圖像。總之,在微型微控制器上運行圖像識別應用程序非常有意義
本教程簡而言之:
- 整合時間!
- 項目的問題/如何改進項目
- 構建您自己的圖像識別項目的一些有用建議
- 使用 OV7670 攝像頭模塊收集訓練數據
- 結論

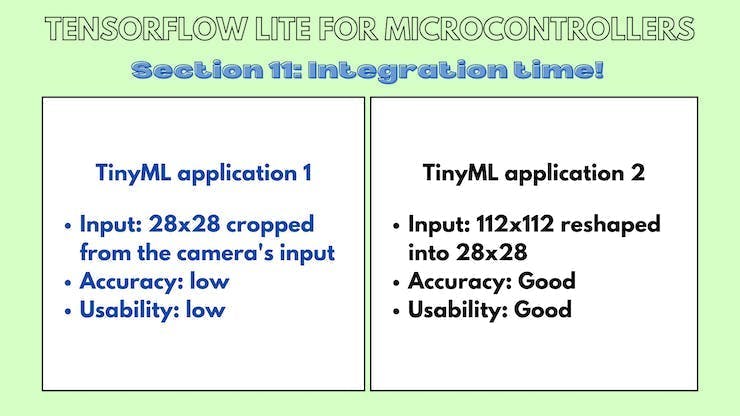
11.積分時間
11.a TinyML 模型:裁剪輸入數據
本小節的 Github 鏈接。
代碼解釋:
Camera.readFrame(pixels);
這行代碼從相機讀取一幀并將其存儲在像素數組中。
for(int i =0; i<28;i++){
    for(int j =0;j<28;j++){
       pixel = pixels[176*i +j];
      tft.drawPixel(i,j,pixel);
    }
  }
  delay(1000);
這些代碼行循環遍歷像素數組,從中裁剪出 28x28 圖像并將其顯示在屏幕上。
for(int i =0; i<28;i++){
    for(int j =0;j<28;j++){
       pixel = pixels[176*i +j];
       red   = ((pixel >> 11) & 0x1f) << 3;
       green = ((pixel >> 5) & 0x3f) << 2;
       blue  = ((pixel >> 0) & 0x1f) << 3;
      grayscale = (red + blue + green)/3 ;
      if(grayscale <128){
        grayscale =0;
      }
     tflInterpreter->input(0)->data.f[28*i+j] = grayscale / 255;
      Serial.println(grayscale);
    }
  }
這些代碼行循環遍歷像素數組,從中裁剪出 28x28 圖像并將其作為輸入發送到 TinyML 模型。
素描:
//MPU6050_model.ino
#include
#include "tensorflow/lite/micro/micro_error_reporter.h"
#include "tensorflow/lite/micro/micro_interpreter.h"
#include "tensorflow/lite/micro/micro_mutable_op_resolver.h"
#include "tensorflow/lite/schema/schema_generated.h"
#include "tensorflow/lite/version.h"
#include "model.h"
#include     // Core graphics library
#include  // Hardware-specific library for ST7735
#include
#include

const tflite::Model*  tflModel = nullptr;
tflite::ErrorReporter*  tflErrorReporter = nullptr;
TfLiteTensor* tflInputTensor = nullptr;
TfLiteTensor* tflOutputTensor = nullptr;
tflite::MicroInterpreter* tflInterpreter = nullptr;

#define TFT_CS        A7
#define TFT_RST        7 // Or set to -1 and connect to Arduino RESET pin
#define TFT_DC         A6

constexpr int tensorArenaSize = 140 * 1024;
uint8_t tensorArena[tensorArenaSize];
float out[10];

uint16_t pixels[176*144];
uint16_t color, pixel;
uint8_t red, blue, green;
float grayscale;

Adafruit_ST7735 tft = Adafruit_ST7735(TFT_CS, TFT_DC, TFT_RST);

void setup() {

  Serial.begin(115200);
  while (!Serial)
    delay(10);

  tft.initR(INITR_BLACKTAB);
  delay(100);
   if (!Camera.begin(QCIF, RGB565, 1)) {
    Serial.println("Failed to initialize camera!");
    while (1);
  }
  Serial.println(F("Initialized"));

  static tflite::MicroErrorReporter micro_error_reporter;
  tflErrorReporter = μ_error_reporter;

   tflModel = tflite::GetModel(model);
   if (tflModel->version() != TFLITE_SCHEMA_VERSION) {
   TF_LITE_REPORT_ERROR(tflErrorReporter,
        "Model provided is schema version %d not equal "
        "to supported version %d.",
        tflModel->version(), TFLITE_SCHEMA_VERSION);
    return;
  }

  static tflite::MicroMutableOpResolver<6> micro_op_resolver;
  micro_op_resolver.AddMaxPool2D();
  micro_op_resolver.AddConv2D();
  micro_op_resolver.AddDepthwiseConv2D();
  micro_op_resolver.AddFullyConnected();
  micro_op_resolver.AddReshape();
  micro_op_resolver.AddSoftmax();

  static tflite::MicroInterpreter static_interpreter(tflModel, micro_op_resolver, tensorArena, tensorArenaSize, tflErrorReporter);
  tflInterpreter = &static_interpreter;

  TfLiteStatus allocate_status = tflInterpreter->AllocateTensors();
  if (allocate_status != kTfLiteOk) {
    TF_LITE_REPORT_ERROR(tflErrorReporter, "AllocateTensors() failed");
    return;
  }
  tflInputTensor = tflInterpreter->input(0);

  tft.fillScreen(ST77XX_BLACK);
  delay(100);

  tft.fillScreen(ST77XX_BLACK);


}

void loop() {
  Camera.readFrame(pixels);

  for(int i =0; i<28;i++){
    for(int j =0;j<28;j++){
       pixel = pixels[176*i +j];
      tft.drawPixel(i,j,pixel);
    }
  }
  delay(1000);
  for(int i =0; i<28;i++){
    for(int j =0;j<28;j++){
       pixel = pixels[176*i +j];
       red   = ((pixel >> 11) & 0x1f) << 3;
       green = ((pixel >> 5) & 0x3f) << 2;
       blue  = ((pixel >> 0) & 0x1f) << 3;
      grayscale = (red + blue + green)/3 ;
      if(grayscale <128){
        grayscale =0;
      }
     tflInterpreter->input(0)->data.f[28*i+j] = grayscale / 255;
      Serial.println(grayscale);
    }
  }

  delay(1000);
  TfLiteStatus invokeStatus = tflInterpreter->Invoke();
  out[0] = tflInterpreter->output(0)->data.f[0];
  out[1] = tflInterpreter->output(0)->data.f[1];
  out[2] = tflInterpreter->output(0)->data.f[2];
  out[3] = tflInterpreter->output(0)->data.f[3];
  out[4] = tflInterpreter->output(0)->data.f[4];
  out[5] = tflInterpreter->output(0)->data.f[5];
  out[6] = tflInterpreter->output(0)->data.f[6];
  out[7] = tflInterpreter->output(0)->data.f[7];
  out[8] = tflInterpreter->output(0)->data.f[8];
  out[9] = tflInterpreter->output(0)->data.f[9];

    float maxVal = out[0];
  int maxIndex = 0;
  for(int k =0; k < 10;k++){
    if (out[k] > maxVal) {
         maxVal = out[k];
         maxIndex = k;
      }
  }
  Serial.print("Number ");
  Serial.print(maxIndex);
  Serial.println(" detected");
  Serial.print("Confidence: ");
  Serial.println(maxVal);

}
11.b TinyML 模型:重塑輸入數據
本小節的 Github 鏈接。
代碼解釋:
Camera.readFrame(pixels);
這行代碼從相機讀取一幀并將其存儲在像素數組中。
for(int i =0; i<112;i++){
    for(int j =0;j<112;j++){

      tft.drawPixel(i,j,pixels[176*i+j]);
      Serial.print("");
    }
  }
這些代碼行循環遍歷像素數組,從中裁剪出 112x112 圖像并將其顯示在屏幕上。
Serial.println("");
  for(int i =0; i< 28; i++)
   {
    for(int j =0; j < 28; j++)
    {
       int sum =0;
       for(int k =0; k<4;k++)
       {
        for(int l =0; l<4; l++)
        {
          sum += pixels[4*(176*i+j) + 176 * k + l];
        }
       }
      sum = sum /16;
      //arr1[i*28+j] = sum;
      tflInterpreter->input(0)->data.f[28*i+j] = float(sum / 255.0);
      Serial.print(sum);
      Serial.print(", ");
    }
    Serial.println("");
 }
這些代碼行通過像素數組循環裁剪 112x112 圖像,將其重新整形為 28x28 圖像,并將其發送到 TinyML 模型。
素描:
//MPU6050_model.ino
#include
#include "tensorflow/lite/micro/micro_error_reporter.h"
#include "tensorflow/lite/micro/micro_interpreter.h"
#include "tensorflow/lite/micro/micro_mutable_op_resolver.h"
#include "tensorflow/lite/schema/schema_generated.h"
#include "tensorflow/lite/version.h"
#include "model.h"
#include     // Core graphics library
#include  // Hardware-specific library for ST7735
#include
#include

const tflite::Model*  tflModel = nullptr;
tflite::ErrorReporter*  tflErrorReporter = nullptr;
TfLiteTensor* tflInputTensor = nullptr;
TfLiteTensor* tflOutputTensor = nullptr;
tflite::MicroInterpreter* tflInterpreter = nullptr;

#define TFT_CS        A7
#define TFT_RST        7 // Or set to -1 and connect to Arduino RESET pin
#define TFT_DC         A6

constexpr int tensorArenaSize = 140 * 1024;
uint8_t tensorArena[tensorArenaSize];
float out[10];

uint16_t pixels[176*144];
uint16_t color, pixel;
uint8_t red, blue, green;
int grayscale;

Adafruit_ST7735 tft = Adafruit_ST7735(TFT_CS, TFT_DC, TFT_RST);

void setup() {

  Serial.begin(9600);
  while (!Serial)
    delay(10);

  tft.initR(INITR_BLACKTAB);
  delay(1000);
   if (!Camera.begin(QCIF, RGB565, 1)) {
    Serial.println("Failed to initialize camera!");
    while (1);
  }
  Serial.println(F("Initialized"));

  static tflite::MicroErrorReporter micro_error_reporter;
  tflErrorReporter = μ_error_reporter;

   tflModel = tflite::GetModel(model);
   if (tflModel->version() != TFLITE_SCHEMA_VERSION) {
   TF_LITE_REPORT_ERROR(tflErrorReporter,
        "Model provided is schema version %d not equal "
        "to supported version %d.",
        tflModel->version(), TFLITE_SCHEMA_VERSION);
    return;
  }

  static tflite::MicroMutableOpResolver<6> micro_op_resolver;
  micro_op_resolver.AddMaxPool2D();
  micro_op_resolver.AddConv2D();
  micro_op_resolver.AddDepthwiseConv2D();
  micro_op_resolver.AddFullyConnected();
  micro_op_resolver.AddReshape();
  micro_op_resolver.AddSoftmax();

  static tflite::MicroInterpreter static_interpreter(tflModel, micro_op_resolver, tensorArena, tensorArenaSize, tflErrorReporter);
  tflInterpreter = &static_interpreter;

  TfLiteStatus allocate_status = tflInterpreter->AllocateTensors();
  if (allocate_status != kTfLiteOk) {
    TF_LITE_REPORT_ERROR(tflErrorReporter, "AllocateTensors() failed");
    return;
  }
  tflInputTensor = tflInterpreter->input(0);

  tft.fillScreen(ST77XX_BLACK);
  delay(100);


}

void loop() {
  Camera.readFrame(pixels);
  tft.fillScreen(ST77XX_BLACK);
  for(int i =0; i<112;i++){
    for(int j =0;j<112;j++){

      tft.drawPixel(i,j,pixels[176*i+j]);
      Serial.print("");
    }
  }
 // delay(1000);
  for(int i =0; i<112;i++){
    for(int j =0;j<112;j++){
       pixel = pixels[176*i +j];
       red   = ((pixel >> 11) & 0x1f) << 3;
       green = ((pixel >> 5) & 0x3f) << 2;
       blue  = ((pixel >> 0) & 0x1f) << 3;
      grayscale = (red + blue + green)/3 ;
      if(grayscale <160){
        grayscale =0;
      }
      pixels[176*i +j] = grayscale;

     //tflInterpreter->input(0)->data.f[28*i+j] = grayscale / 255;
    }
    }

  Serial.println("");
  for(int i =0; i< 28; i++)
   {
    for(int j =0; j < 28; j++)
    {
       int sum =0;
       for(int k =0; k<4;k++)
       {
        for(int l =0; l<4; l++)
        {
          sum += pixels[4*(176*i+j) + 176 * k + l];
        }
       }
      sum = sum /16;
      //arr1[i*28+j] = sum;
      tflInterpreter->input(0)->data.f[28*i+j] = float(sum / 255.0);
      Serial.print(sum);
      Serial.print(", ");
    }
    Serial.println("");
   }

  delay(1000);
  TfLiteStatus invokeStatus = tflInterpreter->Invoke();
  out[0] = tflInterpreter->output(0)->data.f[0];
  out[1] = tflInterpreter->output(0)->data.f[1];
  out[2] = tflInterpreter->output(0)->data.f[2];
  out[3] = tflInterpreter->output(0)->data.f[3];
  out[4] = tflInterpreter->output(0)->data.f[4];
  out[5] = tflInterpreter->output(0)->data.f[5];
  out[6] = tflInterpreter->output(0)->data.f[6];
  out[7] = tflInterpreter->output(0)->data.f[7];
  out[8] = tflInterpreter->output(0)->data.f[8];
  out[9] = tflInterpreter->output(0)->data.f[9];

    float maxVal = out[0];
  int maxIndex = 0;
  for(int k =0; k < 10;k++){
    if (out[k] > maxVal) {
         maxVal = out[k];
         maxIndex = k;
      }
  }
  Serial.print("Number ");
  Serial.print(maxIndex);
  Serial.println(" detected");
  Serial.print("Confidence: ");
  Serial.println(maxVal);

}
12.項目存在的問題/如何改進項目
12.a LCD顯示的色彩空間與ov7670不匹配
當顯示來自相機實時饋送的圖像時,會彈出各種顏色漸變,我不完全確定為什么會發生這種情況,但我猜測這是由于轉換之間的顏色空間信息丟失所致。

12.b LCD 在打印每個像素后刷新
我使用的方法基本上是逐像素打印。Adafruit_st7735 的問題在于它會在打印像素后自動發送緩沖區。我認為在庫中注釋掉發送緩沖區的代碼行是一個簡單的修復。
12.c相機指向哪里
構建此示例時的主要痛點之一是試圖找出相機指向的位置。如果一塊小的 3D 打印矩形塑料片可以幫助大致觀察相機所注視的位置,這將在收集訓練數據和測試應用程序時大有幫助。

?

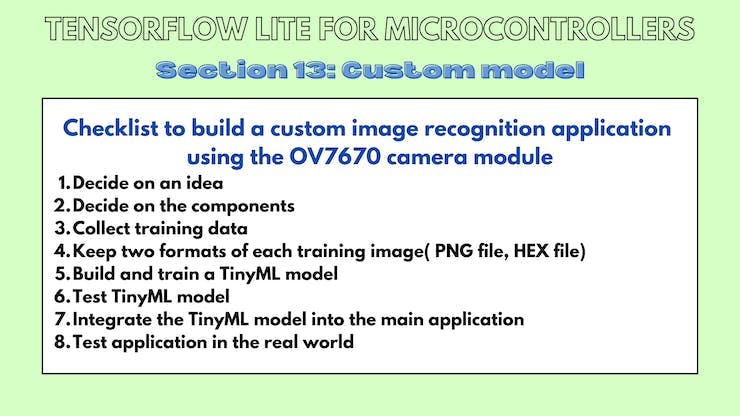
13. 構建您自己的圖像識別項目的一些有用建議
為什么是這個部分?
您可能已經對構建此應用程序的數千個步驟和彎路感到困惑,因此這里列出了可簡化構建下一個圖像識別應用程序的事項。
- 決定一個想法
- 決定組件
- 收集訓練數據
- 每個訓練圖像保留兩種格式(PNG文件,HEX文件)
- 構建和訓練 TinyML 模型
- 測試 TinyML 模型
- 將 TinyML 模型集成到主應用程序中
- 在現實世界中測試應用程序
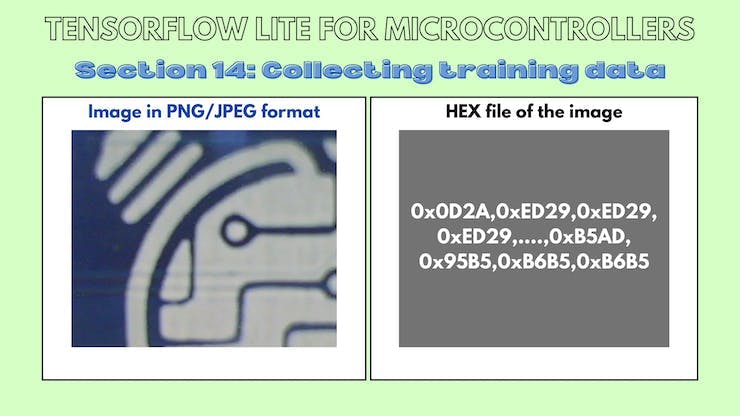
14.使用OV7670攝像頭模塊采集訓練數據
14.a 草圖
此草圖從相機讀取幀并在串行監視器上輸出 RGB565 值。
/*
  OV767X - Camera Test Pattern

  This sketch waits for the letter 'c' on the Serial Monitor,
  it then reads a frame from the OmniVision OV7670 camera and
  prints the data to the Serial Monitor as a hex string.

  The website https://rawpixels.net - can be used the visualize the data:
    width: 176
    height: 144
    RGB565
    Little Endian

  Circuit:
    - Arduino Nano 33 BLE board
    - OV7670 camera module:
      - 3.3 connected to 3.3
      - GND connected GND
      - SIOC connected to A5
      - SIOD connected to A4
      - VSYNC connected to 8
      - HREF connected to A1
      - PCLK connected to A0
      - XCLK connected to 9
      - D7 connected to 4
      - D6 connected to 6
      - D5 connected to 5
      - D4 connected to 3
      - D3 connected to 2
      - D2 connected to 0 / RX
      - D1 connected to 1 / TX
      - D0 connected to 10

  This example code is in the public domain.
*/

#include

unsigned short pixels[176 * 144]; // QCIF: 176x144 X 2 bytes per pixel (RGB565)

void setup() {
  Serial.begin(9600);
  while (!Serial);

  Serial.println("OV767X Camera Capture");
  Serial.println();

  if (!Camera.begin(QCIF, RGB565, 1)) {
    Serial.println("Failed to initialize camera!");
    while (1);
  }

  Serial.println("Camera settings:");
  Serial.print("\twidth = ");
  Serial.println(Camera.width());
  Serial.print("\theight = ");
  Serial.println(Camera.height());
  Serial.print("\tbits per pixel = ");
  Serial.println(Camera.bitsPerPixel());
  Serial.println();

  Serial.println("Send the 'c' character to read a frame ...");
  Serial.println();
}

void loop() {
  if (Serial.read() == 'c') {
    Serial.println("Reading frame");
    Serial.println();
    Camera.readFrame(pixels);

    int numPixels = Camera.width() * Camera.height();

    for (int i = 0; i < numPixels; i++) {
        unsigned short p = pixels[i];
        if (p < 0x1000) {
          Serial.print('0');
        }
        if (p < 0x0100) {
         Serial.print('0');
        }
        if (p < 0x0010) {
          Serial.print('0');
        }
        Serial.print(p, HEX);
      }
  }
}
15.結論
我感謝我的 GSoC 導師 Paul Ruiz,他在整個項目中指導我!
?
- 帶有OV7670相機模塊的TinyML
- 基于OV7670的視覺捕捉系統 3次下載
- Arduino Nano 33 BLE OV7670相機擴展板
- 教程第3部分:帶有OV7670攝像頭模塊的TinyML
- 教程第2部分:帶有OV7670攝像頭模塊的TinyML
- 基于stm32控制OV7670攝像頭 136次下載
- STM32單片機移植帶有FIFO攝像頭的OV7670 111次下載
- OV7670的驅動程序和模塊經典資料合集免費下載 56次下載
- 使用STM32單片機驅動OV7670進行圖像的采集的程序和工程文件免費下載 47次下載
- OV7670攝像頭模塊的資料合集免費下載 124次下載
- OV7670模塊的詳細資料合集免費下載 32次下載
- ov7670電路原理圖 0次下載
- OV7670使用說明和程序講解-參考精英板 77次下載
- OV7670模塊(資料總包) 217次下載
- OV7670/OV7171 CMOS VGA (640x48
- 雙極踏腳車(第二部分):微步和衰減模式 656次閱讀
- ADC數字下變頻器:抽取濾波器和ADC混疊,第2部分 2051次閱讀
- ADC眼中的虛擬評估,第2部分 822次閱讀
- 邊緣智能第1部分:邊緣節點 1251次閱讀
- 如何利用TinyML實現語音識別機器人車的設計 2325次閱讀
- 實時數據體系建設的總體方案的三部分 6771次閱讀
- 微雪電子OV7670數碼攝像頭模塊簡介 4644次閱讀
- 實時控制技術滿足實時工業通信發展的需求 —— 第2部分 1074次閱讀
- JESD204C入門第2部分:新特性及其內容 6517次閱讀
- DC/DC轉換器傳導EMI - 第2部分,噪聲傳播和濾波 3338次閱讀
- 電壓檢測器、監控器和高級監控各種功能介紹:第1部分 5094次閱讀
- 一文看懂ov7620與ov7670的區別 5.1w次閱讀
- 關于如何「訓練」神經網絡的一部分經驗與見解 7633次閱讀
- 無源元件并非真的“無源”:第1部分——電容 2519次閱讀
- 混合信號系統接地揭秘之第二部分 1712次閱讀

 上傳資料賺積分
下載排行
本周
- 1山景DSP芯片AP8248A2數據手冊
- 1.06 MB | 532次下載 | 免費
- 2RK3399完整板原理圖(支持平板,盒子VR)
- 3.28 MB | 339次下載 | 免費
- 3TC358743XBG評估板參考手冊
- 1.36 MB | 330次下載 | 免費
- 4DFM軟件使用教程
- 0.84 MB | 295次下載 | 免費
- 5元宇宙深度解析—未來的未來-風口還是泡沫
- 6.40 MB | 227次下載 | 免費
- 6迪文DGUS開發指南
- 31.67 MB | 194次下載 | 免費
- 7元宇宙底層硬件系列報告
- 13.42 MB | 182次下載 | 免費
- 8FP5207XR-G1中文應用手冊
- 1.09 MB | 178次下載 | 免費
本月
- 1OrCAD10.5下載OrCAD10.5中文版軟件
- 0.00 MB | 234315次下載 | 免費
- 2555集成電路應用800例(新編版)
- 0.00 MB | 33566次下載 | 免費
- 3接口電路圖大全
- 未知 | 30323次下載 | 免費
- 4開關電源設計實例指南
- 未知 | 21549次下載 | 免費
- 5電氣工程師手冊免費下載(新編第二版pdf電子書)
- 0.00 MB | 15349次下載 | 免費
- 6數字電路基礎pdf(下載)
- 未知 | 13750次下載 | 免費
- 7電子制作實例集錦 下載
- 未知 | 8113次下載 | 免費
- 8《LED驅動電路設計》 溫德爾著
- 0.00 MB | 6656次下載 | 免費
總榜
- 1matlab軟件下載入口
- 未知 | 935054次下載 | 免費
- 2protel99se軟件下載(可英文版轉中文版)
- 78.1 MB | 537798次下載 | 免費
- 3MATLAB 7.1 下載 (含軟件介紹)
- 未知 | 420027次下載 | 免費
- 4OrCAD10.5下載OrCAD10.5中文版軟件
- 0.00 MB | 234315次下載 | 免費
- 5Altium DXP2002下載入口
- 未知 | 233046次下載 | 免費
- 6電路仿真軟件multisim 10.0免費下載
- 340992 | 191187次下載 | 免費
- 7十天學會AVR單片機與C語言視頻教程 下載
- 158M | 183279次下載 | 免費
- 8proe5.0野火版下載(中文版免費下載)
- 未知 | 138040次下載 | 免費


 工商網監
工商網監
評論