 電子發(fā)燒友App


 創(chuàng)作
 發(fā)文章
 發(fā)帖
  提問
提問  發(fā)資料
 發(fā)視頻
資料介紹
描述
在本教程結束時,您將能夠檢測運動及其方向,并根據(jù)檢測到的運動觸發(fā)中斷。
BGT60LTR11AIP 防護罩
我們的防護罩使用 60GHz 雷達技術來檢測 7m 范圍內的運動及其方向。它提供僅 20x6.25mm 的小尺寸和低功耗,為許多應用創(chuàng)造了創(chuàng)新、直觀的傳感功能。小型運動傳感器集成天線并在內部處理原始雷達信號,無需任何外部微控制器即可操作設備。

僅使用四個引腳就可以非常輕松地與防護罩連接:
- 接地
- 輸入電壓 (1.5V - 5V)
- P out (= 運動方向)
- T out (= 運動檢測)
帶有 GND 和 Vin(1.5V 至 5V)的電源可以連接到微控制器引腳 Vcc 和 GND。相位檢測輸出 (P out) 引腳表示方向,而目標檢測輸出 (T out) 引腳表示雷達傳感器檢測到的運動。BGT60 可以輕松插入 Arduino MKR1000 板的接頭(Vcc、GND、T out - A1 和 P out - A2)
用于 Arduino 的英飛凌 60GHz 庫
我們?yōu)?60GHz 雷達屏蔽開發(fā)的庫稱為“radar-bgt60”。使用 Arduino IDE,通過 Sketch -> Include library -> Library Manager 安裝 Radar 庫。雷達庫包括八個基本 API 函數(shù),我們稍后會在各種示例中使用它們。
- Bgt60() - Arduino Bgt60 對象的構造函數(shù)
- ~Bgt60() - Arduino Bgt60 對象的析構函數(shù)
- init() - 初始化 Bgt60 類對象
- deinit() - 取消初始化 Bgt60 類對象
- getMotion() - 讀出目標檢測引腳
- getDirection() - 讀出相位檢測引腳
- enableInterrupt() - 啟用硬件中斷
- disableInterrupt() - 禁用硬件中斷
在我們的Arduino API 描述中找到更多詳細信息。
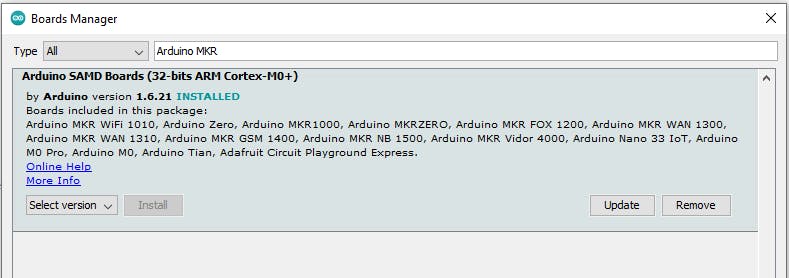
要將草圖上傳到您的板上,您必須先選擇所需的平臺。在此示例中,我們使用 Arduino MKR1000 板。轉到工具 -> 董事會 -> 董事會經理。在那里你搜索你的“Arduino MKR1000”,你會找到需要安裝的包“Arduino SAMD Boards”。
為了現(xiàn)在上傳草圖,您還必須選擇正確的 COM 端口。有一個非常簡單的方法可以做到這一點。拔下連接的 Arduino,然后檢查Tool -> Port下可用的 COM-Ports 。現(xiàn)在連接您的 Arduino 并再次檢查端口。現(xiàn)在你應該看到一個新的,以前沒有的。這是正確的,請選擇它。
運動
在第一個簡單示例中,我們想使用 getMotion() 函數(shù)來識別傳感器環(huán)境中的運動。從文件 -> 示例 -> 雷達-bgt60 -> 運動檢測中獲取代碼。
/*!
* \name motionDetection
* \author Infineon Technologies AG
* \copyright 2021 Infineon Technologies AG
* \brief This example detects the motion of an object
* \details This example demonstrates how to detect a moving object while the
* BGT60LTR11AIP shield is connected to Arduino compatible
* boards using polling method.
*
* Connection details:
* --------------------------------------------------
* Pin on shield Connected to pin on Arduino
* --------------------------------------------------
* TD depends on Arduino board
* PD depends on Arduino board
* GND GND
* Vin VCC (3.3V or 5V - depends on Arduino board)
* --------------------------------------------------
*
* Decoding on-board LED output of BGT60LTR11AIP shield:
*
* - Red LED indicates the output of direction of motion once target is detected (PD)
* ---------------------------------------------
* LED State Output explanation
* ---------------------------------------------
* Red ON Departing target
* OFF Approaching target
* ---------------------------------------------
*
* - Green LED indicates the output of target in motion detection (TD)
* ---------------------------------------------
* LED State Output explanation
* ---------------------------------------------
* Green ON Moving target detected
* OFF No target detected
* ---------------------------------------------
*
* SPDX-License-Identifier: MIT
*/
#include
沒有注釋,代碼只有 50 行。在我們逐步討論之后,我們將上傳示例。
#include
首先,我們包含了來自 Arduino 的主庫和用于 BGT60 雷達傳感器的庫。
#ifndef TD
#define TD  15
#endif

#ifndef PD
#define PD  16
#endif

Bgt60Ino radarShield(TD, PD);
if 條件檢查是否定義了 TD 和 PD。它們代表我們的引腳相位檢測和硬件的目標檢測。在我們的例子中,它們已經設置好了,因為我們之前定義了支持的平臺 Arduino MKR1000。如果我們選擇另一個微控制器(不是來自 Arduino),這一步是指定未知引腳的必要步驟。行“Bgt60Ino radarShield(TD, PD);” 使用教練用兩個針創(chuàng)建一個雷達對象。
void setup()
{
    Serial.begin(9600);
    // Configures the GPIO pins to input mode
    Error_t init_status = radarShield.init();
    if (OK != init_status) {
        Serial.println("Init failed.");
    }
    else {
        Serial.println("Init successful.");
    }
}
在函數(shù)“setup”中是我們程序的初始化。當我們上傳草圖時它只執(zhí)行一次。“Serial.begin()”函數(shù)設置波特率,它定義了向監(jiān)視器發(fā)送消息的傳輸速度。現(xiàn)在我們使用庫的 API 函數(shù)之一“intit()”來初始化之前的 Bgt60 類對象“radarShield”。因此,引腳將設置為輸入模式。如果初始化成功,函數(shù)返回“OK”。為了以用戶身份查看初始化是否有效,我們打印 init 函數(shù)的結果。
void loop()
{
    Bgt60::Motion_t motion = Bgt60::NO_MOTION;

    Error_t err = radarShield.getMotion(motion);
“l(fā)oop()”函數(shù)是代碼的一部分,它一遍又一遍地重復。首先,我們拒絕變量“運動”以保存檢測到的運動。有兩種可能的狀態(tài)。一開始我們將其設置為“Bgt60::NO_MOTION”。
在下一行中,我們在“radarShield”對象上使用函數(shù)“getMotion()”。該函數(shù)的傳遞參數(shù)是運動變量。當傳感器檢測到運動時,該函數(shù)將變量設置為“Bgt60::MOTION” . 如果整個函數(shù)成功,“OK”將保存在“Error_t”變量中。
if(err == OK)
    {
        switch (motion)
        {
            case Bgt60::MOTION:
                Serial.println("Target in motion detected!");
                break;
            case Bgt60::NO_MOTION:
                Serial.println("No target in motion detected.");
                break;
        }
    }
    else {
        Serial.println("Error occurred!");
    }
    delay(500);
}
在最后一部分,我們檢查函數(shù)是否成功。在這種情況下,如果變量“motion”是“Bgt60::MOTION”或“Bgt60::NO_MOTION”,我們將啟動 switch case 條件并打印解決方案。最后我們開始一個延遲,它代表兩個循環(huán)段落之間的暫停。

現(xiàn)在我們了解了整個代碼并準備上傳它。如果到目前為止還沒有完成,您可以編譯按鈕 1 上的代碼。使用 2 將草圖上傳到板上。要查看我們打印的內容以及傳感器是否檢測到運動,您必須在 3 上打開顯示器。
當周圍的一切完全靜止時,您可以在監(jiān)視器上讀取“未檢測到運動中的目標”。但是,如果您在距離傳感器 5 米的范圍內有運動,您的輸出就是“檢測到運動中的目標!”。
方向
在成功檢測到運動之后,我們還想知道這個運動的方向。因此,庫、對象創(chuàng)建和設置功能完全相同。
Bgt60::Direction_t direction = Bgt60::NO_DIR;

Error_t err = radarShield.getDirection(direction);
循環(huán)中的代碼也和之前類似,但現(xiàn)在我們?yōu)榉较蜃觥?/font>首先我們需要一個變量來存儲方向。其次,我們使用 API 函數(shù)“getDirection()”。
if (err == OK)
{
    switch (direction)
    {
        case Bgt60::APPROACHING:
            Serial.println("Target is approaching!");
            break;
        case Bgt60::DEPARTING:
            Serial.println("Target is departing!");
            break;
        case Bgt60::NO_DIR:
            Serial.println("Direction cannot be determined since no motion was detected!");
            break;
    }
}
else{
Serial.println("Error occurred!");
}
方向變量有三種可能的狀態(tài)。我們有兩個不同的方向:接近和離開。也有可能,我們根本沒有運動,因此沒有方向。如果 API 函數(shù)有效,它會為錯誤變量返回“O??K”。只有當它成功時,我們才會開始一個 switch-case 條件,我們在離開、接近和無方向之間做出決定。每次延遲后都會打印當前狀態(tài)。

可能的監(jiān)視器輸出在上圖中。要創(chuàng)建它,您首先將手移向傳感器,然后再移開。
打斷
作為最后一個例子,讓我們展示如何使用中斷功能。當您啟用中斷時,處理器會停止其當前活動并保存其狀態(tài)。相反,它同時執(zhí)行一個稱為中斷服務程序 (ISR) 的功能。在我們的示例中,當檢測到的運動或方向的狀態(tài)發(fā)生變化時會觸發(fā)中斷。因此,代碼中的庫和對象創(chuàng)建仍然與上兩個示例中的相同。
init_status = radarShield.enableInterrupt(cBackFunct);

if (OK != init_status)
    Serial.println("Interrupt init failed.");
else
    Serial.println("Interrupt init successful.");
}
在 setup 函數(shù)中,我們像以前一樣設置波特率并初始化我們的對象。此外,我們現(xiàn)在激活中斷。函數(shù)“enableInterrupt()”打開硬件中斷。“cBackFunct”函數(shù)從中斷開始。此外,我們得到一個狀態(tài)變量,我們可以使用它檢查啟用中斷的 API 函數(shù)是否有效。
/* Definition and initialization of the interrupt active flag */
volatile static bool intActive = false;

/* User defined callback function */
void cBackFunct(void)
{
    if ( ! intActive ) {

        /* Set the interrupt active flag to avoid parallel execution of this function multiple times. */
        intActive = true;

        /* Create variables to store the state of the motion as well as the direction */
        Bgt60::Motion_t motion = Bgt60::NO_MOTION;
        Bgt60::Direction_t direction = Bgt60::NO_DIR;

        /* Now check what happend, first check if a motion was detected or is
not detected anymore */
        Error_t err = radarShield.getMotion(motion);

        /* Check if API execution is successful */
        if(OK == err)
        {
            /* In case motion is detected */
            if(Bgt60::MOTION == motion){
                Serial.println("Target in motion was detected!");

                /* Check the direction of the detected motion */
                err = radarShield.getDirection(direction);
                if(OK == err)
                {
                    /* In case the target is approaching */
                    if(Bgt60::APPROACHING == direction){
                        Serial.println("The target is approaching!");
                    }
                    /* In case the target is departing */
                    else{
                        Serial.println("The target is departing!");
                    }
                }
            /* API execution returned error */
            else{
                Serial.println("Error has occurred during the determination of the direction!");
            }
        }
        /* No motion is detected */
        else{
            Serial.println("No target in motion detected!");
        }
    }
    /* API execution returned errord */
    else {
        Serial.println("Error has occurred during the determination of the direction!");
    }

    Serial.println("\n--------------------------------------\n");

    /* Release the interrupt active flag to allow a new call of this callback function. */
    intActive = false;
    }
}
“cBackFunct”代表中斷服務程序(ISR)。我們將它寫在 setup 函數(shù)之前的單獨函數(shù)中。還。我們有一個局部變量,它是中斷的活動標志。因此,它在 ISR 開始時設置為活動,在函數(shù)結束時設置為非活動。為避免多次并行執(zhí)行此函數(shù),“cBackFunct”檢查活動標志之前是否處于非活動狀態(tài)。該函數(shù)中的其他所有內容都類似于方向檢測。我們首先使用已知函數(shù)來檢查運動,然后分離運動的兩個方向。我們打印相應的運動狀態(tài)和方向。之后,我們打印一個視覺邊框以保持概覽。
void loop()
{
    // Here you can do something else in parallel while waiting for an interrupt.
    delay(1000);
}
在我們的循環(huán)函數(shù)中,我們現(xiàn)在只有延遲。我們可以在那里放置任何代碼,這些代碼應該在沒有發(fā)生運動或方向變化的情況下執(zhí)行。為了更容易理解中斷的工作方式,您也可以在循環(huán)中打印一些內容。
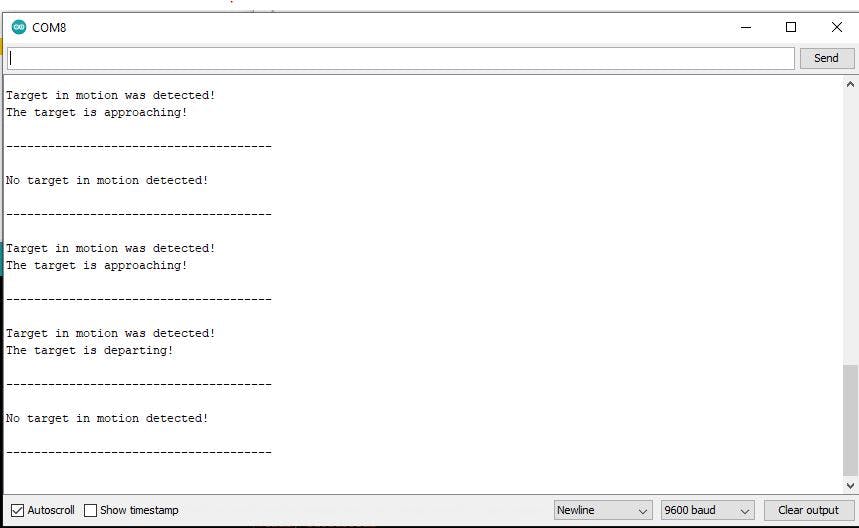
監(jiān)視器輸出在每個邊界后發(fā)生變化。這是因為我們只有在發(fā)生變化時才開始中斷。打印輸出之間的時間不再像以前那樣有規(guī)律,現(xiàn)在取決于中斷。
如果我們不再需要中斷,例如一段時間后,我們可以使用函數(shù)“disableInterrupt()”禁用它。之后只有我們在循環(huán)中的代碼會被執(zhí)行。
- Arduino指紋傳感器教程分享
- RVIT-15-60角位移傳感器
- 帶有用于AGV的磁帶傳感器的Arduino接口
- 如何使用多功能 60GHz 雷達傳感器設計汽車車內手勢檢測系統(tǒng)及更多
- 用于Arduino nodeMCU的Thinger IO溫度和濕度傳感器
- arduino loar_Arduino動手做(6)聲音傳感器模塊
- PH 傳感器說明書FOR Arduino 2.0免費下載 6次下載
- arduino聲音傳感器 模擬資料匯總 2次下載
- 臺信標簽傳感器MN60-PA100-NCD1說明書 7次下載
- 可兼容Arduino的聲音傳感器模塊LM386 6次下載
- 使用Arduino單片機實現(xiàn)JY60六軸姿態(tài)傳感器的演示代碼免費下載 17次下載
- Arduino雨滴傳感器的使用示例代碼免費下載 43次下載
- BGT24MTR11 24GHz雷達用戶指南的資料免費下載 94次下載
- Arduino教程之溫度傳感器及感溫杯實驗的詳細概述
- 多軸力傳感器LF303M60參數(shù)說明 8次下載
- 安信可60G毫米波雷達模組Rd-61產品介紹 358次閱讀
- 毫米波雷達感應Demo 496次閱讀
- 基于PIR傳感器的電路圖 帶Arduino的PIR傳感器設計 1836次閱讀
- 采用數(shù)字微波傳感器和Arduino控制板實現(xiàn)人體探測系統(tǒng) 2202次閱讀
- 采用數(shù)字微波傳感器、繼電器和Arduino控制板的自動光控系統(tǒng) 969次閱讀
- 如何使用Arduino和LDR傳感器實現(xiàn)LCD液晶屏亮度的自動調節(jié) 7185次閱讀
- 基于BGT60LTR11AIP雷達運動傳感器簡介 4773次閱讀
- dfrobotGravity:模擬TDS傳感器簡介 9202次閱讀
- dfrobot模擬角度傳感器簡介 1965次閱讀
- 成像雷達傳感器在自動駕駛汽車中的應用解析 1691次閱讀
- 成像雷達傳感器的特點及原理解析 6842次閱讀
- 成像雷達:一個傳感器控制所有傳感器 835次閱讀
- 數(shù)字傳感器和模擬傳感器的區(qū)別 2.5w次閱讀
- 自動駕駛中激光雷達和傳感器技術的應用 1.1w次閱讀
- 24GHz雷達傳感器的原理及運用解析 1.3w次閱讀

 上傳資料賺積分
下載排行
本周
- 1山景DSP芯片AP8248A2數(shù)據(jù)手冊
- 1.06 MB | 532次下載 | 免費
- 2RK3399完整板原理圖(支持平板,盒子VR)
- 3.28 MB | 339次下載 | 免費
- 3TC358743XBG評估板參考手冊
- 1.36 MB | 330次下載 | 免費
- 4DFM軟件使用教程
- 0.84 MB | 295次下載 | 免費
- 5元宇宙深度解析—未來的未來-風口還是泡沫
- 6.40 MB | 227次下載 | 免費
- 6迪文DGUS開發(fā)指南
- 31.67 MB | 194次下載 | 免費
- 7元宇宙底層硬件系列報告
- 13.42 MB | 182次下載 | 免費
- 8FP5207XR-G1中文應用手冊
- 1.09 MB | 178次下載 | 免費
本月
- 1OrCAD10.5下載OrCAD10.5中文版軟件
- 0.00 MB | 234315次下載 | 免費
- 2555集成電路應用800例(新編版)
- 0.00 MB | 33566次下載 | 免費
- 3接口電路圖大全
- 未知 | 30323次下載 | 免費
- 4開關電源設計實例指南
- 未知 | 21549次下載 | 免費
- 5電氣工程師手冊免費下載(新編第二版pdf電子書)
- 0.00 MB | 15349次下載 | 免費
- 6數(shù)字電路基礎pdf(下載)
- 未知 | 13750次下載 | 免費
- 7電子制作實例集錦 下載
- 未知 | 8113次下載 | 免費
- 8《LED驅動電路設計》 溫德爾著
- 0.00 MB | 6656次下載 | 免費
總榜
- 1matlab軟件下載入口
- 未知 | 935054次下載 | 免費
- 2protel99se軟件下載(可英文版轉中文版)
- 78.1 MB | 537798次下載 | 免費
- 3MATLAB 7.1 下載 (含軟件介紹)
- 未知 | 420027次下載 | 免費
- 4OrCAD10.5下載OrCAD10.5中文版軟件
- 0.00 MB | 234315次下載 | 免費
- 5Altium DXP2002下載入口
- 未知 | 233046次下載 | 免費
- 6電路仿真軟件multisim 10.0免費下載
- 340992 | 191187次下載 | 免費
- 7十天學會AVR單片機與C語言視頻教程 下載
- 158M | 183279次下載 | 免費
- 8proe5.0野火版下載(中文版免費下載)
- 未知 | 138040次下載 | 免費


 工商網(wǎng)監(jiān)
評論