 利用Arduino的自動風扇速度控制電路設計
利用Arduino的自動風扇速度控制電路設計(一)
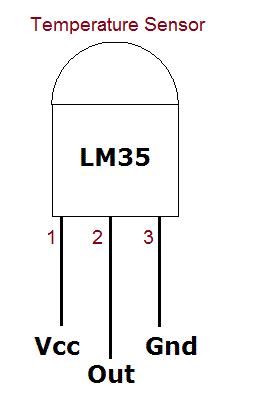
自動風扇速度控制電路Arduino LM35編程非常容易實驗,可用于根據溫度水平通過繼電器控制任何目標設備。對于這里的溫度測量,我們使用 LM35,這是一種精密集成電路溫度器件,其輸出電壓與攝氏度溫度成線性比例。由于其輸出特性,我們在輸出值計算中不需要采用開爾文。該LM35溫度傳感器無需任何外部元件即可工作,只需要4 V至30 V穩壓直流電源作為偏置。在此電路中,我們使用 Arduino 開發板的 +5V DC。該傳感器在室溫下提供±1/4°C的溫度輸出,在-55°C至150°C的整個溫度范圍內提供±3/4°C的溫度輸出。
由于該 LM35 提供模擬輸出(線性 + 10-mV/°C 比例因子),因此我們可以將 LM35 的輸出引腳直接連接到 Arduino 板的任何模擬輸入引腳。 LM35 可以采用單電源或雙電源供電,其自身運行功耗僅為 60 μA。它有不同的封裝,如 TO-CAN (3)、TO-92 (3)。這里我們使用德州儀器 (TI) 的 LM35 TO-92。
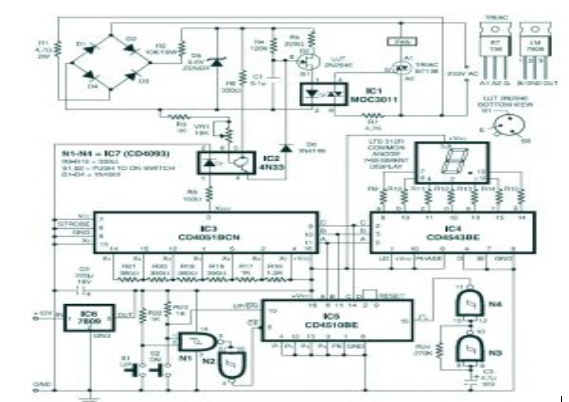
直流風扇控制電路圖

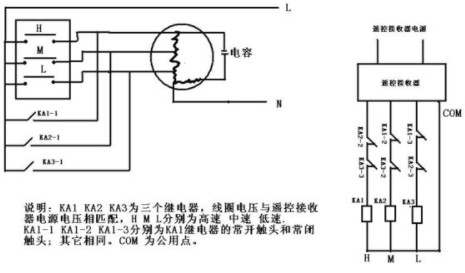
繼電器(交流風扇)控制電路圖

該電路可以構建在面包板或普通 PCB 板上,具有額外的 12V 直流電源用于風扇或繼電器。如前所述,LM35 只需要 5V,因此 Arduino 的 5V 引腳和 Gnd 引腳與 LM35 連接,輸出引腳直接連接到模擬輸入引腳 A0,并在以下程序中提到。指示 LED 與數字引腳 D8 連接并聲明為輸出引腳。 D3 PWM引腳聲明為輸出引腳,連接至開關晶體管 2N2219A 的基極。這里我們必須根據 LM35 感測到的溫度水平來更改輸出脈沖寬度。順便說一下,我們可以達到不同的速度級別。每當溫度傳感器檢測到 Arduino 外部的溫度變化時,D3 引腳的 PWM 輸出就會發生變化,因此風扇的速度也會發生變化。
為了控制繼電器,使用 D3 引腳作為數字輸出引腳并在 Arduino 代碼中聲明它。這樣我們只能根據溫度水平來打開和關閉交流風扇。根據溫度水平使用任何目標負載來打開和關閉。每當溫度傳感器檢測到溫度變化超過 30°C 時,Arduino 就會改變 D3 引腳的數字輸出(高電平),從而風扇速度發生變化。低于 25°C 時,D3 引腳的數字輸出變為(低)。
自動風扇速度控制電路Arduino LM35編程
int tempPin = A0;   // connect Sensor output pin
int fan = 3;       // Output drive for fan
int led = 8;        // fan status led pin
int temp;
int tempMin = 25;   // Minimum temperature to start the fan
int tempMax = 75;   // Maximum temperature to turn fan at 100% speed
int fanSpeed;

void setup() {
  pinMode(fan, OUTPUT);
  pinMode(led, OUTPUT);
  pinMode(tempPin, INPUT);
  Serial.begin(9600);  // Initialize serial communication at 9600 baud rate
}

void loop() {
   temp = readTemp();     // read temperature
   Serial.print("Temperature: ");
   Serial.print(temp);
   Serial.println(" °C");

   if(temp < tempMin) {   // if temp is lower than minimum temperature
       fanSpeed = 0;      // fan is off
       digitalWrite(fan, LOW);
       Serial.println("Fan Speed: OFF");
   }
   if((temp >= tempMin) && (temp <= tempMax)) {  // if temperature is higher than minimum temperature
       fanSpeed = map(temp, tempMin, tempMax, 32, 255);
       analogWrite(fan, fanSpeed);  // spin the fan at the fanSpeed speed
       Serial.print("Fan Speed: ");
       Serial.println(fanSpeed);
   }

   if(temp > tempMax) {        // if temp is higher than tempMax
     digitalWrite(led, HIGH);  // turn on led
     Serial.println("Fan Status: Overheating!");
   } else {                    // else turn off led
     digitalWrite(led, LOW);
     Serial.println("Fan Status: Normal");
   }
   delay(1000); // Delay for 1 second before reading temperature again
 }

int readTemp() {  // get temperature and convert it to celsius
  temp = analogRead(tempPin);
  return temp * 0.48828125;
}
自動繼電器控制電路Arduino LM35編程
const int tempPin = A0;    // LM35 temperature sensor connected to analog pin A0
const int relayPin = 3;    // Relay control pin connected to digital pin 2

const int tempThresholdHigh = 30;  // Temperature threshold to turn on the relay (in Celsius)
const int tempThresholdLow = 25;   // Temperature threshold to turn off the relay (in Celsius)

void setup() {
  pinMode(tempPin, INPUT);
  pinMode(relayPin, OUTPUT);
  digitalWrite(relayPin, LOW);  // Ensure the relay is initially off
  Serial.begin(9600);
}

void loop() {
  int tempValue = analogRead(tempPin);  // Read temperature value from LM35 sensor
  float temperature = (tempValue * 0.48828125);  // Convert analog reading to Celsius

  Serial.print("Temperature: ");
  Serial.print(temperature);
  Serial.println(" °C");

  // Check temperature and control the relay
  if (temperature >= tempThresholdHigh) {
    digitalWrite(relayPin, HIGH);  // Turn on the relay
    Serial.println("Relay Status: ON");
  } else if (temperature <= tempThresholdLow) {
    digitalWrite(relayPin, LOW);  // Turn off the relay
    Serial.println("Relay Status: OFF");
  }

  delay(1000);  // Delay for 1 second before reading temperature again
}
在上面的兩個程序中,我們使用以下方法將模擬輸出電壓從 LM35 轉換為攝氏度
int readTemp() {

temp = analogRead(tempPin);

return temp * 0.48828125;

}
利用Arduino的自動風扇速度控制電路設計(二)
大多數時候,人們在離開房間時仍然開著風扇,因為他們忘記將其關閉。他們甚至將風扇設置為最高速度,無論外面的天氣如何。所有這些習慣每天都會消耗和浪費越來越多的電力。為此,我們需要制作一個風扇可以自動打開和關閉的風扇。
這里風扇的速度可以通過改變輸入電源來改變,但是如果我們需要根據溫度變化來改變風扇速度。然后我們必須在系統中實現微控制器(Arduino)和溫度傳感器 LM 35。現在風扇可以根據房間內的溫度變化來改變速度。所有這些都將節省大量電力。
電路原理圖

如圖電路圖所示,電路的主要部分是Arduino Uno板和LM35溫度傳感器。這里傳感器的輸出直接與Arduino板的模擬輸入A0引腳連接,LED1與數字引腳D8連接。輸出取自Arduino的D11引腳。現在您可以選擇任何具有 PWM 功能的數字引腳作為輸出引腳,為此,我們也必須在 Arduino 程序代碼中進行這些更改。這里給出的代碼基于 D11 引腳作為輸出。每當溫度傳感器檢測到 Arduino 外部的溫度變化時,D11 引腳的 PWM 輸出就會發生變化,因此風扇的速度也會發生變化。此外,在該電路中,SL100 晶體管充當開關晶體管。我們需要一個12V電源來偏置電路。
Arduino代碼
#include < LiquidCrystal.h >
LiquidCrystal lcd(7,6,5,4,3,2);
int tempPin = A0;   // connect Sensor output pin
int fan = 11;       // Output drive for fan
int led = 8;        // fan status led pin
int temp;
int tempMin = 25;   // Minimum temperature to start the fan
int tempMax = 75;   // Maximum temperature to turn fan at 100% speed
int fanSpeed;
int fanLCD;

void setup() {
  pinMode(fan, OUTPUT);
  pinMode(led, OUTPUT);
  pinMode(tempPin, INPUT);
  lcd.begin(16,2);
}

void loop() {
   temp = readTemp();     // read temperature
   if(temp < tempMin) {   // if temp is lower than minimum temperature
       fanSpeed = 0;      // fan is off
       digitalWrite(fan, LOW);
   }
   if((temp >= tempMin) && (temp <= tempMax)) {  // if temperature is higher than minimum temperature
       fanSpeed = map(temp, tempMin, tempMax, 32, 255);
       fanLCD = map(temp, tempMin, tempMax, 0, 100);  // speed of fan to display on LCD
       analogWrite(fan, fanSpeed);  // spin the fan at the fanSpeed speed
   }

   if(temp > tempMax) {        // if temp is higher than tempMax
     digitalWrite(led, HIGH);  // turn on led
   } else {                    // else turn off led
     digitalWrite(led, LOW);
   }

   lcd.print("TEMP: ");
   lcd.print(temp);      // display the temperature
   lcd.print("C ");
   lcd.setCursor(0,1);
   lcd.print("FANS: ");
   lcd.print(fanLCD);    // display the fan speed
   lcd.print("%");
   delay(200);
   lcd.clear();
}

int readTemp() {  // get temperature and convert it to celsius
  temp = analogRead(tempPin);
  return temp * 0.48828125;
}
-
電路圖
+關注
關注
10356文章
10725瀏覽量
532872 -
控制電路
+關注
關注
82文章
1719瀏覽量
136100 -
自動風扇
+關注
關注
0文章
2瀏覽量
5958 -
Arduino
+關注
關注
188文章
6477瀏覽量
187816 -
速度控制
+關注
關注
0文章
38瀏覽量
8005
發布評論請先 登錄
相關推薦
求助!設計一個熱風傳送系統的風扇電機運轉控制電路

如何使用Arduino生成的PWM來控制交流風扇的速度
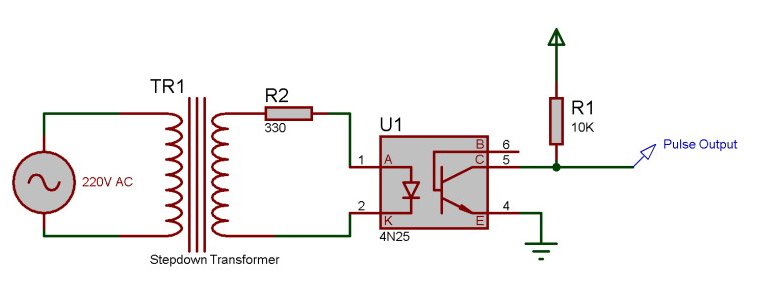
使用Arduino和晶閘管(TRIAC)控制交流風扇的速度


 工商網監
工商網監
評論