 ROS部署PaddlePaddle的CV模型
本篇博客應該是全網第一篇將ROS和PaddlePaddle做結合,并且手把手教基于python3部署的文章,目的是為了把ROS和Paddle Inference打通,方便大家基于飛槳做ROS+CV方面的任務!本文只是Demo,大家跑通該Demo后即可將自己的模型替換,實現你自己的創意~
快速體驗
paddle_inference_ros_demo
paddle_inference_ros_demo功能包是基于paddle_inference_ros開發的,幫助開發者快速體驗paddle_inference在ROS環境下的推理部署效果的功能包。可以直接進入該項目鏈接進行查看和快速體驗。
項目地址:
https://gitee.com/irvingao/paddle_inference_ros_demo
1.環境準備
(1)硬件平臺
Jetson nano(Jetson系列開發板配置和以下都相同)
Jetson系列基礎環境配置:
https://blog.csdn.net/qq_45779334/article/details/108611797
(2)軟件環境
PaddlePaddle:跑通Paddle inference Demo:
https://blog.csdn.net/qq_45779334/article/details/118611953
待Paddle inference GPU預測正常之后再將其遷移進ROS中。
2.編譯python3的cv_bridge
在ROS中想使用原生python3的Paddle Inference,最重要的就是需要重新編譯基于python3的cv_bridge,只有我們在編譯完成python3后,才能基于python3實現Paddle Inference目標檢測、分類、分割等相關節點。
所以編譯基于python3的cv_bridge便是最基礎和最重要的一步,該博客詳細介紹了完整的編譯過程,按步驟進行操作即可成功。
ROS——基于Ubuntu18.04和ROS Melodic編譯python3的cv_bridge:
https://blog.csdn.net/qq_45779334/article/details/119641789
3.創建python3Paddle inference ROS節點
這里將以機器人開發中最常用的目標檢測為例,進行部署演示,大家可以自行修改代碼,完成分類、分割等任務的ROS節點。
(1)初始化paddle_ros_ws工作空間
mkdir -p paddle_ros_ws/src && cd paddle_ros_ws/src
catkin_init_workspace
(2)創建功能包
catkin_create_pkg py3_camera rospy rosmsg roscpp
catkin_create_pkg py3_infer rospy rosmsg roscpp
(3)編寫python圖像發布和paddle inference預測節點
①攝像頭發布節點
cd py3_camera && mkdir scripts
cd scripts && touch camera.py
chmod +x camera.py
cd ../..
camera.py
#!/usr/bin/env python3
# coding:utf-8
import cv2
import numpy as np
import rospy
from std_msgs.msg import Header
from sensor_msgs.msg import Image
from cv_bridge import CvBridge , CvBridgeError
import time
if __name__=="__main__":
import sys
print(sys.version) # 查看python版本
capture = cv2.VideoCapture(0) # 定義攝像頭
rospy.init_node('camera_node', anonymous=True) #定義節點
image_pub=rospy.Publisher('/image_view/image_raw', Image, queue_size = 1) #定義話題
while not rospy.is_shutdown(): # Ctrl C正常退出,如果異常退出會報錯device busy!
start = time.time()
ret, frame = capture.read()
if ret: # 如果有畫面再執行
frame = cv2.flip(frame,1) #水平鏡像操作
ros_frame = Image()
header = Header(stamp = rospy.Time.now())
header.frame_id = "Camera"
ros_frame.header=header
ros_frame.width = 640
ros_frame.height = 480
ros_frame.encoding = "bgr8"
ros_frame.step = 1920
ros_frame.data = np.array(frame).tostring() #圖片格式轉換
image_pub.publish(ros_frame) #發布消息
end = time.time()
print("cost time:", end-start ) # 看一下每一幀的執行時間,從而確定合適的rate
rate = rospy.Rate(25) # 10hz
capture.release()
cv2.destroyAllWindows()
print("quit successfully!")
②paddle inference目標檢測節點
cd py3_infer && mkdir scripts
cd scripts && touch pp_infer.py
chmod +x pp_infer.py
pp_infer.py
#!/usr/bin/env python3
# coding:utf-8
import cv2
import numpy as np
import rospy
from sensor_msgs.msg import Image
from cv_bridge import CvBridge, CvBridgeError
from paddle.inference import Config
from paddle.inference import PrecisionType
from paddle.inference import create_predictor
import yaml
import time
# ————————————————圖像預處理函數————————————————
def resize(img, target_size):
"""resize to target size"""
if not isinstance(img, np.ndarray):
raise TypeError('image type is not numpy.')
im_shape = img.shape
im_size_min = np.min(im_shape[0:2])
im_size_max = np.max(im_shape[0:2])
im_scale_x = float(target_size) / float(im_shape[1])
im_scale_y = float(target_size) / float(im_shape[0])
img = cv2.resize(img, None, None, fx=im_scale_x, fy=im_scale_y)
return img
def normalize(img, mean, std):
img = img / 255.0
mean = np.array(mean)[np.newaxis, np.newaxis, :]
std = np.array(std)[np.newaxis, np.newaxis, :]
img -= mean
img /= std
return img
def preprocess(img, img_size):
mean = [0.485, 0.456, 0.406]
std = [0.229, 0.224, 0.225]
img = resize(img, img_size)
resize_img = img
img = img[:, :, ::-1].astype('float32')
img = normalize(img, mean, std)
img = img.transpose((2, 0, 1))
return img[np.newaxis, :], resize_img
# ——————————————————————模型配置、預測相關函數——————————————————————————
def predict_config(model_file, params_file):
'''
函數功能:初始化預測模型predictor
函數輸入:模型結構文件,模型參數文件
函數輸出:預測器predictor
'''
# 根據預測部署的實際情況,設置Config
config = Config()
# 讀取模型文件
config.set_prog_file(model_file)
config.set_params_file(params_file)
# Config默認是使用CPU預測,若要使用GPU預測,需要手動開啟,設置運行的GPU卡號和分配的初始顯存。
config.enable_use_gpu(400, 0)
# 可以設置開啟IR優化、開啟內存優化。
config.switch_ir_optim()
config.enable_memory_optim()
predictor = create_predictor(config)
return predictor
def predict(predictor, img):
'''
函數功能:初始化預測模型predictor
函數輸入:模型結構文件,模型參數文件
函數輸出:預測器predictor
'''
input_names = predictor.get_input_names()
for i, name in enumerate(input_names):
input_tensor = predictor.get_input_handle(name)
input_tensor.reshape(img[i].shape)
input_tensor.copy_from_cpu(img[i].copy())
# 執行Predictor
predictor.run()
# 獲取輸出
results = []
# 獲取輸出
output_names = predictor.get_output_names()
for i, name in enumerate(output_names):
output_tensor = predictor.get_output_handle(name)
output_data = output_tensor.copy_to_cpu()
results.append(output_data)
return results
# ——————————————————————后處理函數——————————————————————————
def draw_bbox_image(frame, result, label_list, threshold=0.5):
for res in result:
cat_id, score, bbox = res[0], res[1], res[2:]
if score < threshold:
continue
xmin, ymin, xmax, ymax = bbox
cv2.rectangle(frame, (int(xmin), int(ymin)), (int(xmax), int(ymax)), (255,0,255), 2)
label_id = label_list[int(cat_id)]
print('label is {}, bbox is {}'.format(label_id, bbox))
try:
# #cv2.putText(圖像, 文字, (x, y), 字體, 大小, (b, g, r), 寬度)
cv2.putText(frame, label_id, (int(xmin), int(ymin-2)), cv2.FONT_HERSHEY_SIMPLEX, 0.5, (255,0,0), 2)
cv2.putText(frame, str(round(score,2)), (int(xmin-35), int(ymin-2)), cv2.FONT_HERSHEY_SIMPLEX, 0.5, (0,255,0), 2)
except KeyError:
pass
def callback(data):
global bridge, predictor, im_size, im_shape, scale_factor, label_list
cv_img = bridge.imgmsg_to_cv2(data, "bgr8")
img_data, cv_img = preprocess(cv_img, im_size)
# 預測
result = predict(predictor, [im_shape, img_data, scale_factor])
draw_bbox_image(cv_img, result[0], label_list, threshold=0.1)
cv2.imshow("cv_img", cv_img)
cv2.waitKey(1)
if __name__ == '__main__':
import sys
print(sys.version) # 查看python版本
# 初始化節點
rospy.init_node('ppinfer_node', anonymous=True)
bridge = CvBridge()
# 模型文件路徑(最好寫絕對路徑)
model_dir = '/home/nano/workspace/paddle_ros_ws/src/py3_infer/scripts/yolov3_r50vd_dcn_270e_coco/'
# 從infer_cfg.yml中讀出label
infer_cfg = open(model_dir + 'infer_cfg.yml')
data = infer_cfg.read()
yaml_reader = yaml.load(data)
label_list = yaml_reader['label_list']
print(label_list)
# 配置模型參數
model_file = model_dir + "model.pdmodel"
params_file = model_dir + "model.pdiparams"
# 圖像尺寸相關參數初始化
try:
img = bridge.imgmsg_to_cv2(data, "bgr8")
except AttributeError:
img = np.zeros((224,224,3), np.uint8)
im_size = 224
scale_factor = np.array([im_size * 1. / img.shape[0], im_size * 1. / img.shape[1]]).reshape((1, 2)).astype(np.float32)
im_shape = np.array([im_size, im_size]).reshape((1, 2)).astype(np.float32)
# 初始化預測模型
predictor = predict_config(model_file, params_file)
rospy.Subscriber('/image_view/image_raw', Image, callback)
rospy.spin()
準備模型文件
wget https://paddle-inference-dist.bj.bcebos.com/Paddle-Inference-Demo/yolov3_r50vd_dcn_270e_coco.tgz &&tar xzf yolov3_r50vd_dcn_270e_coco.tgz

4.在ROS中運行Paddle Inference節點
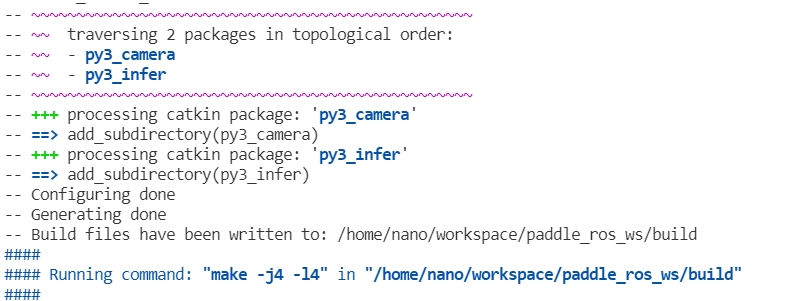
(1)編譯
cd ../../..
catkin_make -DPYTHON_EXECUTABLE=/usr/bin/python3
(2)將工作空間添加進環境變量
sudo vim ~/.bashrc
source /home/nano/workspace/paddle_ros_ws/devel/setup.bash
(3)運行節點
roscore
rosrun py3_camera camera.py
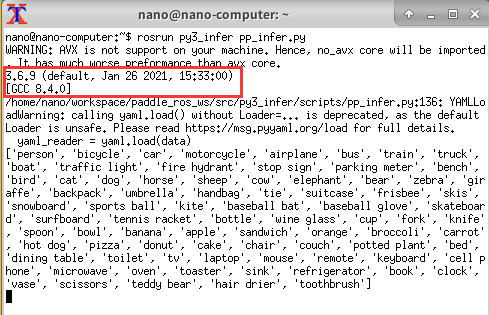
rosrun py3_infer pp_infer.py
rosrun rqt_iamge_view rqt_iamge_view
(4)運行成功示意圖
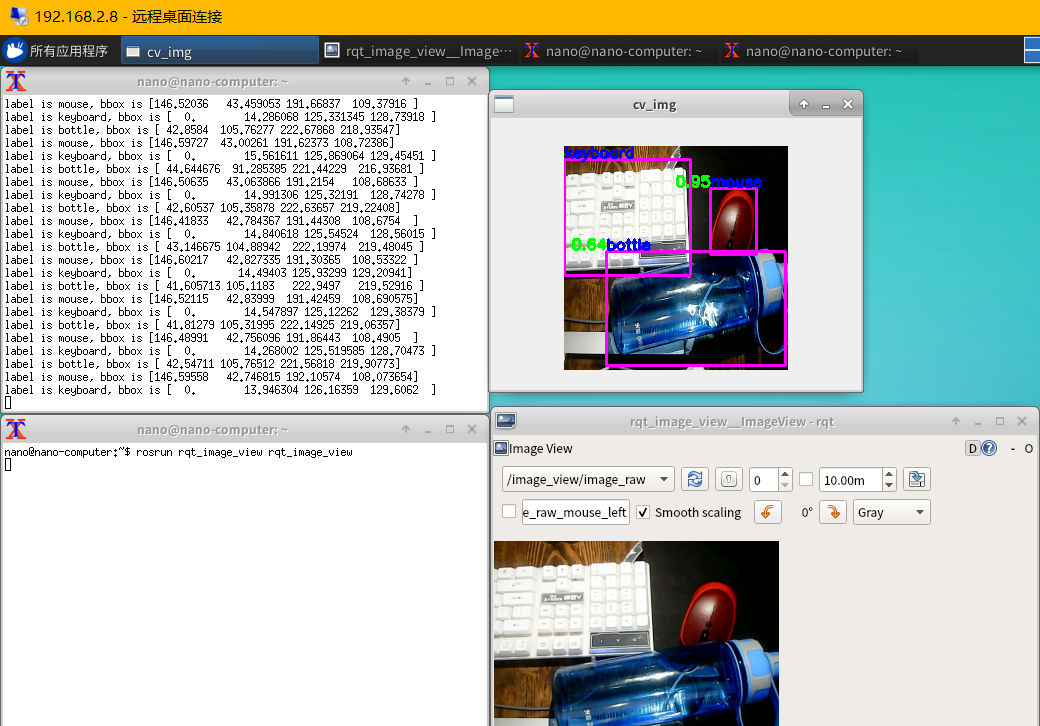
-
CV
+關注
關注
0文章
53瀏覽量
16906 -
模型
+關注
關注
1文章
3305瀏覽量
49220 -
ROS
+關注
關注
1文章
280瀏覽量
17095
原文標題:ROS部署PaddlePaddle的CV模型
文章出處:【微信號:vision263com,微信公眾號:新機器視覺】歡迎添加關注!文章轉載請注明出處。
發布評論請先 登錄
相關推薦
使用CUBEAI部署tflite模型到STM32F0中,模型創建失敗怎么解決?
PaddlePaddle Fluid版本的PaddlePaddle如何保存模型
PaddlePaddle Fluid版PaddlePaddle加載圖像數據出錯解決方案
介紹在STM32cubeIDE上部署AI模型的系列教程
基于micropython的STM32單片機編程
RV1126 PaddlePaddle編譯環境的搭建
如何用Arm虛擬硬件在Arm Cortex-M上部署PaddlePaddle
通過Cortex來非常方便的部署PyTorch模型
部署基于嵌入的機器學習模型
基于深度學習模型的點云目標檢測及ROS實現
使用OpenVINO? 部署PaddleSeg模型庫中的DeepLabV3+模型
實現ARM+ROS(機器人操作系統)之運行ROS!
ros1和ros2的通信模型


 工商網監
工商網監
評論