前言
Spring AOP是一個基于面向切面編程的框架,用于將橫切性關注點(如日志記錄、事務管理)與業務邏輯分離,通過代理對象將這些關注點織入到目標對象的方法執行前后、拋出異常或返回結果時等特定位置執行,從而提高程序的可復用性、可維護性和靈活性。
但使用原生Spring AOP實現統一的攔截是非常繁瑣、困難的。而在本節,我們將使用一種簡單的方式進行統一功能處理,這也是AOP的一次實戰,具體如下:
統一用戶登錄權限驗證
統一數據格式返回
統一異常處理
0 為什么需要統一功能處理?
統一功能處理是為了提高代碼的可維護性、可重用性和可擴展性而進行的一種設計思想。在應用程序中,可能存在一些通用的功能需求,例如身份驗證、日志記錄、異常處理等。
這些功能需要在多個地方進行調用和處理,如果每個地方都單獨實現這些功能,會導致代碼冗余、難以維護和重復勞動。通過統一功能處理的方式,可以將這些通用功能抽取出來,以統一的方式進行處理。這樣做有以下幾個好處:
「代碼復用」 :將通用功能抽取成獨立的模塊或組件,可以在多個地方共享使用,減少重復編寫代碼的工作量。
「可維護性」 :將通用功能集中處理,可以方便地對其進行修改、優化或擴展,而不需要在多個地方進行修改。
「代碼整潔性」 :通過統一功能處理,可以使代碼更加清晰、簡潔,減少了冗余的代碼。
「可擴展性」 :當需要添加新的功能時,只需要在統一功能處理的地方進行修改或擴展,而不需要在多個地方進行修改,降低了代碼的耦合度。
1 統一用戶登錄權限驗證
1.1 使用原生 Spring AOP 實現統一攔截的難點
以使用原生 Spring AOP 來實現?戶統?登錄驗證為例,主要是使用前置通知和環繞通知實現的,具體實現如下
importorg.aspectj.lang.ProceedingJoinPoint;
importorg.aspectj.lang.annotation.*;
importorg.springframework.stereotype.Component;

/**
*@author興趣使然黃小黃
*@version1.0
*@date2023/7/1816:37
*/
@Aspect//表明此類為一個切面
@Component//隨著框架的啟動而啟動
publicclassUserAspect{
//定義切點,這里使用Aspect表達式語法
@Pointcut("execution(*com.hxh.demo.controller.UserController.*(..))")
publicvoidpointcut(){}


//前置通知
@Before("pointcut()")
publicvoidbeforeAdvice(){
System.out.println("執行了前置通知~");
}

//環繞通知
@Around("pointcut()")
publicObjectaroundAdvice(ProceedingJoinPointjoinPoint){
System.out.println("進入環繞通知~");
Objectobj=null;
//執行目標方法
try{
obj=joinPoint.proceed();
}catch(Throwablee){
e.printStackTrace();
}
System.out.println("退出環繞通知~");
returnobj;
}

}
從上述的代碼示例可以看出,使用原生的 Spring AOP 實現統一攔截的難點主要有以下幾個方面:
定義攔截規則非常困難。如注冊?法和登錄?法是不攔截的,這樣的話排除?法的規則很難定義,甚?沒辦法定義。
在切面類中拿到 HttpSession 比較難。
為了解決 Spring AOP 的這些問題,Spring 提供了攔截器~
1.2 使用 Spring 攔截器實現統一用戶登錄驗證
Spring攔截器是Spring框架提供的一個功能強大的組件,用于在請求到達控制器之前或之后進行攔截和處理。攔截器可以用于實現各種功能,如身份驗證、日志記錄、性能監測等。
要使用Spring攔截器,需要創建一個實現了HandlerInterceptor接口的攔截器類。該接口定義了三個方法:preHandle、postHandle和afterCompletion。
preHandle方法在請求到達控制器之前執行,可以用于進行身份驗證、參數校驗等;
postHandle方法在控制器處理完請求后執行,可以對模型和視圖進行操作;
afterCompletion方法在視圖渲染完成后執行,用于清理資源或記錄日志。
攔截器的實現可以分為以下兩個步驟:
創建自定義攔截器,實現 HandlerInterceptor 接口的 preHandle(執行具體方法之前的預處理)方法。
將自定義攔截器加入 WebMvcConfigurer 的 addInterceptors 方法中,并且設置攔截規則。
具體實現如下:
step1. 創建自定義攔截器,自定義攔截器是一個普通類,代碼如下:
importorg.springframework.web.servlet.HandlerInterceptor;

importjavax.servlet.http.HttpServletRequest;
importjavax.servlet.http.HttpServletResponse;
importjavax.servlet.http.HttpSession;

/**
*@author興趣使然黃小黃
*@version1.0
*@date2023/7/1916:31
*統一用戶登錄權限驗證——登錄攔截器
*/
publicclassLoginInterceptorimplementsHandlerInterceptor{
@Override
publicbooleanpreHandle(HttpServletRequestrequest,HttpServletResponseresponse,Objecthandler)throwsException{
//用戶登錄業務判斷
HttpSessionsession=request.getSession(false);
if(session!=null&&session.getAttribute("userinfo")!=null){
returntrue;//驗證成功,繼續controller的流程
}
//可以跳轉登錄界面或者返回401/403沒有權限碼
response.sendRedirect("/login.html");//跳轉到登錄頁面
returnfalse;//驗證失敗
}
}
step2. 配置攔截器并設置攔截規則,代碼如下:
importorg.springframework.context.annotation.Configuration;
importorg.springframework.web.servlet.config.annotation.InterceptorRegistry;
importorg.springframework.web.servlet.config.annotation.WebMvcConfigurer;

/**
*@author興趣使然黃小黃
*@version1.0
*@date2023/7/1916:51
*/
@Configuration
publicclassAppConfigimplementsWebMvcConfigurer{
@Override
publicvoidaddInterceptors(InterceptorRegistryregistry){
registry.addInterceptor(newLoginInterceptor())
.addPathPatterns("/**")//攔截所有請求
.excludePathPatterns("/user/login")//不攔截的url地址
.excludePathPatterns("/user/reg")
.excludePathPatterns("/**/*.html");//不攔截所有頁面
}
}
1.3 攔截器的實現原理及源碼分析
當有了攔截器后,會在調用 Controller 之前進行相應的業務處理,執行的流程如下圖所示:
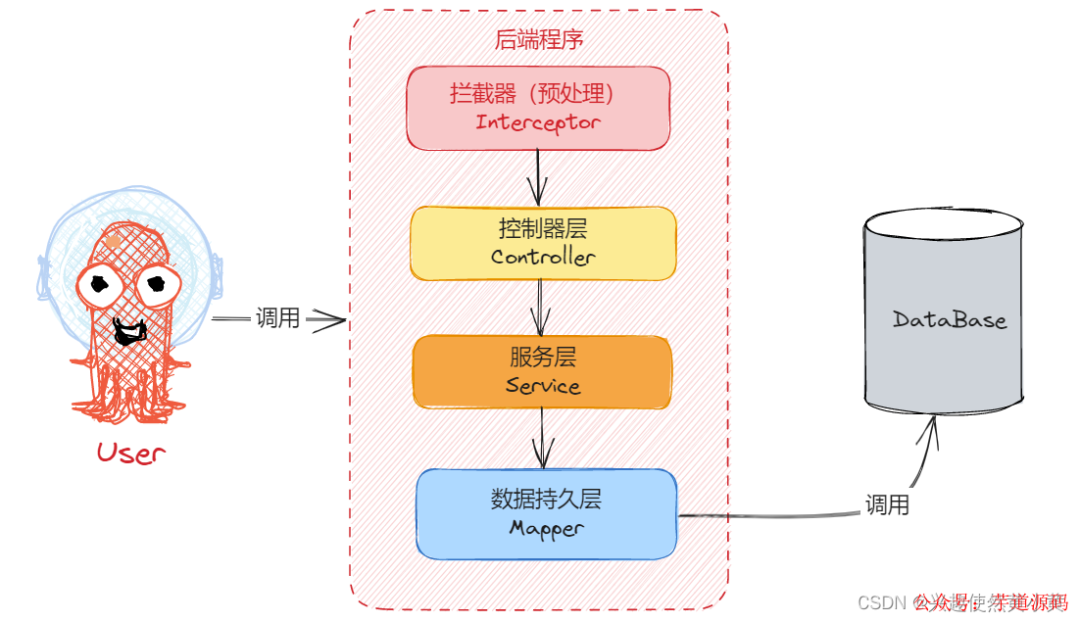
「攔截器實現原理的源碼分析」
從上述案例實現結果的控制臺的日志信息可以看出,所有的 Controller 執?都會通過?個調度器 DispatcherServlet 來實現。

而所有的方法都會執行 DispatcherServlet 中的 doDispatch 調度方法,doDispatch 源碼如下:
protectedvoiddoDispatch(HttpServletRequestrequest,HttpServletResponseresponse)throwsException{
HttpServletRequestprocessedRequest=request;
HandlerExecutionChainmappedHandler=null;
booleanmultipartRequestParsed=false;
WebAsyncManagerasyncManager=WebAsyncUtils.getAsyncManager(request);
try{
try{
ModelAndViewmv=null;
ObjectdispatchException=null;
try{
processedRequest=this.checkMultipart(request);
multipartRequestParsed=processedRequest!=request;
mappedHandler=this.getHandler(processedRequest);
if(mappedHandler==null){
this.noHandlerFound(processedRequest,response);
return;
}
HandlerAdapterha=this.getHandlerAdapter(mappedHandler.getHandler());
Stringmethod=request.getMethod();
booleanisGet=HttpMethod.GET.matches(method);
if(isGet||HttpMethod.HEAD.matches(method)){
longlastModified=ha.getLastModified(request,mappedHandler.getHandler());
if((newServletWebRequest(request,response)).checkNotModified(lastModified)&&isGet){
return;
}
}

//調用預處理
if(!mappedHandler.applyPreHandle(processedRequest,response)){
return;
}
//執行Controller中的業務
mv=ha.handle(processedRequest,response,mappedHandler.getHandler());
if(asyncManager.isConcurrentHandlingStarted()){
return;
}
this.applyDefaultViewName(processedRequest,mv);
mappedHandler.applyPostHandle(processedRequest,response,mv);
}catch(Exceptionvar20){
dispatchException=var20;
}catch(Throwablevar21){
dispatchException=newNestedServletException("Handlerdispatchfailed",var21);
}
this.processDispatchResult(processedRequest,response,mappedHandler,mv,(Exception)dispatchException);
}catch(Exceptionvar22){
this.triggerAfterCompletion(processedRequest,response,mappedHandler,var22);
}catch(Throwablevar23){
this.triggerAfterCompletion(processedRequest,response,mappedHandler,newNestedServletException("Handlerprocessingfailed",var23));
}
}finally{
if(asyncManager.isConcurrentHandlingStarted()){
if(mappedHandler!=null){
mappedHandler.applyAfterConcurrentHandlingStarted(processedRequest,response);
}
}elseif(multipartRequestParsed){
this.cleanupMultipart(processedRequest);
}
}
}
從上述源碼可以看出,在執行 Controller 之前,先會調用 預處理方法 applyPreHandle,該方法源碼如下:
booleanapplyPreHandle(HttpServletRequestrequest,HttpServletResponseresponse)throwsException{
for(inti=0;i
在上述源碼中,可以看出,在 applyPreHandle 中會獲取所有攔截器 HandlerInterceptor 并執行攔截器中的 preHandle 方法,這與之前我們實現攔截器的步驟對應,如下圖所示:
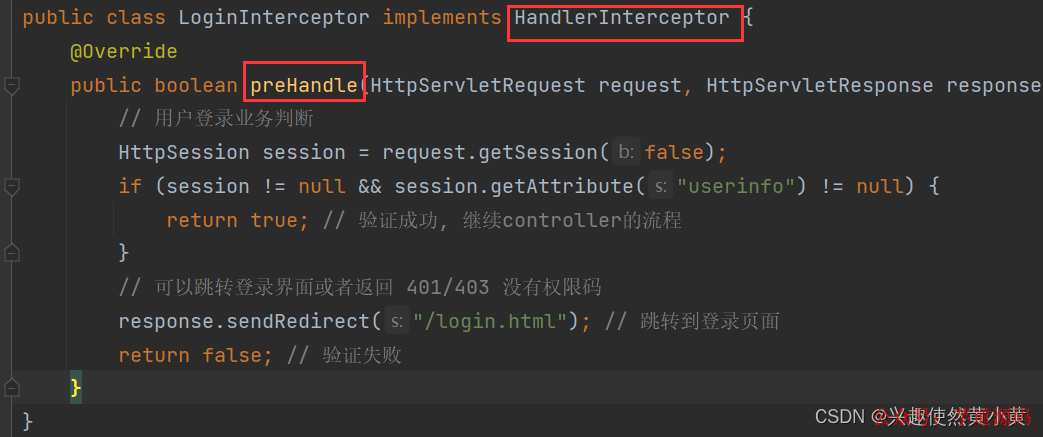
此時,相應的preHandle中的業務邏輯就會執行。
1.4 統一訪問前綴添加
統一訪問前綴的添加與登錄攔截器實現類似,即給所有請求地址添加 /hxh 前綴,示例代碼如下:
@Configuration
publicclassAppConfigimplementsWebMvcConfigurer{
//給所有接口添加/hxh前綴
@Override
publicvoidconfigurePathMatch(PathMatchConfigurerconfigurer){
configurer.addPathPrefix("/hxh",c->true);
}
}
另一種方式是在application配置文件中配置:
server.servlet.context-path=/hxh
2 統一異常處理
統一異常處理是指 在應用程序中定義一個公共的異常處理機制,用來處理所有的異常情況。 這樣可以避免在應用程序中分散地處理異常,降低代碼的復雜度和重復度,提高代碼的可維護性和可擴展性。
需要考慮以下幾點:
異常處理的層次結構:定義異常處理的層次結構,確定哪些異常需要統一處理,哪些異常需要交給上層處理。
異常處理的方式:確定如何處理異常,比如打印日志、返回錯誤碼等。
異常處理的細節:處理異常時需要注意的一些細節,比如是否需要事務回滾、是否需要釋放資源等
本文講述的統一異常處理使用的是 @ControllerAdvice + @ExceptionHandler 來實現的:
@ControllerAdvice 表示控制器通知類。
@ExceptionHandler 異常處理器。
以上兩個注解組合使用,表示當出現異常的時候執行某個通知,即執行某個方法事件,具體實現代碼如下:
importorg.springframework.web.bind.annotation.ControllerAdvice;
importorg.springframework.web.bind.annotation.ExceptionHandler;
importorg.springframework.web.bind.annotation.ResponseBody;
importjava.util.HashMap;
/**
*@author興趣使然黃小黃
*@version1.0
*@date2023/7/1918:27
*統一異常處理
*/
@ControllerAdvice//聲明是一個異常處理器
publicclassMyExHandler{
//攔截所有的空指針異常,進行統一的數據返回
@ExceptionHandler(NullPointerException.class)//統一處理空指針異常
@ResponseBody//返回數據
publicHashMapnullException(NullPointerExceptione){
HashMapresult=newHashMap<>();
result.put("code","-1");//與前端定義好的異常狀態碼
result.put("msg","空指針異常:"+e.getMessage());//錯誤碼的描述信息
result.put("data",null);//返回的數據
returnresult;
}
}
上述代碼中,實現了對所有空指針異常的攔截并進行統一的數據返回。
在實際中,常常設置一個保底,比如發生的非空指針異常,也會有保底措施進行處理,類似于 try-catch 塊中使用 Exception 進行捕獲,代碼示例如下:
@ExceptionHandler(Exception.class)
@ResponseBody
publicHashMapexception(Exceptione){
HashMapresult=newHashMap<>();
result.put("code","-1");//與前端定義好的異常狀態碼
result.put("msg","異常:"+e.getMessage());//錯誤碼的描述信息
result.put("data",null);//返回的數據
returnresult;
}
3 統一數據返回格式
為了保持 API 的一致性和易用性,通常需要使用統一的數據返回格式。 一般而言,一個標準的數據返回格式應該包括以下幾個元素:
狀態碼:用于標志請求成功失敗的狀態信息;
消息:用來描述請求狀態的具體信息;
數據:包含請求的數據信息;
時間戳:可以記錄請求的時間信息,便于調試和監控。
實現統一的數據返回格式可以使用 @ControllerAdvice + ResponseBodyAdvice 的方式實現,具體步驟如下:
創建一個類,并添加 @ControllerAdvice 注解;
實現 ResponseBodyAdvice 接口,并重寫 supports 和 beforeBodyWrite 方法。
示例代碼如下:
importorg.springframework.core.MethodParameter;
importorg.springframework.http.MediaType;
importorg.springframework.http.server.ServerHttpRequest;
importorg.springframework.http.server.ServerHttpResponse;
importorg.springframework.web.bind.annotation.ControllerAdvice;
importorg.springframework.web.servlet.mvc.method.annotation.ResponseBodyAdvice;
importjava.util.HashMap;
/**
*@author興趣使然黃小黃
*@version1.0
*@date2023/7/1918:59
*統一數據返回格式
*/
@ControllerAdvice
publicclassResponseAdviceimplementsResponseBodyAdvice{
/**
*此方法返回true則執行下面的beforeBodyWrite方法,反之則不執行
*/
@Override
publicbooleansupports(MethodParameterreturnType,ClassconverterType){
returntrue;
}
/**
*方法返回之前調用此方法
*/
@Override
publicObjectbeforeBodyWrite(Objectbody,MethodParameterreturnType,MediaTypeselectedContentType,ClassselectedConverterType,ServerHttpRequestrequest,ServerHttpResponseresponse){
HashMapresult=newHashMap<>();
result.put("code",200);
result.put("msg","");
result.put("data",body);
returnnull;
}
}
但是,如果返回的 body 原始數據類型是 String ,則會出現類型轉化異常,即 ClassCastException。
因此,如果原始返回數據類型為 String ,則需要使用 jackson 進行單獨處理,實現代碼如下:
importcom.fasterxml.jackson.core.JsonProcessingException;
importcom.fasterxml.jackson.databind.ObjectMapper;
importorg.springframework.beans.factory.annotation.Autowired;
importorg.springframework.core.MethodParameter;
importorg.springframework.http.MediaType;
importorg.springframework.http.server.ServerHttpRequest;
importorg.springframework.http.server.ServerHttpResponse;
importorg.springframework.web.bind.annotation.ControllerAdvice;
importorg.springframework.web.servlet.mvc.method.annotation.ResponseBodyAdvice;
importjava.util.HashMap;
/**
*@author興趣使然黃小黃
*@version1.0
*@date2023/7/1918:59
*統一數據返回格式
*/
@ControllerAdvice
publicclassResponseAdviceimplementsResponseBodyAdvice{
@Autowired
privateObjectMapperobjectMapper;
/**
*此方法返回true則執行下面的beforeBodyWrite方法,反之則不執行
*/
@Override
publicbooleansupports(MethodParameterreturnType,ClassconverterType){
returntrue;
}
/**
*方法返回之前調用此方法
*/
@Override
publicObjectbeforeBodyWrite(Objectbody,MethodParameterreturnType,MediaTypeselectedContentType,ClassselectedConverterType,ServerHttpRequestrequest,ServerHttpResponseresponse){
HashMapresult=newHashMap<>();
result.put("code",200);
result.put("msg","");
result.put("data",body);
if(bodyinstanceofString){
//需要對String特殊處理
try{
returnobjectMapper.writeValueAsString(result);
}catch(JsonProcessingExceptione){
e.printStackTrace();
}
}
returnresult;
}
}
但是,在實際業務中,上述代碼只是作為保底使用,因為狀態碼始終返回的是200,過于死板,還需要具體問題具體分析。
審核編輯:劉清
-
處理器
+關注
關注
68文章
19407瀏覽量
231182 -
控制器
+關注
關注
112文章
16445瀏覽量
179447 -
狀態機
+關注
關注
2文章
492瀏覽量
27647 -
SpringBoot
+關注
關注
0文章
174瀏覽量
201
原文標題:告別繁瑣:SpringBoot 攔截器與統一功能處理
文章出處:【微信號:芋道源碼,微信公眾號:芋道源碼】歡迎添加關注!文章轉載請注明出處。
發布評論請先 登錄
相關推薦
HarmonyOS實戰開發-如何在Navigation中完成路由攔截
[推薦]奧運全球眼 網絡視頻攝像機 電話報警系統 -電話報警器 GSM防盜器
我想做一個號碼攔截器。面對面5米內接收到對方的手機號碼。我也咨詢很多人,不是技
Springboot是如何獲取自定義異常并進行返回的
網絡組件axios可以在OpenHarmony上使用了
動能攔截器六自由度仿真建模研究
Spring Boot 系列(八)@ControllerAdvice 攔截異常并統一處理
快速定位SpringBoot接口超時問題的神器
什么是 SpringBoot?

SpringBoot統一功能處理
springboot過濾器和攔截器哪個先執行
使用go語言實現一個grpc攔截器


 SpringBoot攔截器與統一功能處理實戰


評論