 手把手教你使用LabVIEW OpenCV DNN實現手寫數字識別(含源碼)
前言
今天和大家一起來看一下在LabVIEW中如何使用OpenCV DNN模塊實現手寫數字識別
一、OpenCV DNN模塊
1.OpenCV DNN簡介
**OpenCV中的DNN(Deep Neural Network module)模塊是專門用來實現深度神經網絡相關功能的模塊。OpenCV自己并不能訓練神經網絡模型,但是它可以載入別的深度學習框架(例如TensorFlow、pytorch、Caffe等等)訓練好的模型,然后使用該模型做inference(預測)。而且OpenCV在載入模型時會使用自己的DNN模塊對模型重寫,使得模型的運行效率更高。所以如果你想在OpenCV項目中融入深度學習模型,可以先用自己熟悉的深度學習框架訓練好,然后使用OpenCV的DNN模塊載入。 **
2.LabVIEW中DNN模塊函數
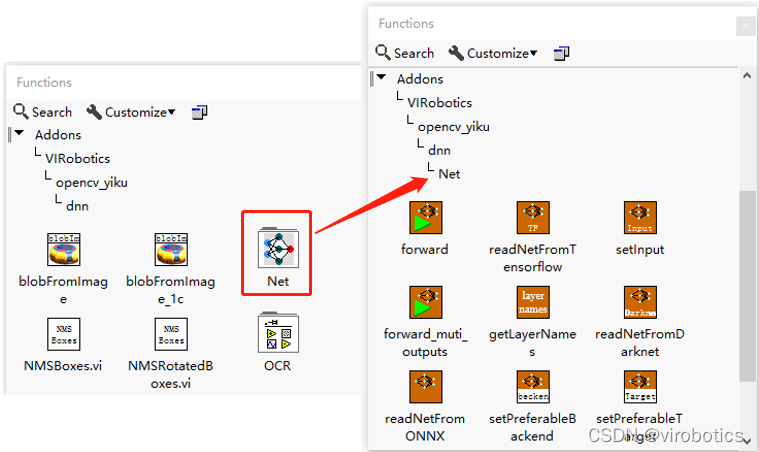
DNN模塊位于程序框圖-函數選板-Addons-VIRobotics-opencv_yiku中,如下圖所示:
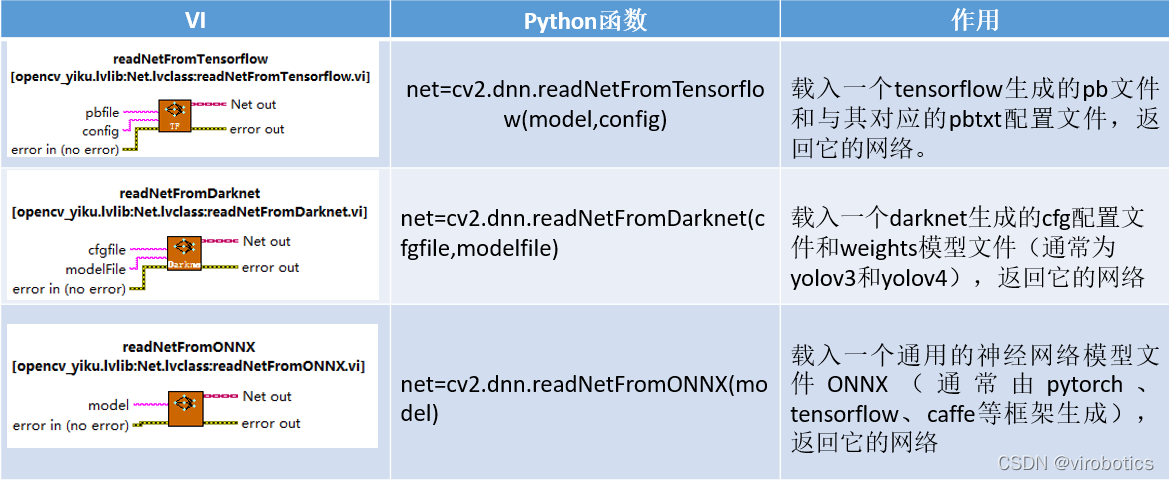
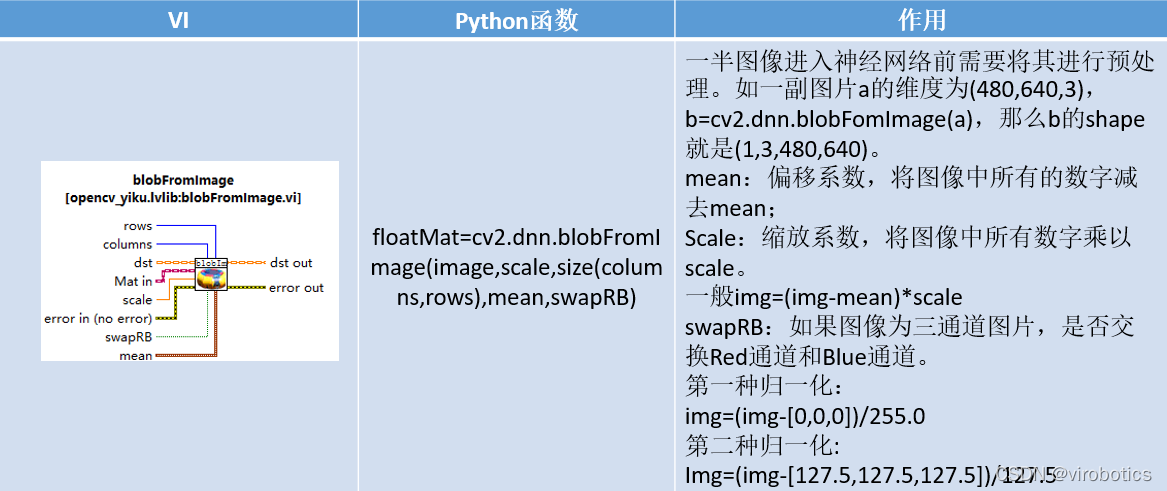
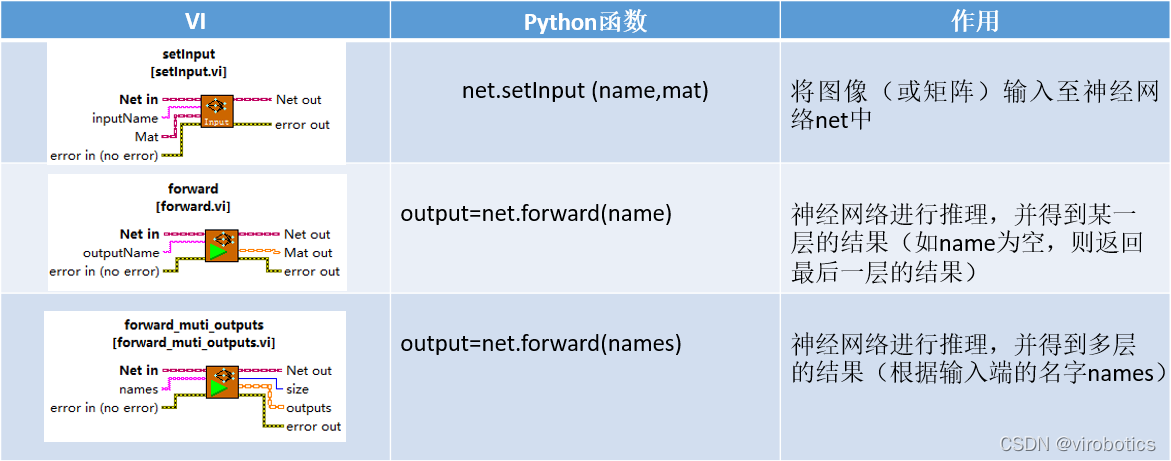
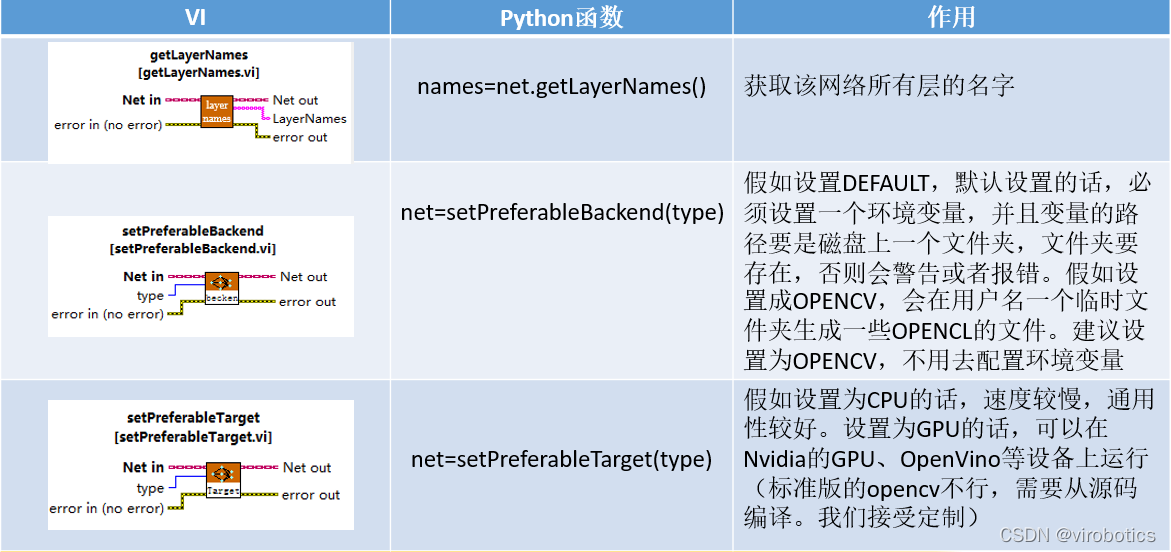
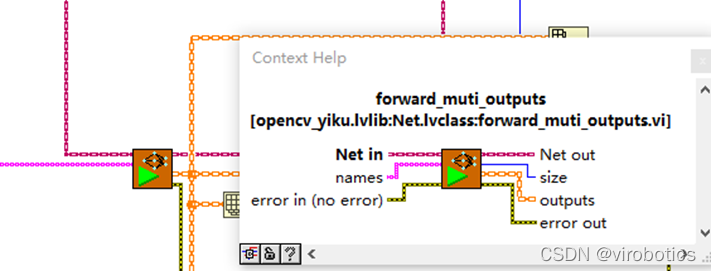
Net選版中的函數與python中的函數對比如下:**
**
二、TensorFlow pb文件的生成和調用
1.TensorFlow2 Keras模型(mnist)
注:本范例必須使用tensorflow 2.x版本
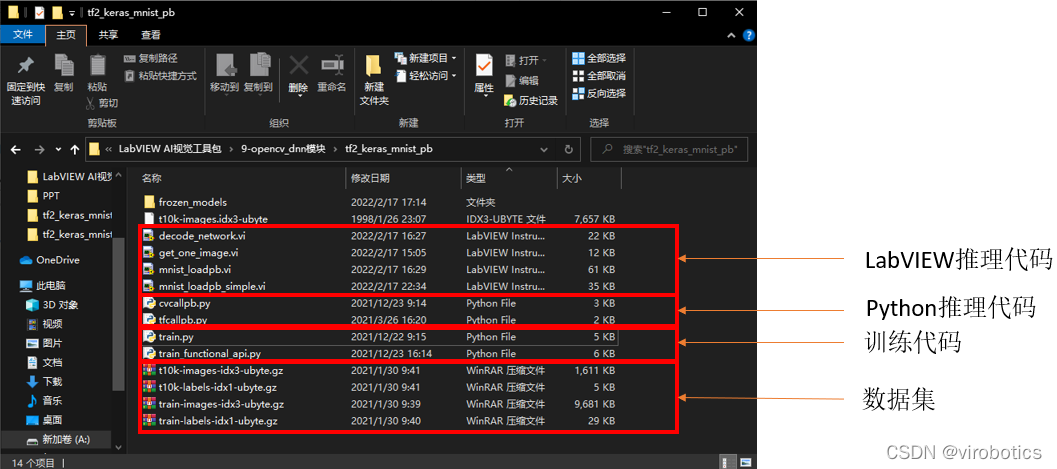
** 如下圖所示所示為數據集以及LabVIEW與Python推理和訓練代碼,相關源碼可在鏈接中下載。**
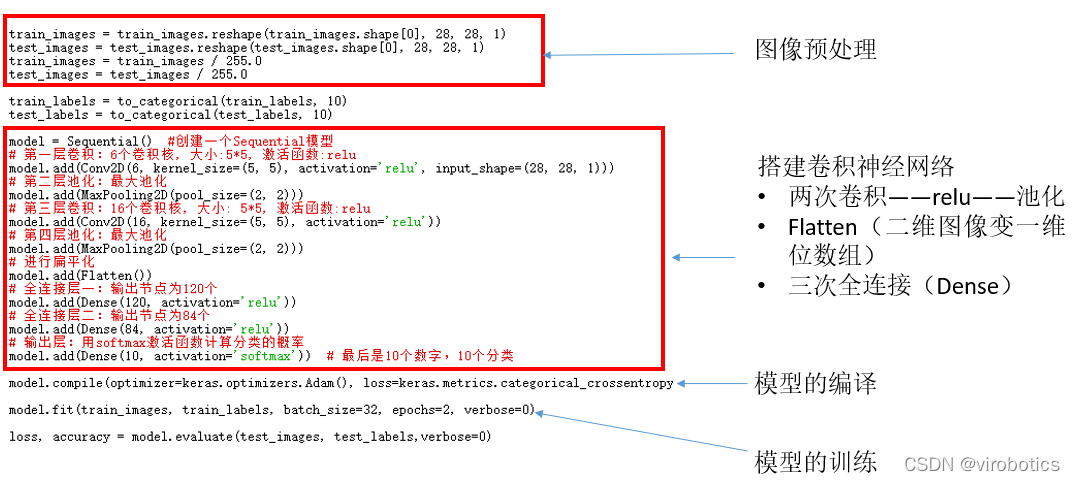
2.使用Keras搭建cnn訓練mnist(train.py),訓練部分源碼如下:
train_images = train_images.reshape(train_images.shape[0], 28, 28, 1)
test_images = test_images.reshape(test_images.shape[0], 28, 28, 1)
train_images = train_images / 255.0
test_images = test_images / 255.0
?
train_labels = to_categorical(train_labels, 10)
test_labels = to_categorical(test_labels, 10)
?
model = Sequential()  #創建一個Sequential模型
# 第一層卷積:6個卷積核, 大小:5*5, 激活函數:relu
model.add(Conv2D(6, kernel_size=(5, 5), activation='relu', input_shape=(28, 28, 1)))
# 第二層池化:最大池化
model.add(MaxPooling2D(pool_size=(2, 2)))
# 第三層卷積:16個卷積核, 大小: 5*5, 激活函數:relu
model.add(Conv2D(16, kernel_size=(5, 5), activation='relu'))
# 第四層池化:最大池化
model.add(MaxPooling2D(pool_size=(2, 2)))
# 進行扁平化
model.add(Flatten())
# 全連接層一:輸出節點為120個
model.add(Dense(120, activation='relu'))
# 全連接層二:輸出節點為84個
model.add(Dense(84, activation='relu'))
# 輸出層:用softmax激活函數計算分類的概率
model.add(Dense(10, activation='softmax'))  # 最后是10個數字,10個分類
model.compile(optimizer=keras.optimizers.Adam(), loss=keras.metrics.categorical_crossentropy, metrics=['accuracy'])
model.fit(train_images, train_labels, batch_size=32, epochs=2, verbose=1)
loss, accuracy = model.evaluate(test_images, test_labels,verbose=0)
#model.save("A:\\code\\tensorflow\\course\\1_fashion_mnist\\mymodel")
print('損失:', loss)
print('準確率:', accuracy)
3.訓練結果保存成凍結模型(pb文件)(train.py),訓練結果保存為凍結模型的源碼如下:
注:無需安裝tensorflow也可以運行
#以下是生成pb的代碼。注意:用model.save生成的pb文件不能被opencv調用
# Convert Keras model to ConcreteFunction
full_model = tf.function(lambda x: model(x))
full_model = full_model.get_concrete_function(
    tf.TensorSpec(model.inputs[0].shape, model.inputs[0].dtype))
?
# Get frozen ConcreteFunction
frozen_func = convert_variables_to_constants_v2(full_model)
frozen_func.graph.as_graph_def()
?
layers = [op.name for op in frozen_func.graph.get_operations()]
print("-" * 50)
print("Frozen model layers: ")
for layer in layers:
    print(layer)
?
print("-" * 50)
print("Frozen model inputs: ")
print(frozen_func.inputs)
print("Frozen model outputs: ")
print(frozen_func.outputs)
?
# Save frozen graph from frozen ConcreteFunction to hard drive
tf.io.write_graph(graph_or_graph_def=frozen_func.graph,
                  logdir=datapath+r"rozen_models",
                  name="frozen_graph.pb",
                  as_text=False)
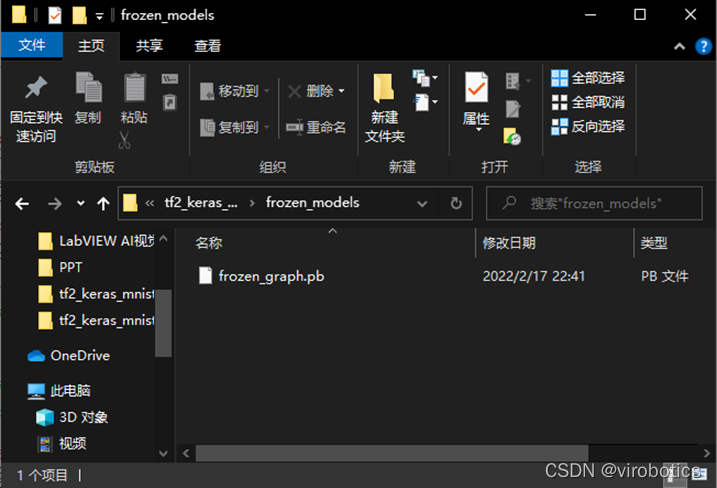
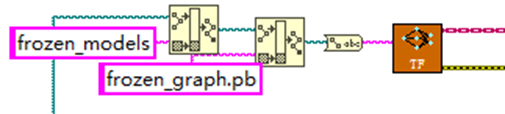
運行之后可生成如下圖所示的pb模型:
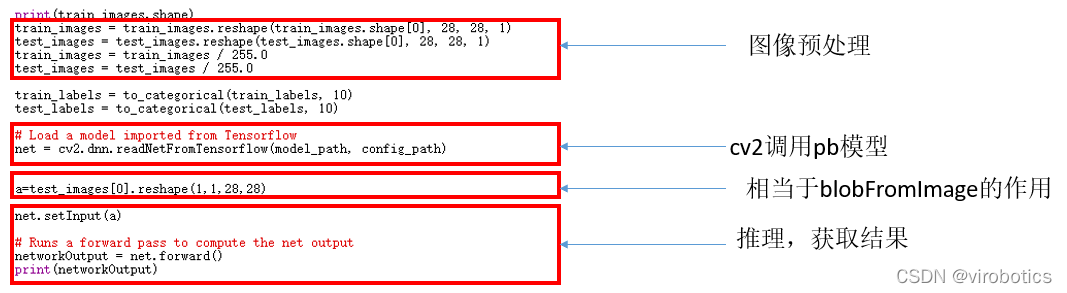
4.python opencv調用凍結模型(cvcallpb.py)
?
import time
model_path = 'frozen_models\\frozen_graph.pb'
config_path = ''
#net = cv.dnn.readNetFromTensorflow(model_path, config_path)
import gzip
import os
import numpy as np
datapath=os.path.split(os.path.realpath(__file__))[0]
import cv2
?
def get_data():
    train_image = datapath+r"	rain-images-idx3-ubyte.gz"
    test_image = datapath+r"	10k-images-idx3-ubyte.gz"
    train_label = datapath+r"	rain-labels-idx1-ubyte.gz"
    test_label = datapath+r"	10k-labels-idx1-ubyte.gz"
    paths = [train_label, train_image, test_label,test_image]
?
    with gzip.open(paths[0], 'rb') as lbpath:
        y_train = np.frombuffer(lbpath.read(), np.uint8, offset=8)
?
    with gzip.open(paths[1], 'rb') as imgpath:
        x_train = np.frombuffer(
            imgpath.read(), np.uint8, offset=16).reshape(len(y_train), 28, 28)
?
    with gzip.open(paths[2], 'rb') as lbpath:
        y_test = np.frombuffer(lbpath.read(), np.uint8, offset=8)
?
    with gzip.open(paths[3], 'rb') as imgpath:
        x_test = np.frombuffer(
            imgpath.read(), np.uint8, offset=16).reshape(len(y_test), 28, 28)
?
    return (x_train, y_train), (x_test, y_test)
?
(train_images, train_labels), (test_images, test_labels)=get_data()
?
def to_categorical(labels,number):
    a=np.zeros((labels.shape[0],number),dtype=labels.dtype)
    count=0
    for i in labels:
        a[count][i]=1
        count+=1
    return a


print(train_images.shape)
train_images = train_images.reshape(train_images.shape[0], 28, 28, 1)
test_images = test_images.reshape(test_images.shape[0], 28, 28, 1)
train_images = train_images / 255.0
test_images = test_images / 255.0
?
train_labels = to_categorical(train_labels, 10)
test_labels = to_categorical(test_labels, 10)
?
# Load a model imported from Tensorflow
net = cv2.dnn.readNetFromTensorflow(model_path, config_path)

?
a=test_images[0].reshape(1,1,28,28)
?
net.setInput(a)

# Runs a forward pass to compute the net output
networkOutput = net.forward()
print(networkOutput)
?
三、LabVIEW OpenCV DNN實現手寫數字識別
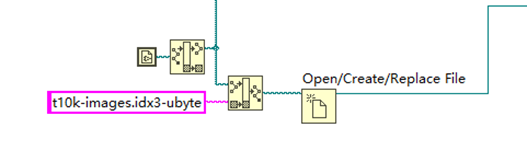
1、實現手寫數字識別并實現MNIST數據簡單的可視化(mnist_loadpb_simple.vi)
(1)讀取mnist測試數據集二進制文件
(2)載入pb神經網絡模型
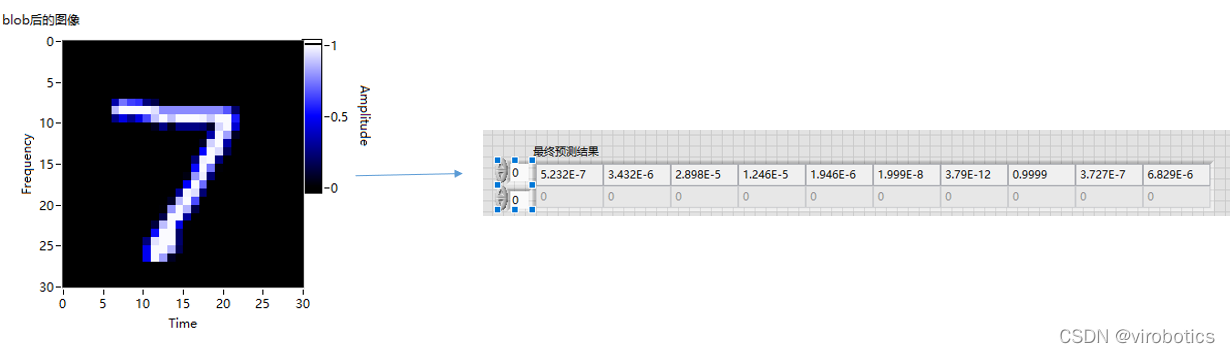
**(3)從二進制文件里讀取某一幅圖并顯示出來 **
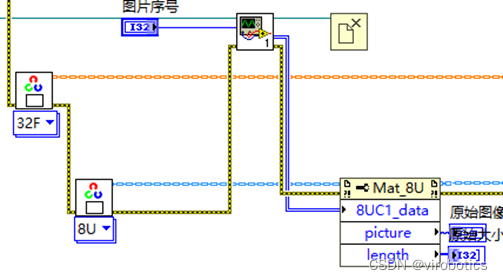
(4)blobImage,并把blob的結果用強度圖顯示出來
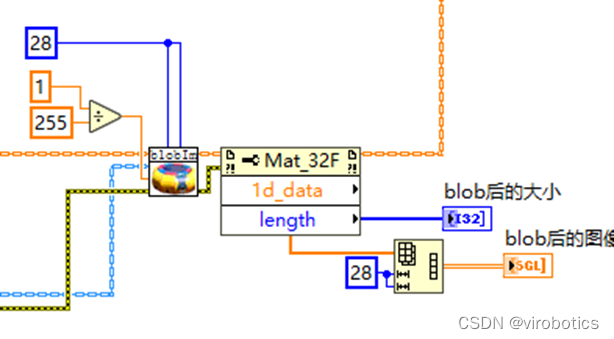
(5)把blob的結果送入神經網絡推理,獲取結果
(6)總體源碼及效果如下:

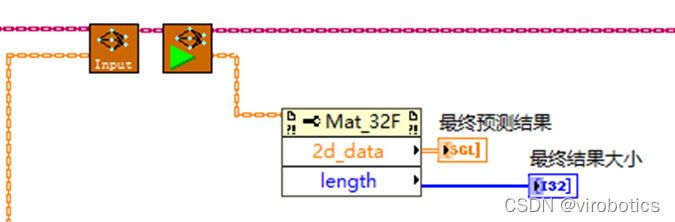
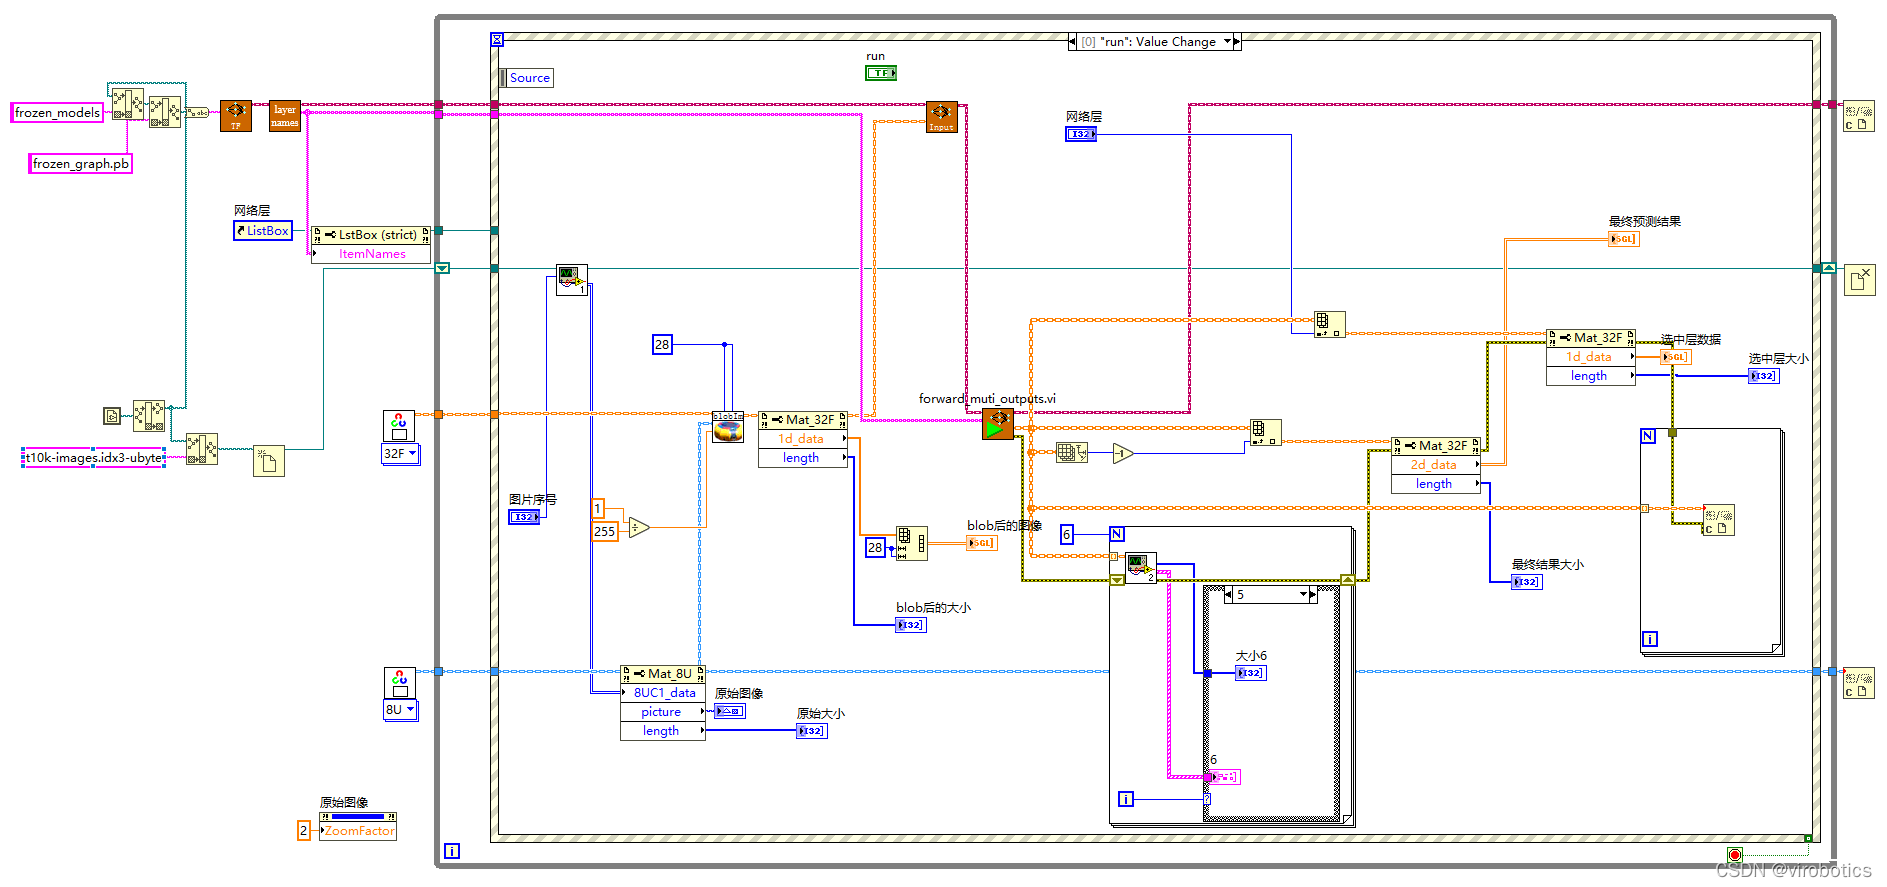
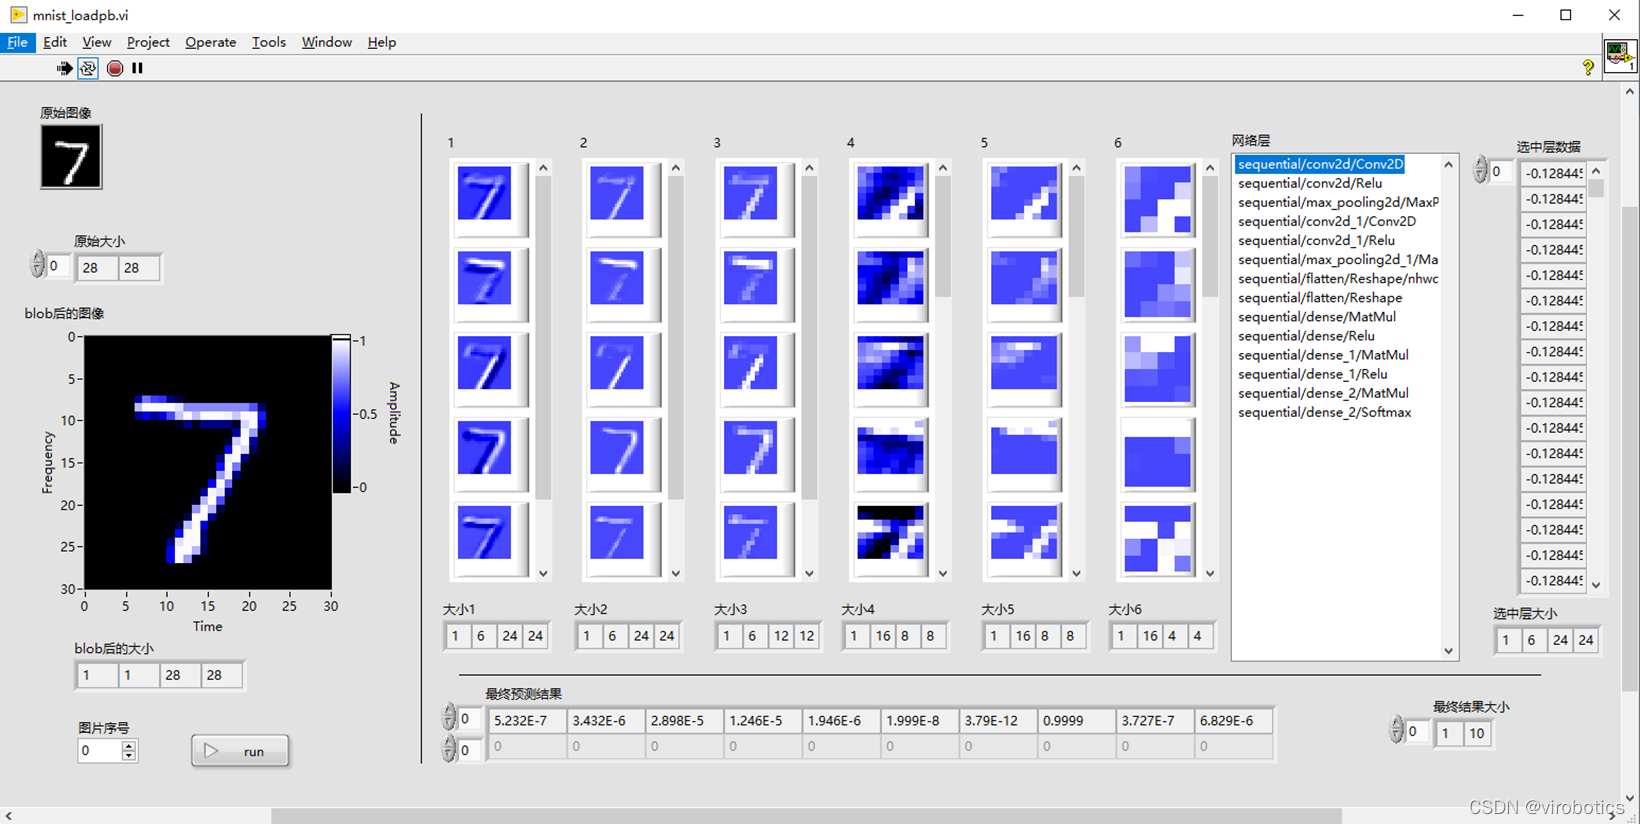
2、實現手寫數字識別并實現MNIST數據高級的可視化(mnist_loadpb.vi)
與簡單的可視化區別僅僅有以下幾項:
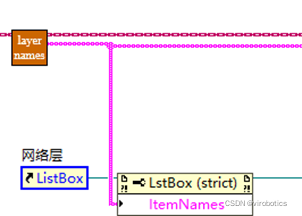
(1)多了getLayerName讀出所有的網絡層名字
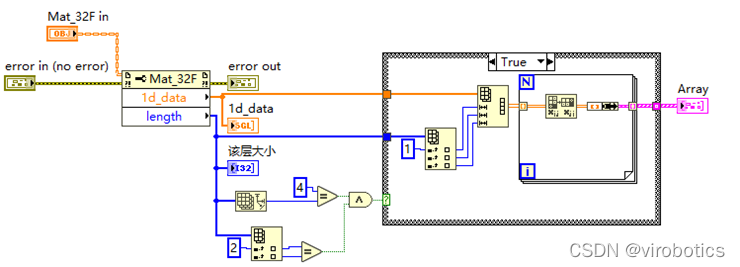
**(2)使用了多通道的forward(輸入為名稱數組) **
 (3)將前六層(兩次卷積——relu——池化用強度圖顯示出來)**
**
總體源碼如下:
運行效果如下:
四、源碼下載
鏈接: https://pan.baidu.com/s/1NU_OcHgS0-5zNXQVkEt5uw
提取碼:8888
總結
Q:我該使用tensorflow 1還是tensorflow 2?
A:目前看tensorflow 1與opencv dnn模塊、樹莓派等開源硬件兼容性更好,且視覺對象檢測的模型暫時更豐富。Tesnroflow 2的Keras函數訓練神經網絡非常方便,但對第三方軟硬件兼容性還未做到最佳。估計隨著后續版本的推出,TF2會逐漸成為主流。有些新的神經網絡算子,慢慢地就不支持TF1了。同時opencv、開源硬件也會不斷更新適應最新版本的TF。
另外,訓練圖像神經網絡不用局限于TF,pytorch也是很好的選擇。目前我們公司已逐漸從TF轉向pytorch了。
Q:LabVIEW的opencv及其dnn模塊支持哪些硬件和神經網絡模型?
A: 提供多種框架模型導入模塊 :包括tensorflow、pytorch、darknet、openvino等多個平臺的深度學習模型,官方的物體分類、物體檢測、語義分割、實例分割都支持(后續會講到),第三方的人臉識別、文字識別也已經通過驗證。少量的高精度實例分割模型暫時不支持,后續我們會給大家介紹ONNX工具包,支持市面上幾乎所有的模型。 支持的硬件方面,支持Nvidia GPU、Intel、TPU、NPU多種硬件加速。
審核編輯 黃宇
-
LabVIEW
+關注
關注
1977文章
3657瀏覽量
325660 -
深度學習
+關注
關注
73文章
5516瀏覽量
121556 -
dnn
+關注
關注
0文章
60瀏覽量
9089
發布評論請先 登錄
相關推薦


 工商網監
工商網監
評論