 電子發(fā)燒友App


Tendermint(TM)是the Cosmos network旗下的一個(gè)區(qū)塊鏈項(xiàng)目。TM能安全且保持一致性地在多臺(tái)機(jī)器之間復(fù)制應(yīng)用程序。TM的共識(shí)算法基于節(jié)點(diǎn)不可信的設(shè)計(jì),也就是允許拜占庭錯(cuò)誤。TM主要分成兩個(gè)部分。
一是一個(gè)區(qū)塊鏈共識(shí)引擎(Tendermint Core)。他主要負(fù)責(zé)節(jié)點(diǎn)之間的數(shù)據(jù)同步有序傳輸,實(shí)現(xiàn)拜占庭共識(shí)機(jī)制。二是區(qū)塊鏈應(yīng)用接口(ABCI)。它是一種接口通訊協(xié)議,可以通過各種編程語(yǔ)言實(shí)現(xiàn)應(yīng)用邏輯。應(yīng)用邏輯和TM Core通過ABCI實(shí)現(xiàn)了解耦。
下面簡(jiǎn)單介紹一下如何在windows環(huán)境下編譯及使用Tendermint。
下載源碼及依賴
當(dāng)然前提是已經(jīng)配置好go環(huán)境和git,并且需要梯子,使用如下命令:
go get github.com/Masterminds/glide
go get github.com/tendermint/tendermint/cmd/tendermint
執(zhí)行時(shí)間比較長(zhǎng),耐心等待完成后,可以發(fā)現(xiàn)%GOPATH%目錄和%GOPETH%\src\github.com目錄下多出許多東西
編譯
有兩種方式:
2.1
cd $GOPATH/src/github.com/tendermint/tendermint
glide install
go install 。/cmd/tendermint
這里作者遇到一個(gè)坑,執(zhí)行g(shù)lide install報(bào)錯(cuò):[ERROR] Failed to find glide.yaml file in directory tree: Cannot resolve parent of D:\
首先執(zhí)行g(shù)lide create,然后按照提示一步步操作,在執(zhí)行g(shù)lide install。
這時(shí)又遇到一個(gè)問題:[ERROR] Unable to export dependencies to vendor directory: Error moving files: exit status 1. output: Access is denied. 0 dir(s) moved.
網(wǎng)上查到資料,是因?yàn)間lide版本造成的,修改到v0.12.3版本即可解決。
接下來重新glide install,新的問題出現(xiàn)了:Error looking for crypto/ed25519: Cannot detect VCS.這是由于國(guó)內(nèi)訪問golang.org被墻導(dǎo)致的,可以添加鏡像文件解決:
glide mirror set https://golang.org/x/crypto https://github.com/golang/crypto
2.2
以上步驟很麻煩,不用怕,我們可以手動(dòng)使用go build命令編譯:
cd %GOPATH/src/github.com/tendermint/cmd/tendermint
go build
cd %GOPATH/src/github.com/tendermint/abci/cmd/abci-cli
go build
兩次build之后,分別生成了tendermint.exe和abci-cli.exe,將這兩個(gè)文件拷到%GOPATH/bin目錄下
tendermint version
abci-cli version
以上兩個(gè)命令如果有版本號(hào)輸出,那么可以進(jìn)入下一個(gè)步驟了。
運(yùn)行官方的例子
官方的代碼為我們展示了一個(gè)kvstore的例子,它的作用就是存儲(chǔ)數(shù)據(jù),類似與levelDB。
打開三個(gè)cmd窗口,cmd1,cmd2,cmd3
在cmd1中輸入 abci-cli kvstore
可以看到程序在Waiting for new connection.。.
接下來在cmd2輸入 tendermint init,然后tendermint node
C:\Users\ch》tendermint init
I[2019-08-04|18:28:48.105] Found private validator module=main keyFile=\.tendermint\config\priv_validator_key.json stateFile=\.tendermint\data\priv_validator_state.json
I[2019-08-04|18:28:48.113] Found node key module=main path=\.tendermint\config\node_key.json
I[2019-08-04|18:28:48.118] Found genesis file module=main path=\.tendermint\config\genesis.json
C:\Users\ch》tendermint node
I[2019-08-04|18:28:57.497] Version info module=main software=0.32.1 block=10 p2p=7
I[2019-08-04|18:28:57.514] Starting Node module=main impl=Node
I[2019-08-04|18:28:57.528] Started node module=main nodeInfo=“{ProtocolVersion:{P2P:7 Block:10 App:1} ID_:fe807a7617494c46d38bc040801ab567cc330852 ListenAddr:tcp://0.0.0.0:26656 Network:test-chain-17UaI5 Version:0.32.1 Channels:4020212223303800 Moniker:caohuan Other:{TxIndex:on RPCAddress:tcp://127.0.0.1:26657}}”
I[2019-08-04|18:28:58.539] Executed block module=state height=1 validTxs=0 invalidTxs=0
I[2019-08-04|18:28:58.546] Committed state module=state height=1 txs=0 appHash=0000000000000000
I[2019-08-04|18:28:59.552] Executed block module=state height=2 validTxs=0 invalidTxs=0
I[2019-08-04|18:28:59.558] Committed state module=state height=2 txs=0 appHash=0000000000000000
I[2019-08-04|18:29:00.573] Executed block module=state height=3 validTxs=0 invalidTxs=0
I[2019-08-04|18:29:00.579] Committed state module=state height=3 txs=0 appHash=0000000000000000
I[2019-08-04|18:29:01.592] Executed block module=state height=4 validTxs=0 invalidTxs=0
I[2019-08-04|18:29:01.599] Committed state module=state height=4 txs=0 appHash=0000000000000000
tendermint init是初始化tendermint服務(wù),tendermint node則是啟動(dòng)服務(wù)
服務(wù)啟動(dòng)后,即開始出塊,那是因?yàn)楹蚦md1啟動(dòng)的abci-cli建立了鏈接,如果想不要自動(dòng)出空塊,可以在啟動(dòng)的時(shí)候加上參數(shù) tendermint node --consensus.create_empty_blocks=false
tendermint服務(wù)啟動(dòng)后,再看cmd1窗口:
C:\Users\ch》abci-cli kvstore
I[2019-08-04|18:28:50.646] Starting ABCIServer module=abci-server impl=ABCIServer
I[2019-08-04|18:28:50.693] Waiting for new connection.。. module=abci-server
I[2019-08-04|18:28:57.473] Accepted a new connection module=abci-server
I[2019-08-04|18:28:57.478] Waiting for new connection.。. module=abci-server
I[2019-08-04|18:28:57.484] Accepted a new connection module=abci-server
I[2019-08-04|18:28:57.488] Waiting for new connection.。. module=abci-server
I[2019-08-04|18:28:57.492] Accepted a new connection module=abci-server
I[2019-08-04|18:28:57.496] Waiting for new connection.。. module=abci-server
能夠發(fā)現(xiàn)這里建立了三個(gè)連接,這三個(gè)連接分別是:
Info/Query Connection:用于查詢服務(wù)通信
Mempool Connection:用于發(fā)送交易通信
Consensus Connection:用于共識(shí)通信
后面還會(huì)提到這三個(gè)連接的作用。
接下來可以開始測(cè)試了,在cmd3窗口輸入 curl -s localhost:26657/broadcast_tx_commit?tx=\“author=caohuan\”
C:\Users\ch》curl -s localhost:26657/broadcast_tx_commit?tx=\“author=caohuan\”
{
“jsonrpc”: “2.0”,
“id”: “”,
“result”: {
“check_tx”: {
“gasWanted”: “1”
},
“deliver_tx”: {
“events”: [
{
“type”: “app”,
“attributes”: [
{
“key”: “Y3JlYXRvcg==”,
“value”: “Q29zbW9zaGkgTmV0b3dva28=”
},
{
“key”: “a2V5”,
“value”: “YXV0aG9y”
}
]
}
]
},
“hash”: “B339C04B9163F0585B8DB0703E2A107A9B21034B2F5D18BF9B66BDEF5DD627E3”,
“height”: “168”
}
}
友情提示:這條命令在linux系統(tǒng)中是這么寫的:curl -s ‘localhost:26657/broadcast_tx_commit?tx=“author=caohuan”’。windows環(huán)境中,少了單引號(hào),多了轉(zhuǎn)義的反斜杠。
現(xiàn)在查詢一下這個(gè)操作有沒有成功:curl -s localhost:26657/abci_query?data=\“author\”
C:\Users\ch》curl -s localhost:26657/abci_query?data=\“author\”
{
“jsonrpc”: “2.0”,
“id”: “”,
“result”: {
“response”: {
“l(fā)og”: “exists”,
“key”: “YXV0aG9y”,
“value”: “Y2FvaHVhbg==”
}
}
}
查詢出的這個(gè)value是base64編碼的,可以使用在線工具轉(zhuǎn)碼,也可以在golang中自己實(shí)現(xiàn)一個(gè)轉(zhuǎn)碼,轉(zhuǎn)碼之后可以發(fā)現(xiàn)“Y2FvaHVhbg==”就是“caohuan”
除了使用curl命令以外,還可以使用瀏覽器,直接在地址欄輸入 http://localhost:26657/abci_query?data=“author” 即可。
以上kvstore的例子就運(yùn)行成功了,官方還有一個(gè)例子counter,這里就不詳細(xì)展開介紹了,有興趣的小伙伴可以去官方文檔看一下。
簡(jiǎn)單分析一下
下面簡(jiǎn)單分析一下剛才經(jīng)歷了什么過程
首先開啟abci-cli(cmd1)服務(wù),然后開啟tendermint(cmd2)服務(wù),然后使用客戶端client(cmd3)向tendermint發(fā)送交易,具體過程如下:
1,client產(chǎn)生了一條數(shù)據(jù)“author=caohuan”,要把這條數(shù)據(jù)發(fā)送到鏈上去
2,client發(fā)起請(qǐng)求:curl -s localhost:26657/broadcast_tx_commit?tx=\“author=caohuan\”
3,tendermint收到tx=“author=caohuan”的交易,發(fā)送給abci
4,abci接受到tx之后,調(diào)用CheckTx方法,驗(yàn)證這個(gè)tx是否符合交易規(guī)范。在/tendermint/abci/example/kvstore/kvstore.go可以看到代碼,這里的CheckTx沒有做任何事
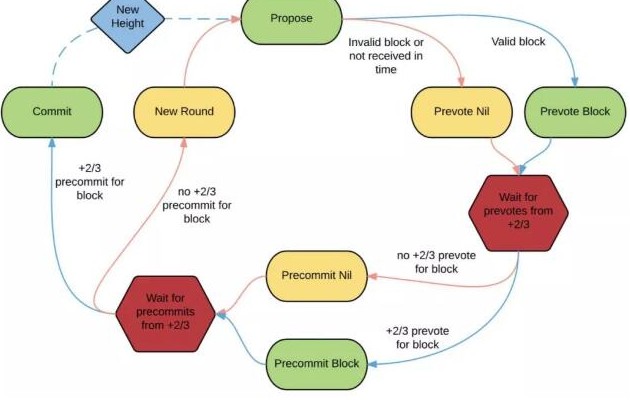
6,tendermint把該tx存在內(nèi)存池里,并把這條tx通轉(zhuǎn)發(fā)給其他tendermint節(jié)點(diǎn),所有節(jié)點(diǎn)對(duì)該交易進(jìn)行兩輪投票,PreVote--》PreCommit--》Commit,PreVote超過三分之二同意之后進(jìn)入PreCommit,再超過三分之二投票后進(jìn)入Commit(在該例中只有一個(gè)節(jié)點(diǎn),所以沒有經(jīng)過共識(shí))
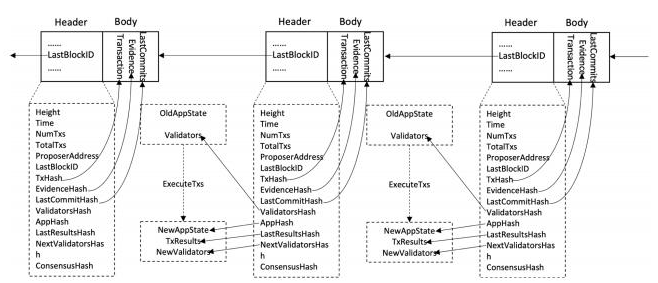
7,tendermint共識(shí)完成之后進(jìn)入commit階段,再對(duì)abci發(fā)送請(qǐng)求:BeginBlock -》 DeliverTx * n次 --》 EndBlock --》 Commit,即:新區(qū)快 --》 正在接受區(qū)塊內(nèi)容 * n條 --》 區(qū)塊內(nèi)容接受完了 --》 提交到區(qū)塊鏈。這些方法在/tendermint/abci/example/kvstore/kvstore.go中都可以找得到
8,abci在Commit之后會(huì)通知tendermint
9,區(qū)塊鏈上多了一個(gè)區(qū)塊記錄著“author=caohuan”
現(xiàn)在在回過頭來看一下剛才提到的三個(gè)連接包含哪些東西:
Info/Query Connection:Info,SetOption,Query
Mempool Connection:CheckTx
Consensus Connection:InitChain,BeginBlock,DeliverTx,EndBlock,Commit
這些接口是定義在/tendermint/abci/types/application.go中的,這些接口在協(xié)助完成了整個(gè)交易過程。
// Info/Query Connection
Info(RequestInfo) ResponseInfo // Return application info
SetOption(RequestSetOption) ResponseSetOption // Set application option
Query(RequestQuery) ResponseQuery // Query for state
// Mempool Connection
CheckTx(RequestCheckTx) ResponseCheckTx // Validate a tx for the mempool
// Consensus Connection
InitChain(RequestInitChain) ResponseInitChain // Initialize blockchain with validators and other info from TendermintCore
BeginBlock(RequestBeginBlock) ResponseBeginBlock // Signals the beginning of a block
DeliverTx(RequestDeliverTx) ResponseDeliverTx // Deliver a tx for full processing
EndBlock(RequestEndBlock) ResponseEndBlock // Signals the end of a block, returns changes to the validator set
Commit() ResponseCommit // Commit the state and return the application Merkle root hash
也就是說,如果我們想使用tendermint實(shí)現(xiàn)自己的一條鏈,就必須實(shí)現(xiàn)這些接口。
實(shí)現(xiàn)自己的一條鏈
接下來,我們嘗試著實(shí)現(xiàn)自己的一條鏈,邏輯很簡(jiǎn)單:初始化xiaoMing和daZhuang兩個(gè)賬戶,余額各為100,由xiaoMing向daZhuang轉(zhuǎn)賬。
代碼:
func NewCounterApplication(serial bool) *CounterApplication {
fmt.Println(“NewCounterApplication進(jìn)來了嗎”)
return &CounterApplication{accountMap: map[string]int{“xiaoMing”: 100, “daZhuang”: 100}}
}
func (app *CounterApplication) DeliverTx(req types.RequestDeliverTx) types.ResponseDeliverTx {
fmt.Println(“DeliverTx進(jìn)來了嗎”)
//xiaoming轉(zhuǎn)給dazhuang
tx8 := make([]byte, 8)
copy(tx8[len(tx8)-len(req.Tx):], req.Tx)
balance := int(binary.BigEndian.Uint64(tx8))
if app.accountMap[“xiaoMing”] 《 balance {
return types.ResponseDeliverTx{
Code: code.CodeTypeEncodingError,
Log: fmt.Sprintf(“Insufficient balance”)}
}
app.accountMap[“xiaoMing”] -= balance
app.accountMap[“daZhuang”] += balance
return types.ResponseDeliverTx{Code: code.CodeTypeOK}
}
func (app *CounterApplication) CheckTx(req types.RequestCheckTx) types.ResponseCheckTx {
fmt.Println(“CheckTx進(jìn)來了嗎”)
//xiaoming轉(zhuǎn)給dazhuang
tx8 := make([]byte, 8)
copy(tx8[len(tx8)-len(req.Tx):], req.Tx)
balance := int(binary.BigEndian.Uint64(tx8))
if app.accountMap[“xiaoMing”] 《 balance {
return types.ResponseCheckTx{
Code: code.CodeTypeEncodingError,
Log: fmt.Sprintf(“Insufficient balance”)}
}
fmt.Println(“CheckTx ok”)
return types.ResponseCheckTx{Code: code.CodeTypeOK}
}
func (app *CounterApplication) Commit() (resp types.ResponseCommit) {
fmt.Println(“Commit進(jìn)來了嗎”)
appHash := make([]byte, 8)
binary.PutVarint(appHash, int64(len(app.accountMap))) //這里隨便commit了一個(gè)hash
return types.ResponseCommit{Data: appHash}
}
func (app *CounterApplication) Query(reqQuery types.RequestQuery) types.ResponseQuery {
fmt.Println(“Query進(jìn)來了嗎”)
name := string(reqQuery.Data)
amount, ok := app.accountMap[name]
if !ok {
return types.ResponseQuery{Log: fmt.Sprintf(“Invalid name %v”, reqQuery.Data)}
}
return types.ResponseQuery{Value: []byte(fmt.Sprintf(“%v”, amount))}
}
先使用unsafe_reset_all參數(shù)啟動(dòng)一次tendermint,以清除之前的數(shù)據(jù),然后啟動(dòng)tendermint和abci-cli開始測(cè)試
首先查詢一下xiaoMing和daZhuang的初始余額:
C:\Users\ch》curl -s localhost:26657/abci_query?data=\“xiaoMing\”
{
“jsonrpc”: “2.0”,
“id”: “”,
“result”: {
“response”: {
“value”: “MTAw”
}
}
}
C:\Users\ch》curl -s localhost:26657/abci_query?data=\“daZhuang\”
{
“jsonrpc”: “2.0”,
“id”: “”,
“result”: {
“response”: {
“value”: “MTAw”
}
}
}
這里查詢出來的結(jié)果還是base64編碼的。
接下來轉(zhuǎn)賬:
C:\Users\ch》curl localhost:26657/broadcast_tx_commit?tx=0x11
{
“jsonrpc”: “2.0”,
“id”: “”,
“result”: {
“check_tx”: {},
“deliver_tx”: {},
“hash”: “4A64A107F0CB32536E5BCE6C98C393DB21CCA7F4EA187BA8C4DCA8B51D4EA80A”,
“height”: “3”
}
}
這里的0x11是16進(jìn)制,換算成十進(jìn)制就是17
再次查詢余額:
C:\Users\ch》curl -s localhost:26657/abci_query?data=\“xiaoMing\”
{
“jsonrpc”: “2.0”,
“id”: “”,
“result”: {
“response”: {
“value”: “ODM=”
}
}
}
C:\Users\ch》curl -s localhost:26657/abci_query?data=\“daZhuang\”
{
“jsonrpc”: “2.0”,
“id”: “”,
“result”: {
“response”: {
“value”: “MTE3”
}
}
}
經(jīng)過base64解碼,ODM=就是83,MTE3就是117,測(cè)試成功!


 工商網(wǎng)監(jiān)
評(píng)論